
McGill Big 3: How to Do the Curl-Up, Side Plank and Bird Dog
The McGill Big 3 is a short routine of three core exercises: a modified curl-up, a side plank and a bird dog. It was developed by Dr Stuart McGill, a spine biomechanics researcher who spent his career studying how the lower back responds to load, and it has become one of the most widely used core routines in physiotherapy clinics and gyms.
The idea behind it is simple. Many traditional ab exercises, such as sit-ups and crunches, repeatedly bend the spine. The Big 3 trains the muscles around the trunk to hold the spine steady instead, using short holds in positions that keep the back close to neutral. The goal is not a six-pack. It is a trunk that can stay stiff and controlled while you lift, carry and move.
This guide shows how to do each exercise properly, explains the distinctive descending rep scheme, gives progressions and regressions, and offers an honest view of what the routine can and cannot do for back pain. That last part matters, because the Big 3 is often presented as a cure, and it is more useful to understand it as a sensible, low-risk foundation.
At a glance
- The Big 3 is the modified curl-up, the side plank and the bird dog
- Each rep is a short hold of about 8 to 10 seconds, not a long hold
- Reps follow a descending pyramid, for example 6, then 4, then 2
- The aim is to keep the spine still while the muscles around it work
- It takes about 10 minutes and can be done daily
- It is a useful foundation for back health, not a cure for every back problem
The thinking behind the Big 3
The routine rests on a few principles that run through McGill’s work on spine biomechanics.
- The trunk’s main job is often to resist movement. When you carry shopping, lift a child or push a door, your core mainly stops your spine bending, twisting or arching under load
- Endurance matters as much as strength. Back trouble is often linked to muscles that fatigue quickly, so the routine favours repeated short holds rather than single maximal efforts
- Short holds beat long holds for building endurance. Holding a position for around 10 seconds and repeating it lets you accumulate time without the muscles running out of oxygen and form breaking down
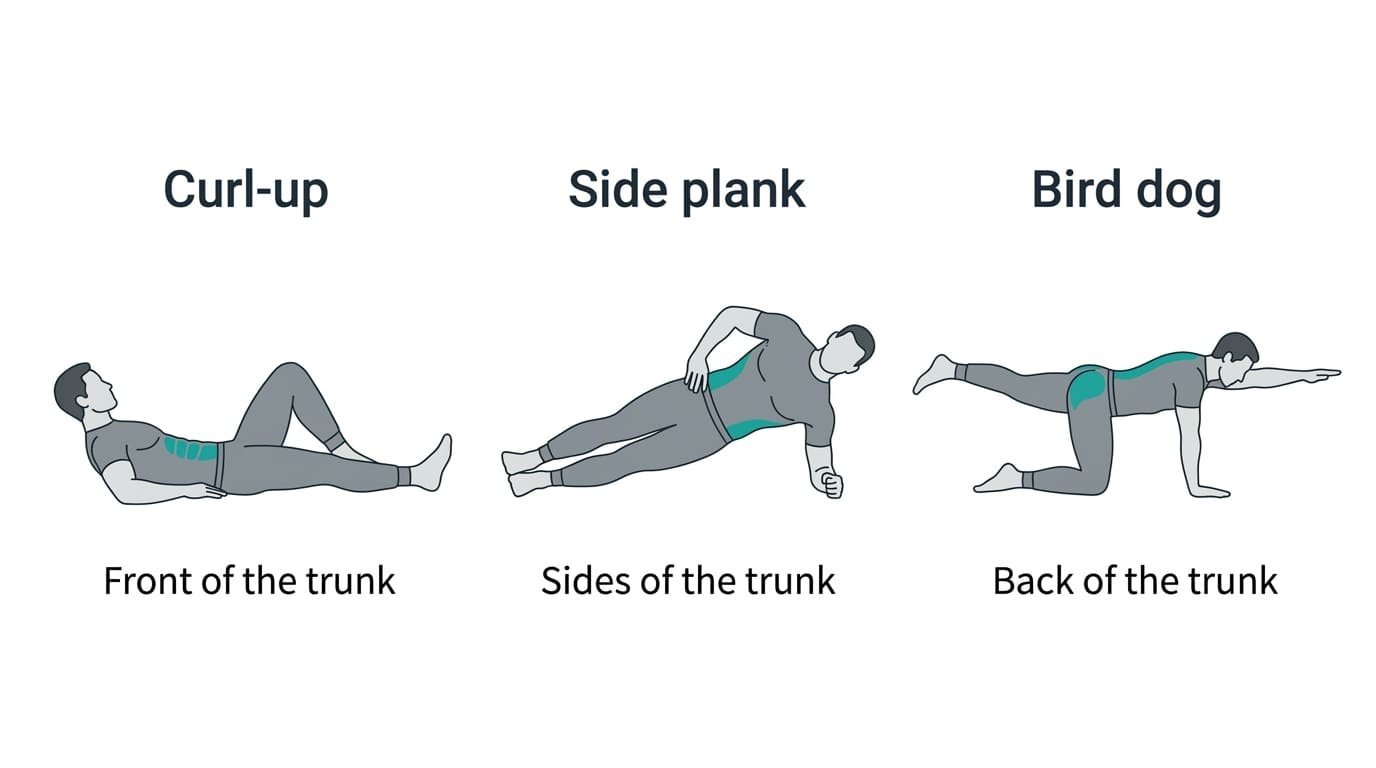
- All sides of the trunk need training. The curl-up covers the front, the side plank covers the sides, and the bird dog covers the back
| Exercise | Main area trained | What it resists |
|---|---|---|
| Modified curl-up | Front of the trunk, rectus abdominis and obliques | The spine arching backward |
| Side plank | Sides of the trunk, obliques and quadratus lumborum | The spine bending sideways |
| Bird dog | Back of the trunk, spinal erectors and glutes | The spine twisting and arching |
That balance is the reason the three exercises are done together. Our isometric, isotonic and isokinetic exercise guide explains why these static holds work differently from moving exercises.
1. The modified curl-up
The curl-up looks like a tiny crunch, but the setup is what makes it different.
- Lie on your back with one knee bent and the foot flat, and the other leg straight on the floor
- Slide your hands, palms down, under the small of your back. This supports the natural curve so it does not flatten
- Brace your midsection lightly, as if preparing to be poked in the stomach
- Lift your head and shoulders just a few centimetres off the floor. Keep your chin slightly tucked and your neck still, as if your head and chest are one piece
- Hold for 8 to 10 seconds while breathing normally
- Lower slowly. Switch the bent leg halfway through your sets
Common errors:
- Lifting too high. This is not a sit-up. The movement is small, and the lift comes from the upper back rather than the lower back
- Pulling with the neck. Keep the chin tucked and the neck still. Lifting your elbows slightly off the floor can help some people
- Flattening the lower back into the hands. The hands are there to preserve the curve, not to push it away
Progressions: lift the elbows off the floor during the hold, then brace harder at the top, then take deeper breaths while holding the brace.
2. The side plank
- Lie on your side with your elbow directly under your shoulder and your knees bent at about 90 degrees
- Place your free hand on your opposite shoulder, which helps stabilise the upper body
- Brace your core and lift your hips so your body forms a straight line from your knees to your head
- Hold for 8 to 10 seconds, then lower and repeat
- Switch sides and complete the same number of reps
Common errors:
- Letting the hips sag toward the floor, which removes the load from the obliques
- Letting the hips drift backward so the body forms a V shape
- Shrugging the supporting shoulder toward the ear. Push the floor away
Progressions:
| Level | Version | Notes |
|---|---|---|
| 1 | Knees bent, short holds | The starting point for most people |
| 2 | Legs straight, feet stacked or staggered | Staggered feet are slightly easier than stacked |
| 3 | Legs straight, free hand on the hip | Removes the help from the shoulder hand |
| 4 | Rolling side plank | Roll from one side to the other through a front plank without the pelvis and ribs separating |
3. The bird dog
- Start on your hands and knees, with your hands under your shoulders and knees under your hips
- Find a neutral spine. Arch and round your back a few times, then settle in the middle
- Brace your core lightly
- Extend one arm forward and the opposite leg back until both are roughly level with your torso. Make a fist with the raised hand and push the heel back as if pressing against a wall
- Hold for 8 to 10 seconds without letting your hips rotate or your lower back sag
- Sweep the hand and knee back down to just above the floor, then repeat. Switch sides
Common errors:
- Lifting the leg too high, which arches the lower back
- Rotating the hips as the leg extends. Imagine a glass of water balanced on your lower back
- Rushing. The holds are the exercise
Progressions: make a fist and squeeze hard with the raised hand, then draw small squares in the air with the hand and foot while keeping the spine still. If the full movement is too much, extend only the leg or only the arm.
The bird dog also appears in our erector spinae exercises guide, which covers other ways to train the muscles along the back of the spine.
The descending pyramid rep scheme
The Big 3 has a distinctive structure. Rather than doing the same number of reps in each set, you reduce the reps across three sets.
| Level | Set 1 | Set 2 | Set 3 | Hold per rep |
|---|---|---|---|---|
| Beginner | 5 reps | 3 reps | 1 rep | 8 to 10 seconds |
| Intermediate | 6 reps | 4 reps | 2 reps | 8 to 10 seconds |
| Advanced | 8 reps | 6 reps | 4 reps | 8 to 10 seconds |
Rest about 20 to 30 seconds between sets. For the side plank and the bird dog, complete the full count on each side.
Why it works this way: the descending sets build endurance while fatigue rises, without forcing you to hold any single position for so long that your form breaks down. The total time under tension adds up, but each rep stays short and clean.
To progress, add reps to the pyramid rather than making each hold longer. Moving from 5, 3, 1 to 6, 4, 2 builds endurance more effectively than holding for 30 seconds.
A full 10-minute session
- Cat camel: 6 to 8 slow, gentle reps on your hands and knees, moving into a comfortable arch and round. This is a gentle warm-up, not a stretch
- Modified curl-up: pyramid of 6, 4, 2, switching the bent leg halfway
- Side plank: pyramid of 6, 4, 2 on each side
- Bird dog: pyramid of 6, 4, 2 on each side
- Short walk: 5 minutes afterward if you can, which many people with back trouble find helpful
Start with the beginner pyramid of 5, 3, 1 if you are new or currently sore.
How often to do the Big 3
| Your situation | Frequency | When |
|---|---|---|
| General core training and back health | 3 to 5 times a week | As a warm-up before lifting or on its own |
| Returning to exercise after back pain | Daily, if comfortable | Many people prefer later in the morning rather than straight after waking |
| Lifting heavy | Before every session | As a warm-up before squats and deadlifts |
| Seated most of the day | Daily | A short session breaks up long sitting |
A note on timing. McGill has recommended avoiding hard spinal bending first thing after waking, because the discs are more hydrated after lying down. The Big 3 keeps the spine near neutral, but if you are sensitive in the morning, doing it an hour or two after getting up is a sensible choice.
What the Big 3 can and cannot do for back pain
This deserves a careful answer, because the Big 3 is often presented as a back pain cure.
What it does well:
- It trains the trunk muscles to work together while keeping the spine near neutral
- It is low-risk and easy to tolerate for most people, including many with sensitive backs
- It builds endurance, which helps the trunk stay controlled through a long day
- It is short and needs no equipment, which makes it easy to stick with
What the evidence suggests:
- Exercise in general is one of the most effective treatments for ongoing, non-specific low back pain
- No single type of exercise has been shown to be clearly better than the others. Core stability work, general strengthening, Pilates and walking all help
- The best exercise is often the one a person will actually do consistently and progress over time
So the honest position is: the Big 3 is a sensible, well-designed, low-risk starting point for core training and for many people with back pain. It is not a special cure, and it should not be the only exercise you do. Over time, it works best as a foundation for broader strength training, walking and loaded carries.
See a doctor or physiotherapist if your back pain is severe, came on after a fall or injury, spreads down a leg below the knee, comes with numbness, tingling or weakness, or has not improved after several weeks. Get urgent help for any loss of bladder or bowel control, or numbness around the groin or inner thighs.
What to do after the Big 3
Once the advanced pyramid feels comfortable, the next step is to use that trunk control while moving and carrying load.
| Next step | What it adds |
|---|---|
| Suitcase carry | Resisting side bending while walking with a weight in one hand |
| Farmer’s carry | Trunk control under heavier load |
| Pallof press | Resisting rotation against a band |
| Dead bug | Anti-extension with arms and legs moving |
| Goblet squat and hip hinge | Holding a neutral spine through everyday movement patterns |
Our farmer’s carry and transverse abdominis exercises guides cover several of these.
How to brace properly
Every exercise in the Big 3 starts with a light brace, and getting this right changes how each one feels.
A brace is not the same as sucking your stomach in. Drawing the belly button toward the spine narrows the waist and can make the trunk less stable. Bracing does the opposite: it stiffens the muscles all the way around the waist without changing its shape much.
- Stand or lie comfortably and place your fingertips on the sides of your waist, just above your hip bones
- Imagine someone is about to poke you in the stomach
- Tighten the muscles under your fingers so they push gently back against your hands
- Keep breathing. You should be able to talk in short sentences while braced
- Use about 10 to 20 percent effort for the Big 3. A maximal brace is for very heavy lifting, not for holds
| Brace level | Feels like | Use it for |
|---|---|---|
| 10 to 20 percent | Light firmness around the waist, normal breathing | The Big 3, walking, everyday tasks |
| 30 to 50 percent | Clearly tense, breathing slightly restricted | Moderate lifting and carries |
| 70 to 100 percent | Fully braced, breath held briefly | Heavy squats and deadlifts only |
Practising a light brace through the Big 3 teaches you to switch it on automatically during everyday lifting, which is one of the main benefits of the routine.
How to know it is working
The Big 3 does not produce obvious visible changes, so it helps to track something concrete.
- The pyramid moves up. Going from 5, 3, 1 to 6, 4, 2 and then 8, 6, 4 with good form is clear progress
- The side plank changes level. Moving from bent knees to straight legs to the free hand on the hip
- The bird dog stays steadier. Less wobble in the hips, and drawing squares without the spine moving
- Everyday tasks feel easier. Carrying shopping, getting out of the car or standing for long periods
- Bracing becomes automatic before you pick something up
Most people notice improved control within two to four weeks of regular practice.
Eight common mistakes
- Turning the curl-up into a crunch by lifting too high or pulling with the neck
- Holding each rep for 30 seconds or more, rather than using short 8 to 10 second holds
- Letting the hips sag in the side plank
- Rotating the hips or arching the back in the bird dog
- Holding the breath. Brace lightly and keep breathing
- Rushing between reps instead of resetting position each time
- Pushing through sharp pain. Mild effort is fine. Sharp or spreading pain means stop
- Treating it as the only exercise you need rather than a foundation for broader training
McGill Big 3 vs other core routines
| Approach | Main focus | Spine movement | Best for |
|---|---|---|---|
| McGill Big 3 | Endurance and trunk stiffness | Minimal | Back health, warm-ups, sensitive backs |
| Crunches and sit-ups | Rectus abdominis, spinal flexion | Repeated bending | Ab endurance in healthy backs |
| Long plank holds | Anti-extension endurance | Minimal | General core work |
| Pilates | Control, mobility and core strength | Varied | Mobility and body awareness |
| Loaded carries | Trunk stiffness under load | Minimal | Real-world strength |
The Big 3 stands out for being short, low-risk and balanced across all sides of the trunk. If you want a broader core programme, our beginner core workout builds on the same ideas.
The bottom line
The McGill Big 3 is three exercises, the modified curl-up, the side plank and the bird dog, done as short holds in a descending pyramid. Together they train the front, sides and back of the trunk to keep the spine steady, which is what the core does most of the time in everyday life.
Keep each hold to 8 to 10 seconds, reduce the reps across three sets, and focus on staying still rather than lifting high or holding long. Ten minutes, several times a week, is enough.
Treat it as a solid foundation rather than a cure. It pairs well with walking, carries and general strength training, and it is an excellent warm-up before lifting. If your back pain is severe, spreading or not improving, get it assessed rather than relying on any single routine.
Gentle stretches pair well with this routine on stiff days. Our back stretching exercises guide explains which to choose.
If you run, my guide to core exercises for runners builds on these moves with single-leg and anti-rotation work.
Frequently asked questions
What are the McGill Big 3 exercises?
The modified curl-up, the side plank and the bird dog. Developed by spine researcher Dr Stuart McGill, they train the front, sides and back of the trunk to keep the spine steady while keeping it close to neutral, which makes them low-risk for most people, including many with sensitive backs.
How many reps and sets should I do for the McGill Big 3?
Use a descending pyramid of three sets, such as 6, 4 and 2 reps, with each rep held for 8 to 10 seconds and 20 to 30 seconds of rest between sets. Beginners can start with 5, 3 and 1. For the side plank and bird dog, complete the reps on each side.
How long should you hold each McGill Big 3 exercise?
About 8 to 10 seconds per rep. The short holds build endurance without letting the muscles fatigue to the point where form breaks down. To progress, add more reps to the pyramid rather than holding for longer.
Can I do the McGill Big 3 every day?
Yes. The exercises are gentle and keep the spine near neutral, so most people can do them daily. If your back is sensitive first thing in the morning, doing the routine an hour or two after waking is a reasonable choice.
Does the McGill Big 3 help with back pain?
Many people with non-specific back pain find it helpful, and it is a low-risk starting point. However, research suggests that no single exercise type is clearly superior for back pain, so it works best as part of a broader approach that includes walking and general strengthening.
Is the McGill curl-up the same as a crunch?
No. The curl-up keeps one knee bent and one leg straight, places the hands under the lower back to preserve its curve, and lifts the head and shoulders only a few centimetres while the neck stays still. A crunch repeatedly bends the spine through a larger range.
Should I do the McGill Big 3 before or after a workout?
Before is the most common choice, as a warm-up to prepare the trunk for squats, deadlifts and other lifts. It can also be done on its own on rest days or as a short daily routine.
When should I see a doctor instead of doing the McGill Big 3?
If back pain is severe, follows a fall or injury, spreads down a leg below the knee, comes with numbness, tingling or weakness, or has not improved after several weeks. Seek urgent help for any loss of bladder or bowel control or numbness around the groin.
What’s next?
Reading is the easy part. Pick one of these and do it today.