Sandbag Exercises: 12 Moves and a Beginner Sandbag Workout
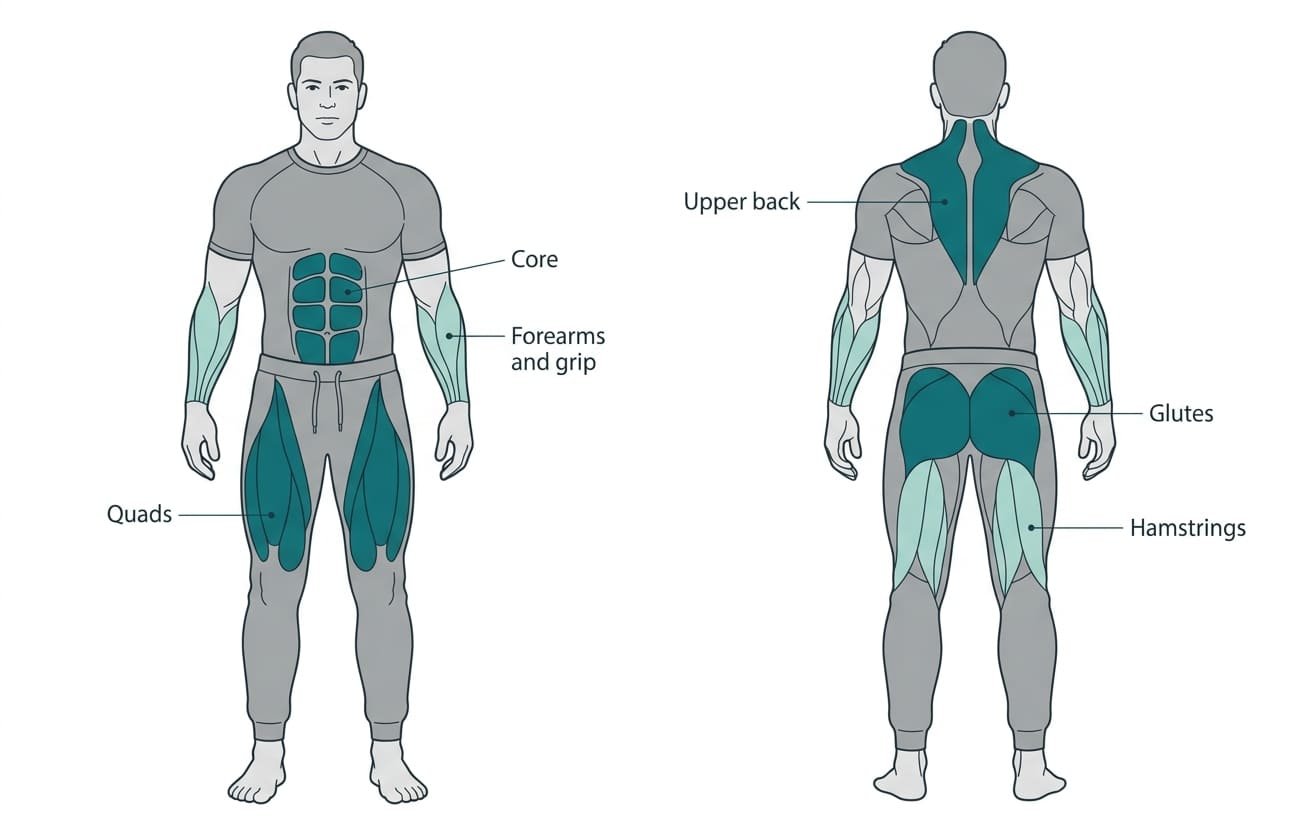
A sandbag is the opposite of a dumbbell. A dumbbell is balanced, rigid and predictable. A sandbag is lumpy, floppy and constantly shifting, so every time you lift it the load moves a little and your body has to adjust. That is exactly what makes it useful.
Because the sand keeps moving, your grip, core and stabilising muscles work harder than they would with the same weight in a fixed form. The awkwardness also makes sandbag training feel much closer to lifting real things: a bag of compost, a child, a suitcase, a piece of furniture. And a bag is cheap, quiet, and hard to drop on your toes in a way that does damage.
This guide covers what makes sandbags different, how heavy to go, how to make your own, twelve exercises with form cues, and a four-week beginner plan. It also covers the mistakes that turn the bag’s instability from an advantage into a sore lower back.
At a glance
- The shifting sand makes your grip, core and stabilisers work harder than a fixed weight
- Most beginners should start around 10 to 20 kg, lighter than they expect
- Hug the bag close to your body. Distance from your torso is what makes it heavy
- The bear hug squat, sandbag deadlift and bear hug carry are the best starting exercises
- Two to three sessions a week of 20 to 30 minutes is plenty
- A heavy-duty duffel bag with sand in sealed liners works as a homemade sandbag
What makes sandbags different
| Feature | Dumbbell or barbell | Sandbag |
|---|---|---|
| Load behaviour | Fixed and balanced | Shifts with every movement |
| Grip | Built-in handle | Often grabbing fabric or a handle on a moving load |
| Where you hold it | In the hands | Often hugged against the chest or on the shoulder |
| Stabiliser demand | Moderate | High |
| Maximum load | Very high | Moderate |
| Learning curve | Technique matters for heavy lifts | Simple movements, but awkward at first |
| Noise and floor risk | Can damage floors when dropped | Quiet and floor-friendly |
| Cost | Moderate to high | Low, very low if homemade |
The key idea: a 20 kg sandbag feels heavier than a 20 kg dumbbell. The load moves, you cannot grip it as cleanly, and you often have to hold it in front of your body. Expect to use less weight than you would with dumbbells, and do not see that as a weakness.
What sandbags are good for: full-body strength, grip strength, core stability, conditioning circuits, carries, and training at home with minimal equipment.
What they are less good for: very heavy maximal strength work and isolating small muscles. If you want to build a big deadlift, a barbell will take you further. If you want strength that transfers to awkward, real-world lifting, a sandbag is hard to beat.
How heavy should your sandbag be?
Start lighter than you think. The awkward load and the bear hug position make sandbag lifts much harder than the number on the bag suggests.
| Your experience | Suggested starting weight | Notes |
|---|---|---|
| New to strength training | 10 to 15 kg | Learn the positions first |
| Some experience with weights | 15 to 25 kg | Most people start here |
| Experienced lifter | 25 to 40 kg | For squats, deadlifts and carries |
| Advanced, heavy carries and shouldering | 40 kg and above | Build up gradually |
A useful rule: choose a weight where the last two or three reps of each set are genuinely hard but your back stays flat and the bag stays close to your body. If you have to lean back, round your back or jerk the bag up, it is too heavy.
Adjustable bags are worth it. Most commercial sandbags have several inner filler bags, so one shell can be set to different weights. You will want a lighter setting for presses and a heavier one for carries and deadlifts.
Upper body moves such as presses and cleans need far less weight than lower body moves such as deadlifts and carries. Many people end up using two settings, or two bags, for a full session.
How to make your own sandbag
You do not need to buy one. A homemade bag works well for most exercises.
- Get a heavy-duty duffel bag or an old military kit bag with strong stitching and a sturdy zip
- Fill several heavy-duty plastic bags or freezer bags with sand, about 5 kg each. Double-bag them
- Seal each one tightly with duct tape, squeezing out the air first
- Place the filled liners inside the duffel bag until you reach the weight you want
- Weigh the bag on bathroom scales and write the weight on a piece of tape
| Filler | Pros | Cons |
|---|---|---|
| Play sand or builder’s sand | Cheap, dense, shifts well | Messy if a liner splits |
| Pea gravel | Less dust, does not clump when damp | Lumpier and slightly louder |
| Rubber mulch | Light and clean | Bulky, so it is hard to make a heavy bag |
| Rice | Easy to find | Can attract pests, absorbs moisture |
Check the bag before every session. Fabric and zips wear out, and a split bag mid-clean is messy at best. Leave a little space in each liner so the sand can move, since a packed-tight bag behaves more like a fixed weight.
12 sandbag exercises
The exercises below are grouped by movement pattern. Each one lists a starting prescription for a beginner.
Lower body
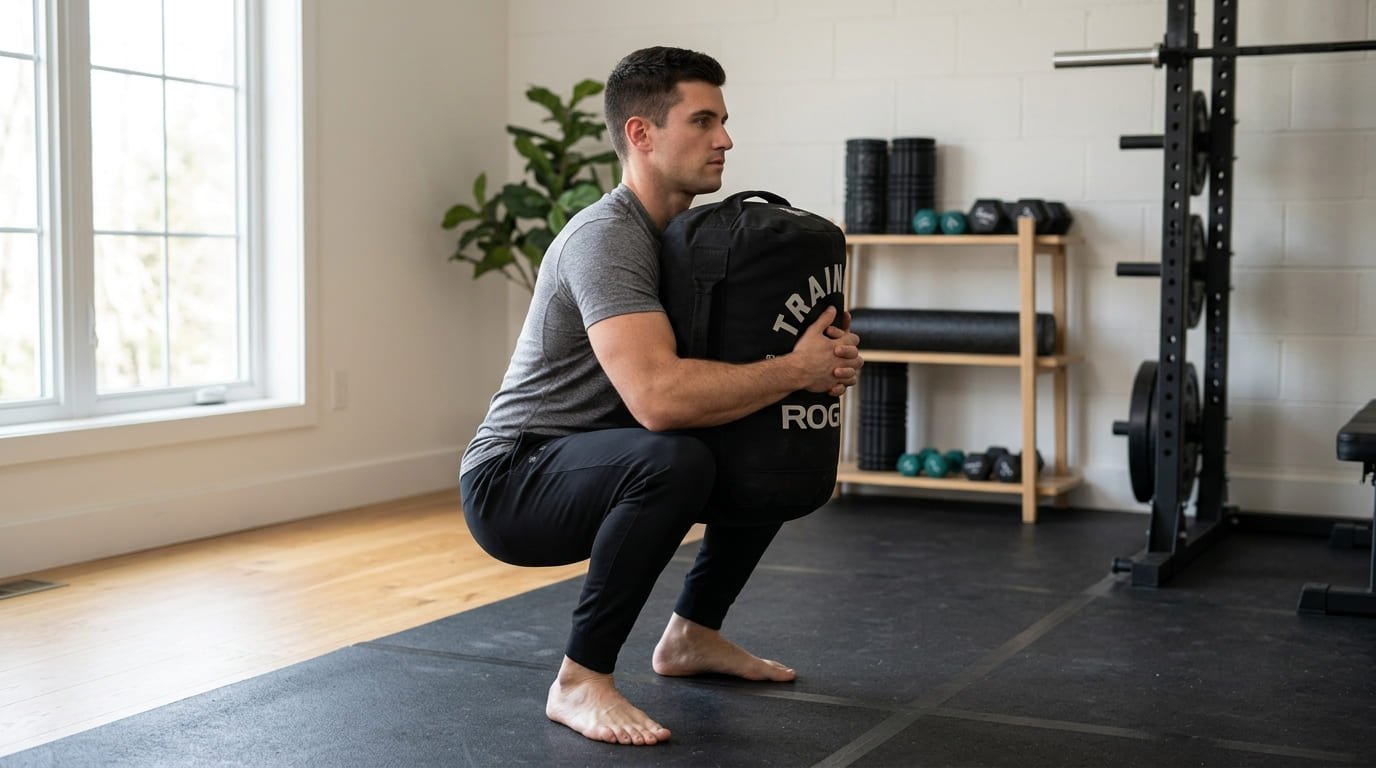
1. Bear hug squat
Wrap both arms around the bag and hold it tight against your chest. Squat down with your chest up until your thighs are at least parallel, then drive back up.
- Reps: 3 sets of 10 to 12
- Why it is a great first exercise: the bag in front of you acts as a counterweight, which makes it easier to stay upright and squat deep
2. Sandbag deadlift
Stand with the bag on the floor between your feet. Push your hips back with a flat back, grip the handles or the bag itself, then drive through your feet to stand tall.
- Reps: 3 sets of 8 to 10
- Keep the bag close to your shins on the way up and down
3. Reverse lunge in the bear hug
Hold the bag in a bear hug and step back into a lunge, lowering the back knee toward the floor, then return.
- Reps: 3 sets of 8 per leg
4. Sandbag Romanian deadlift
Hold the bag by its handles in front of your thighs. Hinge at the hips with a slight knee bend until you feel a stretch in your hamstrings, then stand up.
- Reps: 3 sets of 10
- Our hamstring exercises at home guide explains the hinge in detail
5. Sandbag glute bridge
Lie on your back with the bag across your hips and hold it in place. Drive your hips up, squeezing the glutes at the top.
- Reps: 3 sets of 12 to 15
Upper body
6. Sandbag floor press
Lie on your back holding the bag across your chest by its handles or with your palms underneath. Press it up until your arms are straight, then lower until your elbows touch the floor.
- Reps: 3 sets of 10 to 12
7. Sandbag bent-over row
Hinge forward with a flat back, holding the bag by its handles. Row it toward your lower ribs, squeezing your shoulder blades together.
- Reps: 3 sets of 10 to 12
8. Sandbag overhead press
Start with the bag resting on your upper chest, held by the handles or ends. Press it overhead until your arms are straight, keeping your ribs down.
- Reps: 3 sets of 8
- Use a light setting. Pressing an unstable load overhead is surprisingly hard
Full body and carries
9. Bear hug carry
Hug the bag to your chest and walk with short, steady steps, standing tall.
- Distance or time: 3 carries of 30 to 40 metres, or 30 seconds
- This is the most useful sandbag exercise for grip, upper back and core strength, and the hardest to cheat
10. Sandbag clean
From a deadlift position, pull the bag explosively up your body and catch it in a bear hug or on your forearms at chest height. Lower it back to the floor under control.
- Reps: 3 sets of 6 to 8
- Learn the deadlift first. The clean is a fast deadlift with a catch
11. Sandbag shouldering
Clean the bag to your chest, then drive it up onto one shoulder in a single movement. Lower it back to the floor and repeat to the other shoulder.
- Reps: 3 sets of 3 to 5 per side
- One of the best real-world strength exercises there is, but save it until your deadlift and clean feel solid
12. Sandbag rotational swing
Hold the bag by its handles at hip height. Rotate your hips and shoulders to swing it from one side of your body to the other in a controlled arc, pivoting the back foot.
- Reps: 3 sets of 8 per side
A beginner sandbag workout
Do this two or three times a week, with at least one rest day between sessions. It takes about 25 minutes.
| Exercise | Sets | Reps or time | Rest |
|---|---|---|---|
| Bear hug squat | 3 | 10 | 60 sec |
| Sandbag deadlift | 3 | 8 | 75 sec |
| Sandbag floor press | 3 | 10 | 60 sec |
| Sandbag bent-over row | 3 | 10 | 60 sec |
| Reverse lunge in the bear hug | 2 | 8 per leg | 60 sec |
| Bear hug carry | 3 | 30 seconds | 60 sec |
Warm-up first: 5 minutes of brisk walking or marching on the spot, then 10 bodyweight squats, 10 hip hinges with your hands on your thighs, 10 arm circles each direction, and one light set of bear hug squats.
A 4-week progression
| Week | Focus | What changes |
|---|---|---|
| Week 1 | Learn the positions | Light bag, 2 sets of each exercise, slow and controlled |
| Week 2 | Build volume | 3 sets of each exercise, same weight |
| Week 3 | Add the clean | Add 3 sets of 6 cleans after the deadlift |
| Week 4 | Add load or density | Increase the bag weight for squats, deadlifts and carries, or cut rest to 45 seconds |
After four weeks, either keep adding weight for strength or switch to a circuit for conditioning.
Conditioning circuit: perform each exercise for 40 seconds with 20 seconds rest, moving straight to the next. Rest 90 seconds after the full round and complete 3 to 4 rounds.
- Bear hug squat
- Sandbag clean
- Floor press
- Reverse lunge
- Bent-over row
- Bear hug carry
Holding the bag
How you hold the bag changes the exercise more than with any other piece of equipment.
| Hold | How to do it | Best for |
|---|---|---|
| Bear hug | Arms wrapped around the bag, hugged tight to the chest | Squats, lunges, carries |
| Handles | Gripping the built-in handles | Deadlifts, rows, presses, swings |
| Front rack on the forearms | Bag resting across the forearms at chest height | Squats and lunges |
| Shoulder | Bag resting on one shoulder | Carries, lunges, shouldering |
| Fabric grip | Pinching the bag itself without handles | Grip training, cleans |
Hugging the bag tight is the single most important habit. The further the bag drifts from your torso, the more it pulls you forward and the more your lower back has to resist. A bag hugged to the chest is easier to control and safer.
Three technique principles for every lift
Sandbag exercises vary, but three principles apply to almost all of them.
1. Hinge to the floor, never round
Every time the bag starts on the floor, set up like a deadlift: feet about hip width, hips pushed back, back flat, chest up. Grip the bag, brace your midsection, then stand by driving through the whole foot. A rounded back under a shifting load is the most common route to a strain.
2. Close is light, far is heavy
The same bag feels very different depending on where you hold it. Hugged to the chest, a 20 kg bag is manageable. Held at arm’s length, it becomes punishing for the lower back and shoulders. Keep it close unless the exercise specifically requires otherwise.
3. Let the sand move, but stay in control
The shifting load is the point, so you do not need to fight every wobble. Grip firmly, brace, and move steadily. If the bag is swinging you around rather than the other way round, lighten it.
| Exercise type | Where the bag sits | Key cue |
|---|---|---|
| Squats and lunges | Bear hug at the chest | Elbows tucked, chest up, bag tight |
| Deadlifts and Romanian deadlifts | Between or in front of the legs | Flat back, bag brushing the legs |
| Rows | Hanging below the chest | Pull to the lower ribs, no torso swing |
| Presses | Across the chest or overhead | Ribs down, no lower back arch |
| Carries | Bear hug or shoulder | Stand tall, short steps, breathe |
Breathing under an awkward load
Holding a heavy bag against the chest restricts your breathing, which is part of why sandbag sessions feel tougher than they look.
- Take a breath and brace before each rep of squats, deadlifts and cleans
- Breathe out as you finish the lift, then reset
- During carries, take short, steady breaths rather than holding your breath for the whole walk
- Put the bag down if you feel lightheaded
Seven common mistakes
- Starting too heavy, because the number on the bag looks light compared with dumbbells
- Letting the bag drift away from the body, which multiplies the load on the lower back
- Rounding the back to pick the bag up. Hinge at the hips and keep the back flat, just as with a deadlift
- Rushing into cleans and shouldering before the deadlift is solid
- Overfilling the liners, so the bag behaves like a rigid weight and loses its benefit
- Using a worn bag with weak seams
- Pressing a heavy bag overhead and arching the lower back to finish the rep
Who sandbag training suits
| Person | Why sandbags work well |
|---|---|
| Home trainers with limited space and budget | Cheap, quiet, and one bag covers a full-body workout |
| Beginners | Movements are simple and the bag is forgiving if dropped |
| People wanting functional strength | The awkward load mirrors real-world lifting |
| Anyone wanting stronger grip | Holding a shifting bag trains grip constantly |
| Combat sports and outdoor athletes | Builds strength in awkward positions |
| People training outdoors | A bag is easy to carry to a park |
Be more cautious if you have current lower back pain, a shoulder injury, or a hernia. The constant stabilising demand is the benefit for most people, but it is also a stress on these areas. Start with carries and light squats and check with a professional if you have a history of injury.
If you enjoy loaded carries, our farmer’s carry guide covers the dumbbell version, and our weighted vest training guide covers another way to add load to bodyweight movements.
The bottom line
Sandbags are one of the cheapest and most practical tools for building strength at home. The shifting load makes your grip, core and stabilisers work hard, and it builds the kind of strength you use when you lift awkward objects in everyday life.
Start lighter than you think, around 10 to 20 kg for most beginners. Hug the bag close, keep your back flat, and learn the bear hug squat, deadlift and carry before moving on to cleans and shouldering. Two or three sessions a week of 20 to 30 minutes is plenty.
And if you do not want to buy one, a heavy-duty duffel bag with sealed bags of sand inside works perfectly well.
Sandbag carries are a staple of mud runs. Our obstacle race training guide has an 8-week plan.
Frequently asked questions
Are sandbag exercises good for beginners?
Yes. The movements are simple, the bag is forgiving if you drop it, and holding it in a bear hug makes squats and lunges easier to perform with good posture. Beginners should start with a light bag of around 10 to 15 kg and learn the bear hug squat, deadlift and carry first.
How heavy should a sandbag be for beginners?
Around 10 to 15 kg if you are new to strength training, or 15 to 25 kg if you have some experience. Sandbags feel heavier than dumbbells of the same weight because the load shifts and is held away from the hands, so choose a weight where you can keep your back flat and the bag close.
Can you build muscle with sandbag training?
Yes, as long as you progress the weight or the volume over time. Sandbags work every major muscle group and are particularly good for the upper back, grip, glutes and core. For very heavy maximal strength work a barbell goes further, but for general strength and muscle a sandbag is effective.
What sandbag exercises should I start with?
The bear hug squat, sandbag deadlift, floor press, bent-over row and bear hug carry. These cover the main movement patterns with simple technique. Add cleans and shouldering once your deadlift feels solid and you can keep your back flat throughout.
How do I make a homemade sandbag?
Fill several heavy-duty plastic or freezer bags with about 5 kg of sand each, double-bag them, seal them with duct tape and place them inside a strong duffel or kit bag. Weigh the finished bag on bathroom scales, and leave a little room in each liner so the sand can shift.
How often should I do sandbag workouts?
Two to three times a week, with at least one rest day between sessions. Each session can take 20 to 30 minutes. That frequency is enough to build strength while giving your grip, back and shoulders time to recover from the extra stabilising work.
Are sandbags better than dumbbells?
They are different rather than better. Sandbags challenge your grip, core and stabilisers more because the load moves, and they are cheaper and floor-friendly. Dumbbells are easier to load precisely and suit heavier and more isolated work. Many people get the most from using both.
Is sandbag training bad for your back?
Not when done with good technique. The main risks come from rounding the back to pick the bag up and letting it drift away from your body. Hinge at the hips with a flat back, hug the bag close, and start light. If you have current back pain, check with a professional first.
What’s next?
Reading is the easy part. Pick one of these and do it today.