Glute Bridges Exercise: How to Do It Right, Plus 12 Variations
The glute bridges exercise was the first lower body move I ever did properly. I was a few weeks into training at home, my lower back felt stiff after long days at a desk, and squats still felt awkward. A friend who works as a physiotherapist told me to lie on the floor, bend my knees and lift my hips. That was it. No equipment, no gym, no special skill.
It looked too simple to matter. Then I tried to hold the top position for ten seconds with my glutes doing the work instead of my lower back, and I understood. My hamstrings cramped, my back wanted to arch and my glutes barely switched on. It took me about two weeks to do a clean set of 12.
That is why I like this exercise so much for beginners. It is easy to start, hard to master and safe for almost everyone. This guide covers how to do a glute bridge step by step, the muscles it works, the mistakes I made, 12 glute bridge variations from easiest to hardest, and a 6-week plan you can follow at home.
At a glance
- The glute bridges exercise strengthens your glutes, hamstrings and core while you lie on your back
- Keep your feet flat, push through your heels and lift until your body forms a straight line from shoulders to knees
- Squeeze your glutes at the top and keep your ribs down so your lower back does not arch
- Beginners can start with 2 to 3 sets of 10 to 15 reps, two or three times a week
- If your hamstrings cramp, move your feet a little closer to your hips
- The single leg glute bridge is the natural next step once 3 sets of 15 feel easy
- Research shows bridging builds hip extension strength, and small changes in knee angle shift the work toward the glutes
What is the glute bridges exercise?
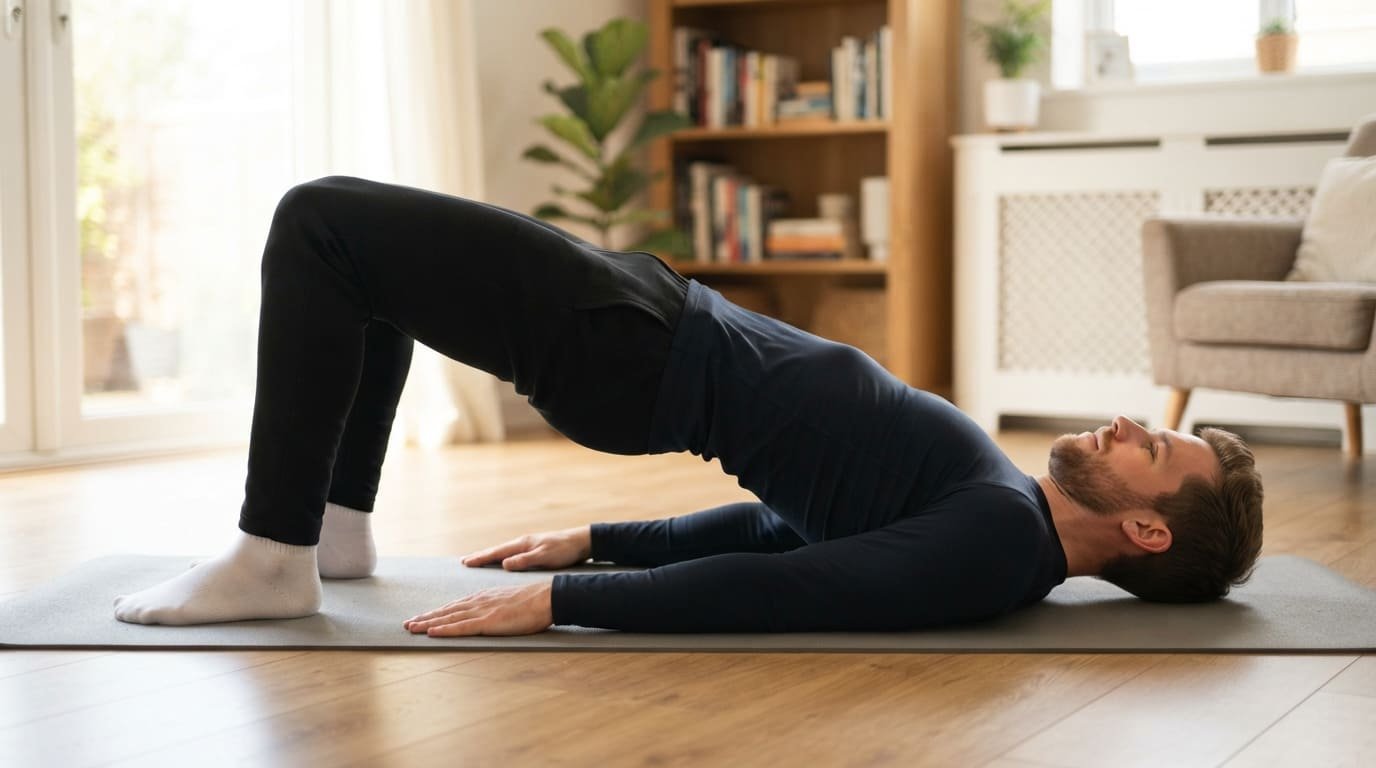
A glute bridge is a hip extension exercise done lying on your back. You bend your knees, plant your feet and drive your hips up toward the ceiling. At the top, your shoulders, hips and knees form a straight line, like a bridge.
The movement trains hip extension, which is the same action you use to stand up from a chair, climb stairs, walk uphill and run. That is why the glute bridges exercise turns up in so many places: beginner workouts, physiotherapy programmes, running warm-ups and athletic training.
It also has a big practical advantage. You do it on the floor, so balance is not an issue, and your spine is supported the whole time. If you are heavier, older, new to exercise or coming back after a break, the glute bridge is one of the friendliest strength moves you can choose.
Muscles the glute bridge works
| Muscle | Role in the bridge | How to feel it more |
|---|---|---|
| Gluteus maximus | Main driver. Extends the hip and lifts you up | Squeeze hard at the top and pause for 2 seconds |
| Gluteus medius and minimus | Keep your knees from caving in | Add a mini band above the knees and push out gently |
| Hamstrings | Help extend the hip | Move your feet further away from your hips |
| Core muscles | Stop your lower back from arching | Keep your ribs down and brace lightly |
| Lower back muscles | Hold your spine steady | They should work, but never take over |
| Quadriceps | Small role, more with feet close in | Move your feet closer to your hips |
If you want to target the top of the glutes in particular, our guide to upper glute exercises covers moves that pair well with bridges.
How to do a glute bridge step by step
Here is how to do a glute bridge with good form. Read it once, then try it slowly with no music and no rush.
- Lie on your back on a mat or carpet with your knees bent and your feet flat on the floor, hip-width apart
- Walk your heels back until your fingertips can just brush them when your arms rest by your sides
- Rest your arms on the floor, palms down, to help with balance
- Take a breath in, then breathe out and gently tighten your stomach, as if bracing for a light poke
- Press through your heels and the outside edges of your feet, and squeeze your glutes to lift your hips
- Stop when your body forms a straight line from your shoulders to your knees. Do not push higher by arching your back
- Pause for 1 to 2 seconds and squeeze your glutes at the top
- Lower slowly, taking about 2 to 3 seconds, until your hips just touch the floor
- Reset your breath and repeat
Beginner dose: 2 to 3 sets of 10 to 15 reps, with 45 to 60 seconds of rest between sets.
A quick self-check: at the top, place one hand on your glute. It should feel firm. If your lower back feels tighter than your glutes, lower your hips a little and squeeze harder before you lift.
Where to put your feet
Foot position changes which muscles do the most work. Small changes make a big difference.
| Foot position | What changes | Best for |
|---|---|---|
| Heels close to hips | More glutes and quads, less hamstring | Most beginners, and anyone who gets hamstring cramps |
| Heels further away | More hamstring work | Hamstring strength |
| Feet wider, toes turned out a little | More side glute work | Hip stability |
| Feet raised on a step or sofa | More range and more hamstring | Intermediate lifters |
A study on single-leg bridges found that bending the working knee more, to about 135 degrees, cut hamstring activity to about a third while glute activity stayed high. In simple terms, bringing your foot closer to your hips makes the glute bridges exercise more of a glute exercise.
How to breathe
Breathe out as you lift and breathe in as you lower. Do not hold your breath for the whole set. If you pause at the top, keep breathing gently while you hold the squeeze.
Benefits of the glute bridges exercise
- Stronger glutes. Strong glutes help you stand, climb, walk and run with less effort
- Kind on the joints. There is no impact and your spine stays supported
- Better hip extension. This helps posture and makes squats and deadlifts feel easier later
- A good warm-up. A few sets wake up the glutes before leg workouts or runs
- No equipment needed. You can do it on a bedroom floor
- Easy to progress. You can add pauses, bands, weights or one-leg versions as you get stronger
A small 8-week trial asked healthy students to do either bilateral glute bridges or glute squeezes every day. Both groups improved their hip extension strength significantly. It is a modest study, but it backs up what I felt in my own legs: simple daily bridging does build strength.
Glute bridges and back pain
Many people start the glute bridges exercise because their lower back aches, and that is a reasonable choice. Exercise in general is one of the best-supported treatments for chronic low back pain, and bridges are a gentle place to begin.
I want to be honest about the limits, though. One trial added a hip strengthening programme to a standard back exercise programme and found no extra drop in pain compared with the back exercises alone. Both groups improved. So glute bridges are a helpful piece of a back routine, not a magic fix on their own.
Pair your bridges with gentle movement and stretching. Our back stretching exercises and the McGill Big 3 fit alongside them nicely.
Common glute bridge mistakes and fixes
The glute bridges exercise looks simple, which is exactly why small errors slip in. These are the mistakes I made, plus the ones I see most often.
| Mistake | What it feels like | Fix |
|---|---|---|
| Arching the lower back at the top | Tight or pinchy lower back | Lift only to a straight line, keep ribs down and squeeze glutes harder |
| Pushing through the toes | Thighs burn, glutes stay quiet | Press through your heels, or lift your toes slightly |
| Feet too far away | Hamstring cramps | Walk your feet closer to your hips |
| Knees falling in or out | Wobbly, uneven bridge | Keep knees in line with your feet. A mini band helps |
| Rushing the reps | Hips bounce off the floor | Take 2 to 3 seconds to lower |
| Holding your breath | Face goes red, neck tenses | Breathe out on the way up |
| Pressing the head into the floor | Sore neck | Relax your neck and look at the ceiling |
| One hip lower than the other | Hips tilt at the top | Slow down and watch in a mirror or film yourself |
The fix I needed most was the first one. For weeks I pushed my hips as high as I could, thinking higher meant better. It only meant more back. Once I stopped at a straight line and focused on the squeeze, my glutes finally started doing the work.
12 glute bridge variations, easiest to hardest
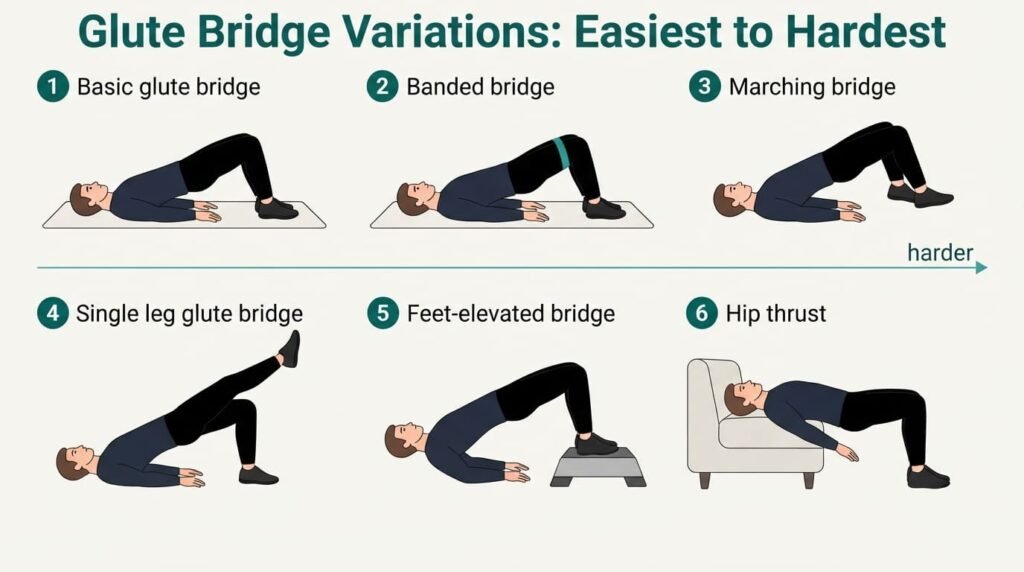
Once you can do 3 sets of 15 clean bridges, these glute bridge variations keep the exercise challenging. Move up one level at a time.
| Level | Variation | Why it helps |
|---|---|---|
| 1 | Glute squeeze lying down | Learn to switch on the glutes without moving |
| 2 | Half-range bridge | Builds confidence if full range feels hard |
| 3 | Basic glute bridge | The foundation of every other version |
| 4 | Bridge with 3-second hold | More time under tension |
| 5 | Banded glute bridge | Extra side glute work |
| 6 | Marching bridge | Adds core and hip control |
| 7 | Feet-elevated bridge | Bigger range of motion |
| 8 | Single leg glute bridge | Twice the load on one side |
| 9 | Dumbbell glute bridge | Adds external load |
| 10 | Single leg bridge with foot on a step | More range on one leg |
| 11 | Frog-stance bridge | Feet together, knees wide, strong glute focus |
| 12 | Hip thrust with shoulders on a bench | Biggest range and heaviest loading |
1. Glute squeeze lying down
Lie in the bridge start position and squeeze your glutes for 5 seconds without lifting. Relax for 5 seconds. Do 10. This sounds too easy, but it teaches you what the top of the bridge should feel like.
2. Half-range bridge
Lift your hips only halfway, pause, then lower. Good for the first week or two if your back or hips feel stiff.
3 and 4. Basic bridge and bridge with a hold
Do the basic bridge exactly as described above. When that feels easy, add a 3-second hold at the top of every rep. The hold is where most beginners discover their glutes.
5. Banded glute bridge
Place a loop band just above your knees. Push your knees out gently against the band as you lift. You will feel the sides of your hips working too. Our guide to the clamshell exercise and our monster walks train the same side glute muscles.
6. Marching bridge
Lift into a bridge and hold. Slowly lift one foot an inch off the floor, put it down, then lift the other. Keep your hips level. Do 6 to 10 marches per side.
7. Feet-elevated bridge
Place your heels on a low step, a sturdy box or the edge of a sofa. Lift as usual. The range is bigger, so the glutes and hamstrings work harder.
8. Single leg glute bridge
The single leg glute bridge is the most useful upgrade in this list. It doubles the load on each side and shows you if one side is weaker.
- Lie in the start position, then straighten one leg or hug that knee to your chest
- Press through the heel of the planted foot and lift your hips
- Keep your hips level. Do not let the free side drop
- Lower slowly and repeat, then switch sides
Dose: 2 to 3 sets of 6 to 12 reps per side. Start with the weaker side and match the reps on the stronger side.
If your hamstring cramps in the single leg glute bridge, bring your foot closer to your hips. That small change is exactly what the research above found reduces hamstring work while the glutes stay busy.
9. Dumbbell glute bridge
Rest a dumbbell or a filled backpack across your hips, holding it steady with both hands. Lift as usual. Start light, about 5 to 10 kg, and add weight slowly.
10. Single leg bridge with foot on a step
Put one heel on a low step and lift the other leg. This is a tough version, so make sure the floor single leg glute bridge feels solid first.
11. Frog-stance bridge
Put the soles of your feet together and let your knees fall out wide. Lift your hips. The range is short, but the glutes work hard. Our guide to frog pumps explains this version in detail.
12. Hip thrust
Rest your upper back on a sofa or bench, feet flat, and lift your hips. The hip thrust takes the bridge into a bigger range and allows heavier loading. A study comparing resisted bridge and thrust variations found glute activity was high across the board and recommended choosing the one that suits your preferences and goals.
If you are unsure which one to choose, read our comparison of the glute bridge vs hip thrust, and our guide to hip thrusts at home for the full technique.
A 6-week glute bridges exercise plan for beginners
Do this plan two or three times a week, on non-consecutive days. Each session takes about 10 minutes.
| Week | Main exercise | Sets and reps | Finisher |
|---|---|---|---|
| 1 | Glute squeeze plus basic bridge | 2 x 10 squeezes, then 2 x 10 bridges | None |
| 2 | Basic bridge | 3 x 12 | 20-second bridge hold |
| 3 | Bridge with 3-second hold | 3 x 10 | Marching bridge, 1 x 6 per side |
| 4 | Banded glute bridge | 3 x 12 | Marching bridge, 2 x 6 per side |
| 5 | Single leg glute bridge | 3 x 6 per side | Banded bridge, 1 x 15 |
| 6 | Single leg glute bridge | 3 x 8 to 10 per side | Feet-elevated bridge, 1 x 12 |
If a week feels too hard, repeat it. There is no prize for rushing. You can track your reps over time with our bodyweight exercise progress calculator.
Where glute bridges fit in a workout
| Use | How to do it |
|---|---|
| Warm-up before leg day or a run | 2 sets of 10 slow bridges with a 2-second squeeze |
| Main exercise in a home workout | 3 to 4 sets, choosing a variation that makes the last 2 reps hard |
| Finisher at the end of a workout | 1 to 2 sets of bridge holds, 20 to 40 seconds |
| Desk break | 10 bridges on the floor, or 10 glute squeezes in your chair |
Our beginner leg workout at home and our resistance band leg workout both include bridges, and the warm-up before a workout guide shows how to slot them in.
Who should do glute bridges?
Almost everyone can do some version of the glute bridges exercise. Here is where I would start, depending on who you are.
| Person | Best starting version | Tips |
|---|---|---|
| Complete beginners | Basic bridge, 2 x 10 | Focus on the squeeze, not the height |
| Desk workers | Basic bridge plus glute squeezes | Do a set after long sitting spells |
| Runners | Single leg glute bridge | Pair with core exercises for runners |
| Older adults | Half-range or basic bridge on a bed or mat | Go slowly and use your arms for balance |
| People with knee pain | Basic bridge, feet close in | Our exercises for knee pain guide adds more |
| Heavier beginners | Basic bridge, small range | A mat or folded blanket makes the floor more comfortable |
Older adults can find more floor and chair options in our guides to leg exercises for seniors and core exercises for seniors.
Safety and when to stop
The glute bridges exercise is low risk for most people, but use common sense.
- Stop if you feel sharp pain in your back, hips or knees
- If you have had recent surgery on your back, hip or knee, ask your surgeon or physiotherapist first
- In later pregnancy, lying flat on your back for long periods is often discouraged, so check with your midwife or doctor
- If your back hurts during bridges, reduce the height and focus on the glute squeeze
- Muscle soreness for a day or two after a new variation is normal. Our guide on how to reduce muscle soreness helps
This article is general information, not medical advice. If you have ongoing pain, numbness or weakness, see a doctor or physiotherapist. See our medical disclaimer.
Glute bridges compared with other glute exercises
| Exercise | Equipment | Difficulty | Main focus |
|---|---|---|---|
| Glute bridge | None | Easy | Glutes and hamstrings |
| Hip thrust | Bench or sofa | Moderate | Glutes, heavier loading |
| Clamshell | None or band | Easy | Side glutes |
| Fire hydrant | None | Easy | Side glutes and hip control |
| Frog pump | None | Easy | Glutes, short range |
| Squat | None | Moderate | Quads and glutes |
| Single leg squat | None | Hard | Legs, balance and glutes |
A good beginner glute session mixes one bridge variation with one side glute exercise. For example: 3 sets of banded bridges, then 2 sets of clamshells. Add hamstring exercises at home once a week to round things out.
How to know you are getting stronger
Progress with the glute bridges exercise is easy to miss, because the movement looks the same week to week. Watch for these signs instead:
- You can hold the top of a bridge for 30 seconds without your back taking over
- Your basic bridges feel easy for 3 sets of 15
- You can do a single leg glute bridge on both sides with level hips
- Standing up from a low chair feels easier
- Stairs and hills feel less tiring on your legs
In my own training, the single leg glute bridge was the clearest marker. In week one I could do three shaky reps on my left side. By week six I could do ten on each side, and walking up the hill near my house felt noticeably lighter.
The bottom line
The glute bridges exercise is one of the best starting points for anyone new to strength training. You lie on your back, press through your heels and lift your hips to a straight line, squeezing your glutes at the top. Keep your ribs down, lower slowly and breathe.
Start with 2 to 3 sets of 10 to 15, two or three times a week. When that feels easy, work through the glute bridge variations, from holds and bands to the single leg glute bridge and the hip thrust. Six weeks of steady practice is enough to feel a real difference in your hips, your back and the way you move every day.
Frequently asked questions
What does the glute bridges exercise work?
It mainly works the gluteus maximus, with help from the hamstrings, the side glute muscles and the core. Your lower back muscles keep your spine steady but should not do most of the work.
How many glute bridges should a beginner do?
Start with 2 to 3 sets of 10 to 15 reps, two or three times a week. Rest 45 to 60 seconds between sets. When 3 sets of 15 feel easy, move to a harder variation instead of doing endless reps.
Are glute bridges good for back pain?
They can be a helpful part of a back routine, because exercise is one of the best-supported treatments for chronic low back pain. They work best with other movement such as walking and stretching. Stop if a bridge causes sharp pain and get your back checked if pain persists.
Why do I feel glute bridges in my hamstrings?
Usually because your feet are too far from your hips, or you are pushing through your toes. Walk your feet closer and press through your heels. Research shows a deeper knee bend reduces hamstring work while keeping the glutes active.
Why do I feel glute bridges in my lower back?
You are probably lifting too high and arching your back. Stop at a straight line from shoulders to knees, keep your ribs down and squeeze your glutes before you lift.
Is the single leg glute bridge better than the regular bridge?
It is harder, not automatically better. The single leg glute bridge puts about twice the load on each side and shows strength differences between legs. Master the regular version first.
Can I do glute bridges every day?
Light bridges as a warm-up can be done daily. For strength, two or three harder sessions a week with rest days in between works well for most beginners.
What is the difference between a glute bridge and a hip thrust?
A glute bridge is done with your shoulders on the floor. A hip thrust is done with your upper back on a bench or sofa, which gives a bigger range of motion and allows heavier loading.
How long does it take to see results from glute bridges?
Most beginners notice better control and less effort within 2 to 3 weeks. Visible strength gains, such as doing single leg bridges with ease, usually take 6 to 8 weeks of steady training.
Do glute bridges make your glutes bigger?
They can help, especially when you add load and progress the variations over time. For bigger gains, combine bridges with heavier moves such as hip thrusts and squats, and eat enough protein.
What’s next?
Reading is the easy part. Pick one of these and do it today.