Fire Hydrant Exercise: How to Do It, and What It Actually Works
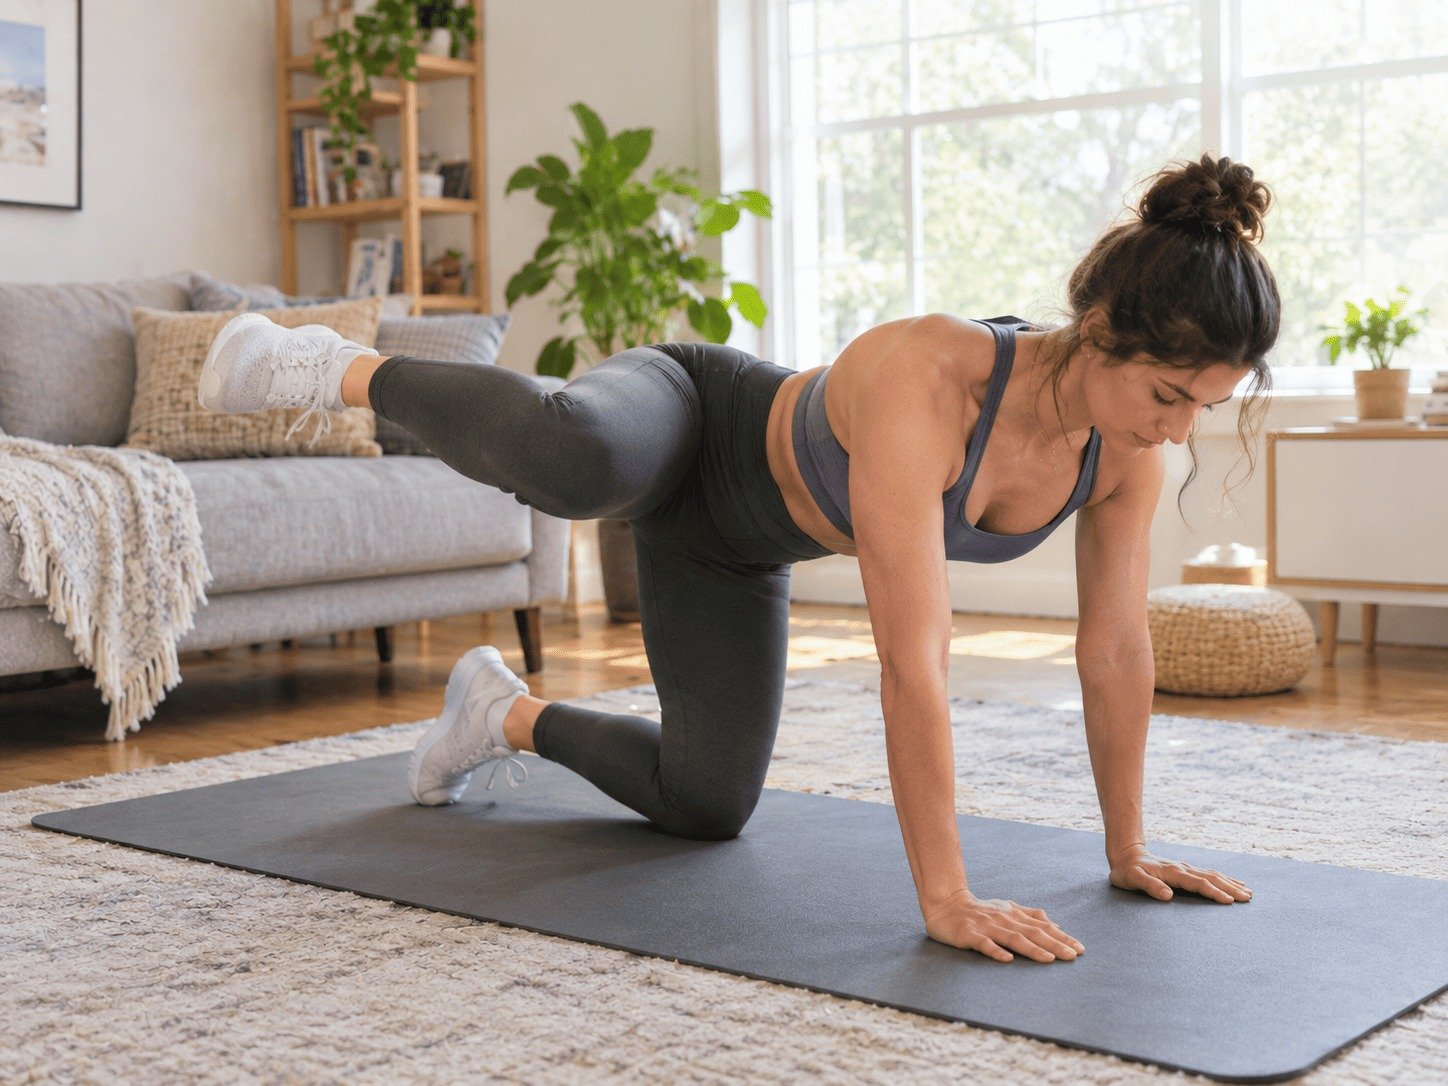
The fire hydrant is a glute exercise done on all fours, where you lift one bent knee out to the side without letting your body twist. It gets its name from the way a dog behaves at a lamppost, which is unglamorous but makes it impossible to forget. It trains the gluteus medius on the side of your hip, and the whole exercise lives or dies on whether your torso stays still.
I used to do these quickly at the end of leg workouts, swinging my leg up as high as it would go and feeling almost nothing. The fix took ten seconds to learn: stop lifting so high and stop letting your shoulders rotate. Suddenly twelve slow reps were genuinely hard, which is exactly what should happen.
This guide covers how to do them properly, what they do and do not achieve, the variations worth using, and how they compare with the clamshell.
At a glance
- Main muscle: gluteus medius, with the gluteus maximus helping
- Equipment: none, though a mat is kind to your knees
- Reps: 10 to 15 per side, 2 to 3 sets
- The key detail: hips stay square to the floor
- Height matters less than control. Lower and slower beats high and swinging
- Great for: warm-ups, hip stability, glute activation
- Not great for: building glute size on its own
What a fire hydrant is
Start on all fours with your hands under your shoulders and your knees under your hips. Keeping your knee bent at 90 degrees, lift one leg out to the side, then lower it back down without resting your knee on the floor.
The movement itself is hip abduction, which simply means moving your leg away from the midline of your body. It is the same basic job as a clamshell, but done against gravity from a different position, which makes it a little harder and brings the larger glute muscle in slightly more.
Two things make it different from most glute exercises:
- You are on all fours, so your core has to stop your body tipping and twisting.
- The resistance comes from your own leg, which means the exercise is naturally light and suits high reps and warm-ups.
Fire hydrant muscles worked
| Muscle | What it does |
|---|---|
| Gluteus medius | Main mover, lifts the leg out to the side |
| Gluteus minimus | Assists underneath the medius |
| Gluteus maximus | Helps, especially if the leg drifts slightly backwards |
| Deep hip rotators | Control the rotation of the thigh |
| Core and obliques | Stop your torso twisting or your lower back arching |
| Shoulders | Work quietly to hold the all-fours position |
If you feel it mostly in your lower back, your back is arching as you lift. If you feel it in the front of your hip, you are probably swinging the leg forward rather than out to the side.
How to do a fire hydrant properly
- Set up on all fours. Hands under shoulders, knees under hips, on a mat if your floor is hard.
- Find a flat back. Neither arched nor rounded, with your neck in line so you are looking at the floor just ahead of your hands.
- Brace your stomach gently. This is what stops you twisting.
- Keep the knee bent at 90 degrees throughout.
- Lift the knee out to the side slowly, leading with the knee rather than the foot, until you feel the side of your hip working.
- Stop before your hips start to rotate. For most people that is somewhere around hip height or a little below.
- Pause for a second at the top.
- Lower under control without letting the knee touch down between reps.
Two seconds up, one second hold, two seconds down. If you can do these fast, they are too easy or you are swinging.
A simple self-check
Balance something light on your lower back, like a folded towel or a water bottle lying flat. If it slides off as you lift, your hips are rotating. It is a fast, slightly humbling test that fixes the technique quicker than any verbal cue I know.
Another option: film ten reps from behind. Your shoulders and hips should stay level, and your body should not shift sideways as the leg rises.
Common fire hydrant mistakes
- Lifting too high. Above a certain point the hip can only go further by rotating your whole torso, which takes the work away from the muscle you are trying to train.
- Twisting the body. The most common fault, and usually a result of the first one.
- Arching the lower back. Turns a hip exercise into a back exercise and often causes an ache afterwards.
- Swinging the leg. Momentum makes it easier but pointless.
- Straightening the knee. Fine as a variation, but it changes the exercise, and most people do it accidentally as they tire.
- Sinking into the shoulders. Keep your arms actively pushing the floor away.
- Resting the knee between reps. You lose the tension that makes the set work.
If your wrists dislike the all-fours position, drop to your forearms, or make fists and rest on your knuckles so your wrists stay straight. It changes almost nothing about how the exercise feels in your hip.
Fire hydrant variations
| Variation | How it changes things | Best for |
|---|---|---|
| Standard fire hydrant | The basic version | Everyone, warm-ups |
| Banded fire hydrant | Mini band above the knees adds resistance | Progression once 15 reps are easy |
| Fire hydrant with leg extension | Lift out, then straighten the leg before returning | More glute max and hamstring involvement |
| Fire hydrant circles | Small controlled circles at the top | Endurance and hip mobility |
| Straight leg fire hydrant | Leg straight throughout | Longer lever, noticeably harder |
| Forearm fire hydrant | On your forearms instead of hands | Wrist-friendly, more core demand |
| Standing fire hydrant | Same movement standing, holding a chair | Balance practice, easy on knees |
Using a band
A mini loop band above the knees is the natural progression. Choose a light one. If the band forces your torso to twist to get the leg moving, it is too strong for you right now, and you will simply be practising the cheat with added resistance.
If you are picking bands, my guide to the best resistance bands for beginners covers the different types and what they suit.
Fire hydrant vs clamshell
These two are close cousins and people often ask which one to do. The honest answer is that they train the same muscle from different positions, and using both is better than agonising over the choice.
| Fire hydrant | Clamshell | |
|---|---|---|
| Position | All fours | Side lying |
| Difficulty | Slightly harder | Slightly easier |
| Core demand | Higher, resists twisting | Lower |
| Easiest to feel the muscle | Moderate | Easier for most beginners |
| Best used for | Warm-ups, glute activation, core control | Learning the movement, rehab-style work, warm-ups |
If you cannot feel either of them, start with the clamshell exercise, because the side-lying position makes the target muscle easier to find. Once you can feel that reliably, the fire hydrant becomes much more productive.
Sets, reps and where it fits
| Goal | Sets | Reps per side |
|---|---|---|
| Warm-up before legs | 1 to 2 | 10 to 12 |
| Glute accessory work | 3 | 12 to 15, with a band |
| Endurance or circuit use | 2 to 3 | 15 to 20 |
| Advanced | 3 | 10 to 12 straight leg or with extension |
Fire hydrants belong either at the start of a leg session as activation work, or at the end as accessory work. They are not a main exercise, and treating them as one is a common way to spend a lot of time on very little load.
For actual glute growth, you need heavier hip extension work. That means hip thrusts, glute bridges, squats and step-ups. My glute bridge vs hip thrust guide explains how to choose between the two main options, and upper glute exercises covers the side of the hip in more depth.
A 10-minute glute and hip routine
Do this two or three times a week, or use the first three exercises as a warm-up before a leg workout.
| Exercise | Sets | Reps |
|---|---|---|
| Fire hydrant | 2 | 12 per side |
| Clamshell | 2 | 15 per side |
| Glute bridge | 3 | 15 |
| Side-lying leg raise | 2 | 12 per side |
| Bird dog | 2 | 8 per side |
Everything here is slow and controlled. If your hips are new to this kind of work, expect the side of your hip to be pleasantly sore the next day for the first week or two.
The standing fire hydrant
If the all-fours position does not suit you, whether because of sore knees, wrist pain, pregnancy or simply because getting up and down off the floor is a nuisance, the standing version keeps almost all of the benefit.
Stand tall next to a chair or worktop and hold it lightly with one hand. Shift your weight onto the far leg. Lift the near knee to about hip height in front of you, then, keeping the knee bent, take it out to the side. Bring it back to the front, then lower.
Two things make the standing version worth doing even if you are perfectly happy on the floor:
- The standing leg works too. It has to stabilise your whole body while the other leg moves, which is exactly the job the gluteus medius does when you walk.
- It transfers better. You walk, climb stairs and carry shopping on your feet, not on all fours.
Keep your torso upright. The temptation is to lean away from the working leg, which lets the hip do less. If you catch yourself tipping sideways, hold the chair a little more firmly and lift the knee less high.
Ten to twelve reps per side is plenty. It also makes a genuinely good thing to do while the kettle boils, which is how most of mine get done.
Why activation work before leg day helps
You will often see fire hydrants and clamshells described as activation exercises, which sounds like jargon. What it means in practice is simple.
Muscles that have not been used much take a moment to join in. If you sit all day and then go straight into squats, your quads and lower back, which are used to working, tend to take over, while the smaller hip stabilisers stay quiet. Doing a couple of light sets first gives those muscles a chance to wake up before the load arrives.
You can feel the difference within a single session. Try this: do five squats cold and pay attention to where you feel them. Then do a set of fire hydrants and a set of clamshells on each side, and repeat the five squats. Most people notice their knees tracking a little better, and feel more of the work in the glutes rather than purely in the thighs.
Two or three minutes is all it takes. I do one set of each at the start of every leg session, and it has become as automatic as tying my shoes. My full warm-up routine covers the rest of the body if you want a complete sequence.
Fitting fire hydrants into your week
| Day | Session | Where fire hydrants fit |
|---|---|---|
| Monday | Leg workout | 1 set of 12 per side in the warm-up |
| Tuesday | Upper body or walk | Not needed |
| Wednesday | Rest or short hip routine | 3 sets with a band, as accessory work |
| Thursday | Full body workout | 1 set in the warm-up |
| Friday | Leg workout | 1 set in the warm-up, plus 2 sets at the end |
| Weekend | Walk or rest | Optional standing version |
The pattern to notice is that fire hydrants appear often but never as the main event. Little and often is how small stabilising muscles respond best. If you want a complete lower body session to attach them to, my beginner leg workout at home is the simplest place to start.
What fire hydrants actually do for you
Let me be straight about what to expect, because this exercise gets oversold.
What they genuinely do:
- Strengthen the muscles that keep your pelvis steady on one leg
- Improve how your knees track in squats, lunges and stairs
- Make a very good warm-up before leg training
- Build hip and core control with no equipment at all
- Give you something useful to do on a rest day or in a hotel room
What they do not do:
- Burn fat from your hips or thighs. Spot reduction is not a thing
- Build significant glute size on their own, because the load is too light
- Fix hip or knee pain by themselves, though they can be part of a plan
- Replace squats, hip thrusts or any loaded lower body work
If your goal is a stronger, shapelier lower body, use fire hydrants as the supporting act. The main event is progressive strength work like my beginner leg workout at home or the dumbbell leg workout.
If your knees or wrists complain
The all-fours position puts pressure on both, and there are easy fixes.
- Sore knees: double up your mat, use a folded towel under the working knee, or switch to the standing version
- Sore wrists: go onto your forearms or your fists
- Lower back ache: reduce how high you lift and brace your stomach more, because the ache almost always comes from arching
- Cramping in the glute: common when the muscle is new to the work, and usually settles with a short stretch and more frequent, lighter sessions
If you are managing a knee or hip condition, my low-impact workout for beginners guide has gentler alternatives, and it is worth getting personal advice before building a routine around any painful joint.
How to progress
- Weeks 1 to 2: bodyweight only, 2 sets of 10 per side, focused entirely on keeping the hips square.
- Weeks 3 to 4: 3 sets of 12 to 15, adding a pause at the top.
- Weeks 5 to 6: add a light band, dropping back to 10 to 12 reps.
- After that: progress the band strength, or move to the leg extension or straight leg versions.
Better still, judge progress by how your bigger lifts look. If your knees stop drifting inwards when you squat, and standing on one leg feels steadier, the exercise is doing its job even if the reps have not changed much.
Where the name comes from, and why it sticks
It is worth a short detour, because the silly name is genuinely useful.
The exercise is named after the way a dog lifts its leg at a fire hydrant. Once you have heard that, the movement pattern is impossible to forget, which is more than can be said for most exercise names. You will also see it called the quadruped hip abduction, which describes it precisely and is far harder to remember.
The reason this matters is that the image gets one detail right that people frequently get wrong. A dog lifts its leg out to the side, not backwards and not upwards towards the ceiling. If your leg is drifting behind you, you have turned it into a different exercise, usually a donkey kick, which trains the gluteus maximus instead.
So when your form starts slipping late in a set, the fix is simply to picture the original image again. Knee out to the side, body still, everything else unchanged. It is the quickest self-correction I know for this exercise, and it is why I have never bothered learning the technical name.
The short version
If you remember nothing else from this guide, remember these five things:
- Keep your hips square to the floor. That single detail decides whether the exercise works.
- Lift the knee out to the side, not backwards, and not as high as it will go.
- Go slowly. Two seconds up, a pause, two seconds down.
- Use them as a warm-up or accessory exercise, not as your main glute training.
- Add a light band only once bodyweight reps are genuinely controlled.
Frequently asked questions
What does the fire hydrant exercise work?
It mainly works the gluteus medius on the side of your hip, with help from the gluteus minimus, the gluteus maximus and the deep hip rotators. Your core also works to stop your torso twisting as the leg lifts.
What is a fire hydrant workout?
It refers to a glute and hip routine built around the fire hydrant exercise, usually alongside clamshells, glute bridges and side-lying leg raises. It is normally used as a warm-up or an accessory routine rather than a full workout.
How high should you lift your leg in a fire hydrant?
Only as high as you can go while your hips stay square to the floor, which is usually around hip height or slightly lower. Lifting higher looks impressive but comes from rotating your torso, which takes the work off the target muscle.
How many fire hydrants should I do?
Two or three sets of 10 to 15 reps per side is a good range. Use lighter sets in a warm-up, or three sets with a band above the knees if you are training hip strength directly.
Do fire hydrants make your glutes bigger?
Not on their own. The load is too light to drive much growth, so they are best used to activate and strengthen the smaller stabilising muscles. For size, use heavier work like hip thrusts, squats and step-ups.
Fire hydrants or clamshells, which is better?
They train the same muscle from different positions. Clamshells are easier to feel and better for learning the movement, while fire hydrants add more core demand. Most people benefit from doing both rather than choosing.
Can I do fire hydrants every day?
Yes, for most people, because the load is light. Daily sets work well as a warm-up or a morning routine. If you use a strong band and feel sore, leave a day between sessions.
Why do I feel fire hydrants in my lower back?
Almost always because your lower back is arching or your torso is twisting as you lift. Brace your stomach gently, lift the knee less high, and keep your hips square. A towel balanced on your lower back is a useful check.
Source: NHS, Physical activity guidelines for adults aged 19 to 64