Abdominal Bracing Exercises: How to Brace Your Core, Plus 10 Moves
Abdominal bracing exercises teach one of the most useful skills in all of strength training: tightening the muscles around your middle so your spine stays steady while your arms and legs work. Coaches say “brace your core” constantly, but very few beginners are ever shown what that actually means.
I think of bracing as a skill first and an exercise second. Once you can switch it on at the right level, squats feel steadier, lifting shopping out of the car feels safer and planks suddenly make sense. Without it, you can do hundreds of crunches and still feel wobbly when you pick something up.
This guide explains what abdominal bracing is, how it differs from “sucking in” your stomach, and how to brace your core step by step. You will then find 10 abdominal bracing exercises from easiest to hardest, a 6-week plan and the mistakes that make bracing harder than it needs to be.
At a glance
- Abdominal bracing means gently tightening all the muscles around your waist at once, without sucking in or pushing out
- It differs from hollowing, where you draw your belly button in toward your spine
- Research using spine models found bracing improved spinal stability more than hollowing
- Most daily tasks need only a light brace, about 10 to 25 percent of your maximum effort
- Heavier lifts need a firmer brace, combined with a breath held briefly or breathed through
- Start with lying brace holds, then progress to dead bugs, bird dogs, planks and carries
- Practise for 5 to 10 minutes, 3 or 4 times a week
What is abdominal bracing?
Your core is like a cylinder around your spine. The front is your abdominal muscles, the sides are your obliques, the back is the muscles along your spine, the top is your diaphragm and the bottom is your pelvic floor. When you brace, you tighten all the walls of that cylinder at the same time, so your trunk becomes stiffer and more stable.
A simple way to feel it: imagine someone is about to poke you in the stomach. Without sucking in or puffing out, you tense your whole midsection. That gentle stiffening is the abdominal brace.
Bracing vs hollowing: which is better?
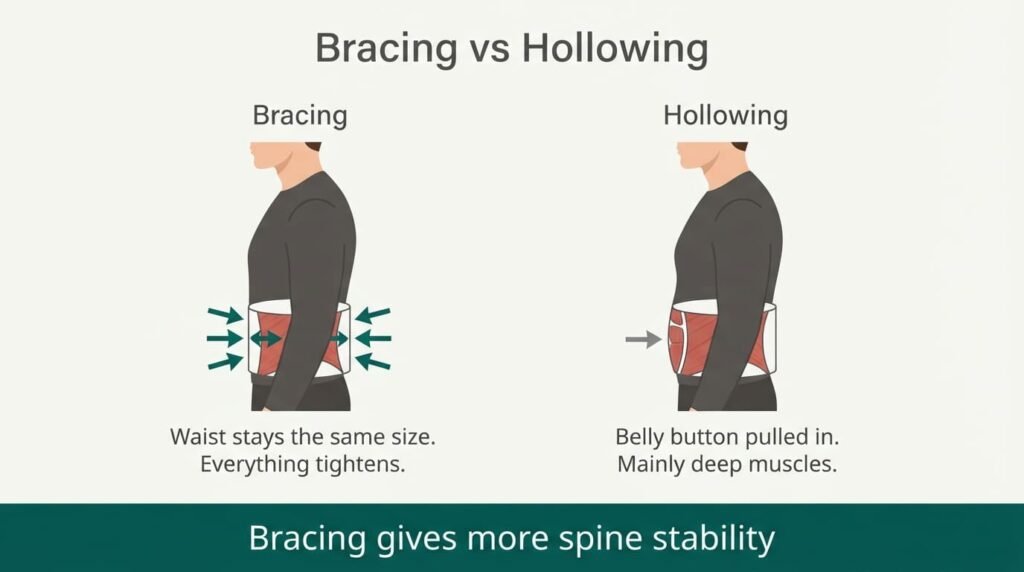
Hollowing, also called drawing in, means pulling your belly button in toward your spine. It is often used to target the deep transverse abdominis muscle. Bracing keeps your waist the same size and tightens everything at once.
| Point | Bracing | Hollowing (drawing in) |
|---|---|---|
| What you do | Tighten all the muscles around the waist | Pull the belly button in |
| Waist size | Stays the same | Gets smaller |
| Muscles used | Deep and outer abdominals, obliques and back muscles together | Mainly the deep abdominals |
| Best for | Lifting, carrying, sport and daily tasks | Learning to feel and control the deep core |
A modelling study compared the two strategies. Bracing increased lumbar stability by about 32 percent, with a 15 percent increase in spinal compression. The authors found no mechanical reason to use hollowing to improve stability.
Another study pushed participants unexpectedly from behind. Hollowing did not reduce how much the trunk moved, while bracing increased co-contraction, reduced lower back movement and improved stability, again at the cost of a little more spinal compression.
That does not make hollowing useless. It can help you find and feel the deep core muscles, and our guide to transverse abdominis exercises covers it. For lifting and everyday stability, though, bracing is the skill to learn.
How to brace your core, step by step
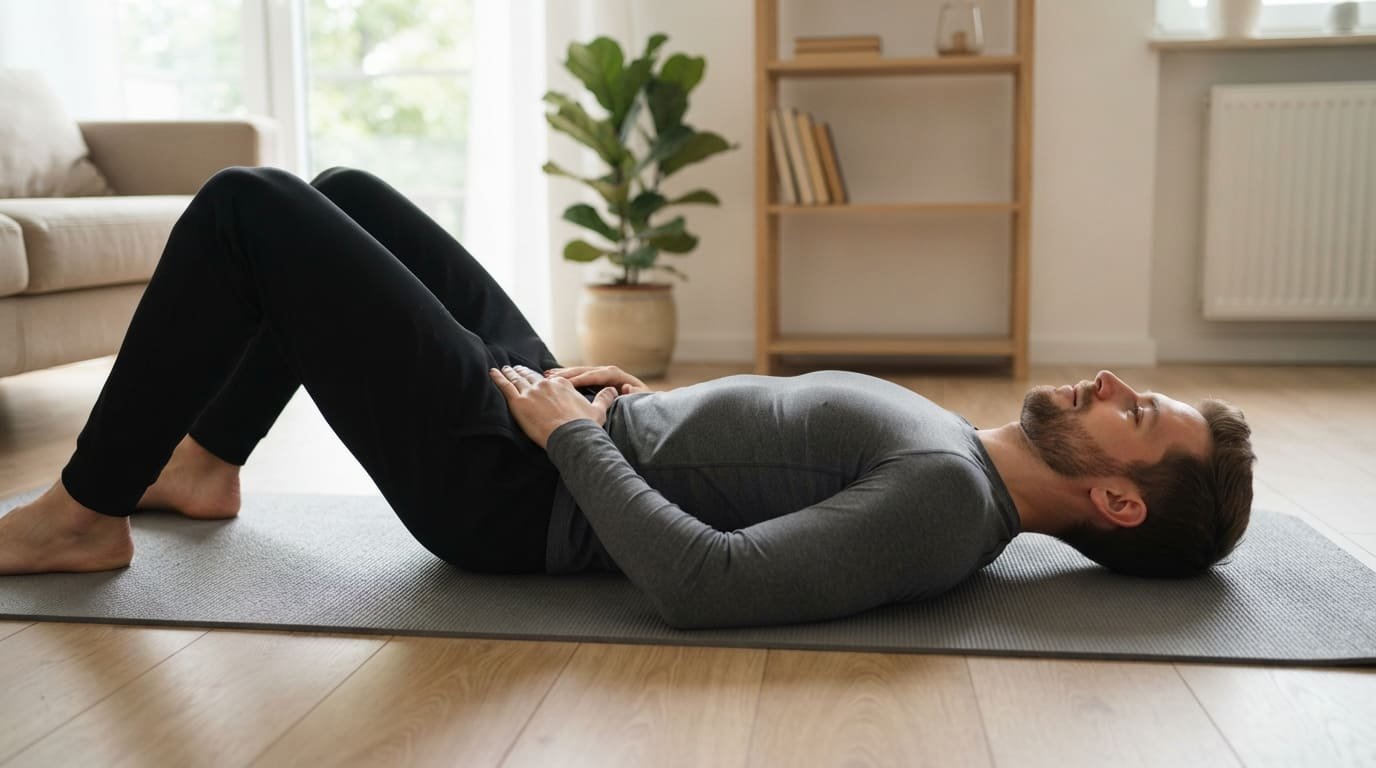
Here is how to brace your core properly. Practise lying down first, because it is easier to feel.
- Lie on your back with knees bent and feet flat
- Place your fingertips on the sides of your waist, just above your hip bones
- Breathe in normally through your nose
- As you breathe out, gently tighten your waist as if preparing for a light poke. You should feel your fingertips pushed outward slightly, not sucked in
- Keep your ribs down and your lower back in its natural position, neither arched nor pressed flat
- Now keep breathing normally while holding that tension
Hold for 10 seconds while breathing, relax, and repeat 5 times. If you have to hold your breath to keep the brace, you are bracing too hard for this stage.
How hard should you brace?
| Situation | Brace level | What it feels like |
|---|---|---|
| Walking, standing, sitting | Very light, 5 to 10 percent | You barely notice it |
| Carrying shopping, getting out of a chair | Light, 10 to 25 percent | Gentle firmness, normal breathing |
| Bodyweight exercises such as planks | Moderate, 25 to 40 percent | Firm but you can talk |
| Heavy lifts | Firm, 50 percent or more | Strong tension, often with a held breath for one rep |
Most beginners brace too hard for everything. Matching the brace to the task is the real skill, and it is what makes abdominal bracing exercises useful in daily life.
Breathing while you brace
For light and moderate effort, keep breathing through the brace. Breathe into your belly and sides while keeping the tension. For a single heavy lift, many lifters take a breath, brace firmly, hold it for the hardest part of the rep and breathe out at the top. If you have high blood pressure, heart problems or are pregnant, avoid holding your breath during effort and check with your doctor. Our guide to breathing while running covers belly breathing in more detail.
10 abdominal bracing exercises, easiest to hardest
| Level | Exercise | Equipment |
|---|---|---|
| 1 | Lying brace hold | Mat |
| 2 | Heel slides with a brace | Mat |
| 3 | Dead bug | Mat |
| 4 | Bird dog | Mat |
| 5 | Front plank | Mat |
| 6 | Side plank | Mat |
| 7 | Pallof press | Resistance band |
| 8 | Standing brace with arm raises | Light weight optional |
| 9 | Suitcase carry | Kettlebell, dumbbell or bag |
| 10 | Goblet squat with a brace | Kettlebell or dumbbell |
1. Lying brace hold
This is the basic ab brace exercise. Lie on your back, knees bent. Brace as described above and hold for 10 to 20 seconds while breathing normally. Do 5 to 8 reps. Focus on keeping the same tension from start to finish.
2. Heel slides with a brace
Lie on your back with a brace. Slowly slide one heel along the floor until the leg is straight, then slide it back. Your lower back and pelvis should not move. Do 8 to 10 per leg. This is the first step in moving your limbs while your trunk stays still.
3. Dead bug
Lie on your back with arms reaching to the ceiling and knees bent at 90 degrees above your hips. Brace, then slowly lower one arm overhead and the opposite leg toward the floor. Return and switch sides. Do 2 to 3 sets of 6 to 8 per side. If your lower back lifts, shorten the movement. Our beginner core workout covers the dead bug in detail.
4. Bird dog
Start on all fours. Brace, then slowly reach one arm forward and the opposite leg back until both are level with your body. Hold for 5 to 10 seconds, return and switch. Do 2 to 3 sets of 6 per side. Imagine a glass of water balanced on your lower back.
5. Front plank
From your forearms and knees or toes, brace and form a straight line from your head to your heels or knees. Keep breathing. Hold for 15 to 30 seconds and build toward 60. Short, high-quality holds beat long sloppy ones. Our plank shoulder taps guide shows a harder version once you are steady.
6. Side plank
Lie on your side on your forearm, knees bent for the easier version or legs straight for the harder one. Lift your hips into a straight line and hold. 2 to 3 holds of 15 to 30 seconds per side. The side plank trains the obliques and the muscles on the side of the lower back, which are a key part of the brace.
7. Pallof press
Anchor a resistance band at chest height to a door or post. Stand side-on to the anchor, holding the band at your chest with both hands. Brace and press your hands straight out in front of you, resisting the band’s pull to twist you. Hold for 2 seconds and bring them back. Do 2 to 3 sets of 10 per side. This is one of the best abdominal bracing exercises for teaching your core to resist rotation.
8. Standing brace with arm raises
Stand tall, brace lightly and slowly raise both arms overhead, then lower them. Your ribs should not flare and your lower back should not arch. Add a light weight when it feels easy. Do 2 sets of 10. This brings bracing into a standing position, closer to real life.
9. Suitcase carry
Hold a heavy kettlebell, dumbbell or shopping bag in one hand. Brace and walk 20 to 30 metres without leaning toward the weight. Switch hands. Do 3 rounds per side. Carrying is where bracing becomes a practical, everyday skill. Our guide to kettlebell back exercises includes more carry variations.
10. Goblet squat with a brace
Hold a kettlebell or dumbbell at your chest. Brace before each rep, squat down while keeping the brace, and stand up. Breathe out at the top and re-brace for the next rep. Do 3 sets of 8 to 10. This teaches you to keep the brace while your legs do the work.
A 6-week abdominal bracing exercises plan
Do this plan 3 or 4 times a week. Each session takes 8 to 12 minutes.
| Week | Exercises | Sets and reps |
|---|---|---|
| 1 | Lying brace hold, heel slides | 5 x 10 seconds, 2 x 8 per leg |
| 2 | Lying brace hold, dead bug | 5 x 15 seconds, 2 x 6 per side |
| 3 | Dead bug, bird dog, front plank | 2 x 8 per side, 2 x 6 per side, 3 x 20 seconds |
| 4 | Bird dog, front plank, side plank | 3 x 6 per side, 3 x 30 seconds, 2 x 20 seconds per side |
| 5 | Pallof press, side plank, suitcase carry | 3 x 10 per side, 3 x 25 seconds per side, 3 x 20 metres per side |
| 6 | Standing brace with arm raises, goblet squat, suitcase carry | 2 x 10, 3 x 8, 3 x 30 metres per side |
By the end of six weeks, you should be able to brace without thinking hard about it, at the right level for each task.
Using your brace in daily life
The point of abdominal bracing exercises is not just a stronger plank. It is moving more safely and confidently every day. Try a light brace when you:
- Lift a heavy bag, a child or a box from the floor
- Get in and out of the car
- Push a heavy door or shopping trolley
- Carry groceries up the stairs
- Do any strength exercise, from squats to rows
A light brace is enough for almost all of these. Save the firm brace for genuinely heavy lifts.
Common mistakes
| Mistake | Why it matters | Fix |
|---|---|---|
| Sucking the stomach in | That is hollowing, not bracing | Keep your waist the same size and tighten all around |
| Pushing the belly out hard | Can strain and is not necessary | Tighten, do not push |
| Holding your breath for everything | Raises blood pressure and tires you quickly | Breathe through light and moderate braces |
| Bracing at 100 percent all the time | Exhausting and stiff | Match the brace to the task |
| Arching or flattening the lower back | Changes the position you are trying to protect | Keep a natural, neutral spine |
| Only practising lying down | Does not transfer to daily tasks | Progress to standing, carrying and lifting |
Abdominal bracing exercises for lifting and sport
Once the basics feel natural, you can use your brace in more demanding situations. Here is how abdominal bracing exercises carry over to common activities.
| Activity | How to use the brace | Practice drill |
|---|---|---|
| Squats and deadlifts | Breathe in, brace firmly before each rep, breathe out at the top | Goblet squat with a brace |
| Overhead pressing | Moderate brace, ribs down, glutes lightly squeezed | Standing brace with arm raises |
| Carrying heavy objects | Light to moderate brace, breathe normally | Suitcase carry |
| Running | Very light brace with relaxed belly breathing | Dead bug and bird dog |
| Racquet and throwing sports | Brace quickly as you twist and stop | Pallof press |
| Lifting a child or box | Light brace, hinge from the hips, keep the load close | Kettlebell deadlift |
Keep the brace light for anything long or repetitive, and firmer only for short, heavy efforts. Our guide to kettlebell leg exercises is a good next step once your brace feels solid.
How to check your brace
Two simple checks tell you whether your abdominal bracing exercises are working.
- The finger test. Place your fingertips on the sides of your waist and brace. You should feel the muscles push gently outward and firm up, all the way around. If your fingers sink in, you are hollowing
- The talk test. Hold a moderate brace and say a short sentence out loud. If you cannot talk, you are bracing too hard for everyday tasks
Retest every couple of weeks. Being able to hold an abdominal brace exercise like the plank for longer while still breathing and talking comfortably is a clear sign of progress.
Bracing and back pain
Bracing is a key part of many back-friendly core routines, including the McGill Big 3. It can help you feel more secure during movement. But it is not a cure for back pain, and staying generally active matters most. Some people with long-lasting back pain actually brace too much and too often, which makes movement stiff and tiring. If that sounds like you, focus on relaxed breathing and light bracing only when needed.
For broader back care, our guides to back stretching exercises and core exercises for runners pair well with this plan.
This article is general information, not medical advice. If you have back pain with numbness, weakness, or bladder or bowel changes, get medical help urgently. If you are pregnant, recently had a baby or have abdominal separation or a hernia, ask a physiotherapist which core exercises suit you. See our medical disclaimer.
Bracing and the pelvic floor
The pelvic floor forms the bottom of your core cylinder, so it works alongside the brace. If you notice leaking when you lift, cough or jump, or a feeling of pressure downward when you brace, your pelvic floor may need some attention. Our guide to pelvic floor exercises explains how to train it, and a pelvic health physiotherapist can help.
The bottom line
Abdominal bracing exercises teach you to tighten all the muscles around your waist at once, without sucking in, so your spine stays steady while you move. Research suggests bracing creates more stability than hollowing, which is why coaches rely on it for lifting and sport.
Learn how to brace your core lying down, then progress through dead bugs, bird dogs, planks, Pallof presses and carries. Keep breathing, match the strength of your brace to the task, and practise 3 or 4 times a week. Within six weeks it should feel natural, both in your workouts and in everyday life.
If you are just starting, give yourself a week of lying brace holds and heel slides before moving on. It may feel too easy, but learning to brace while breathing calmly is the foundation for every harder exercise, and rushing past it is the most common reason people find planks and carries uncomfortable.
Frequently asked questions
What is an abdominal brace exercise?
It is any exercise where you tighten all the muscles around your waist at once and hold that tension while you breathe or move. The simplest version is a lying brace hold, and harder versions include planks, Pallof presses and carries.
How do I brace my core properly?
Imagine someone is about to poke you in the stomach and gently tighten your whole waist without sucking in or pushing out. Keep your ribs down and your spine neutral, and keep breathing while you hold the tension.
What is the difference between bracing and sucking in?
Sucking in, or hollowing, makes your waist smaller and mainly uses the deep abdominal muscles. Bracing keeps your waist the same size and tightens the front, sides and back together. Research suggests bracing gives more stability.
Should I hold my breath when I brace?
For everyday tasks and most exercises, no. Keep breathing through the brace. Some lifters hold a breath briefly for a single heavy rep, but avoid this if you have high blood pressure, heart problems or are pregnant.
How hard should I brace?
Usually much less than you think. A light brace of 10 to 25 percent effort suits most daily tasks. Use a firmer brace only for heavy lifts.
How long does it take to learn abdominal bracing?
Most people can feel the brace within a few sessions. Using it automatically during exercise and daily tasks usually takes 4 to 6 weeks of regular practice.
Can abdominal bracing help with back pain?
It can help you feel more stable during movement and is part of many back-friendly routines. It is not a cure, and some people with back pain brace too much. Staying active and getting persistent pain checked matter most.
Is the ab brace exercise safe after pregnancy?
Gentle bracing is often part of postnatal recovery, but it depends on your pelvic floor and whether you have abdominal separation. A pelvic health physiotherapist can tell you how and when to start.
Is a plank an abdominal bracing exercise?
Yes. A plank is a bracing exercise because you hold your trunk still against gravity. Brace first, then hold the position while breathing normally.
How often should I do abdominal bracing exercises?
Three or four short sessions a week is plenty. Once you have learned the skill, you can also practise a light brace during everyday tasks such as lifting bags or getting out of a chair.
Do abdominal bracing exercises give you a flat stomach?
Abdominal bracing exercises strengthen the muscles around your waist, but they do not burn fat from your stomach. A flatter stomach comes mostly from overall fat loss, with core strength as a supporting part.
What’s next?
Reading is the easy part. Pick one of these and do it today.