Frog Pumps: How to Do Them and Why They Hit Your Glutes
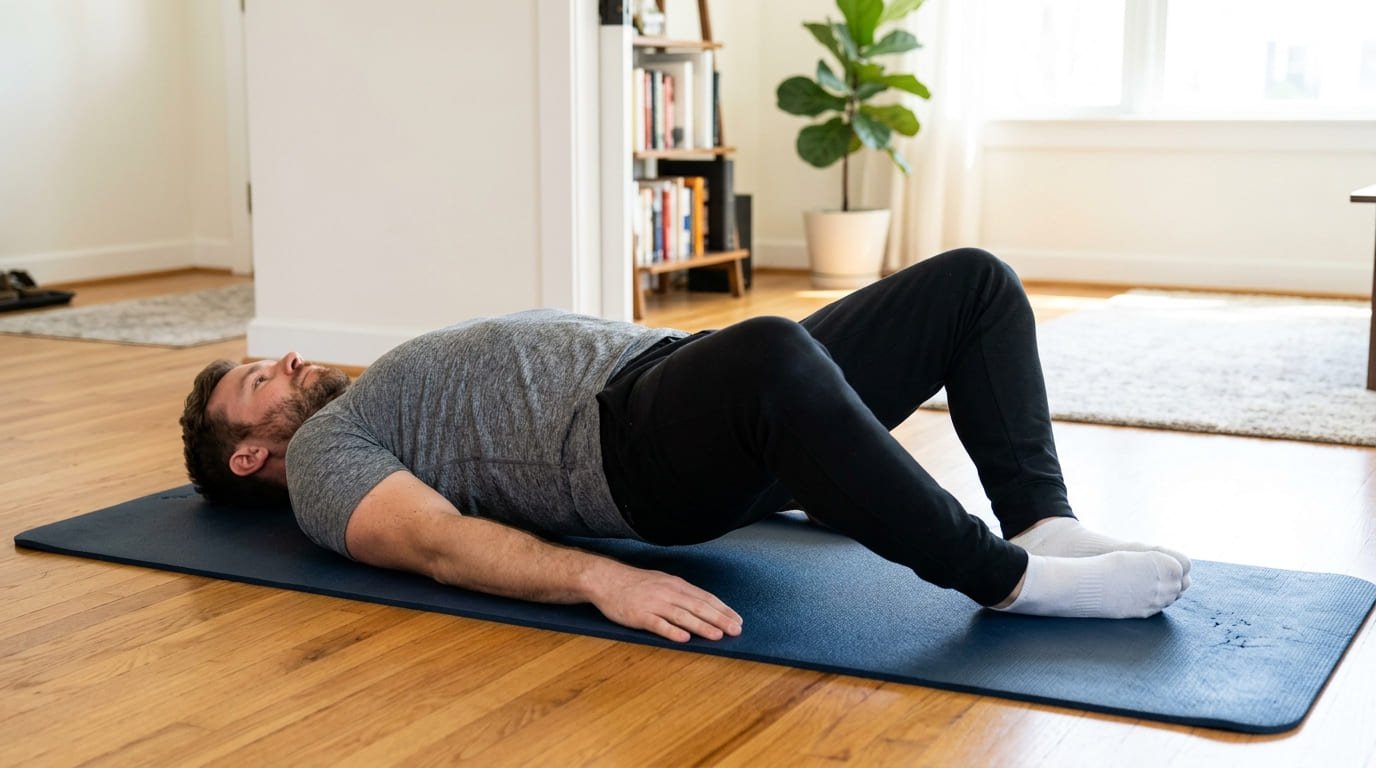
The frog pump looks slightly ridiculous. You lie on your back, press the soles of your feet together, let your knees fall open like a frog, and then pump your hips up and down. It is one of those exercises people do once in a class and quietly drop because they feel silly.
It deserves better than that, because the odd-looking position has a clear purpose. Bending the knees, turning the hips out and tilting the pelvis together take your hamstrings and lower back out of the movement, leaving your glutes to do almost all of the lifting. That makes frog pumps one of the most effective ways to feel your glutes working with no equipment at all, which is why they show up as a warm-up, a finisher and a home workout staple.
This guide explains the position properly, walks through the form step by step, gives you programming for activation and for growth, and shows how to keep progressing once bodyweight reps get easy. It also covers the people for whom the frog position simply does not suit their hips, and what they should do instead.
At a glance
- Frog pumps are a glute bridge with the soles together and the knees wide
- The position reduces hamstring and lower back involvement so the glutes do the work
- The range of motion is short. Height is not the goal, the squeeze at the top is
- Use them as a warm-up (2 x 15 to 20), a finisher (2 to 3 x 25 to 30) or a main exercise with load
- Progress with a band above the knees, a dumbbell on the hips, or a bench under the upper back
- If the frog position hurts your hips or knees, a standard glute bridge does the same job
Why the frog position targets your glutes
Your glutes extend the hip, which is the movement of pushing the hips up in any bridge. But they are not the only muscles that can do it. The hamstrings and the spinal erectors in your lower back can both help, and in a standard bridge they often help more than you want.
The frog position limits each helper in turn.
| Element of the position | What it changes | Why it helps the glutes |
|---|---|---|
| Knees bent with heels close to the hips | Shortens the hamstrings | A shortened hamstring cannot contribute much force, so the glutes take over |
| Soles together, knees falling outward | Turns the hips outward (external rotation) | The glutes are strong hip external rotators, so this puts them in a favourable position |
| Pelvis tucked under, lower back flat | Posterior pelvic tilt | Stops the lower back arching to fake extra height |
| Chin tucked toward the chest | Keeps the upper back rounded | Further discourages arching through the spine |
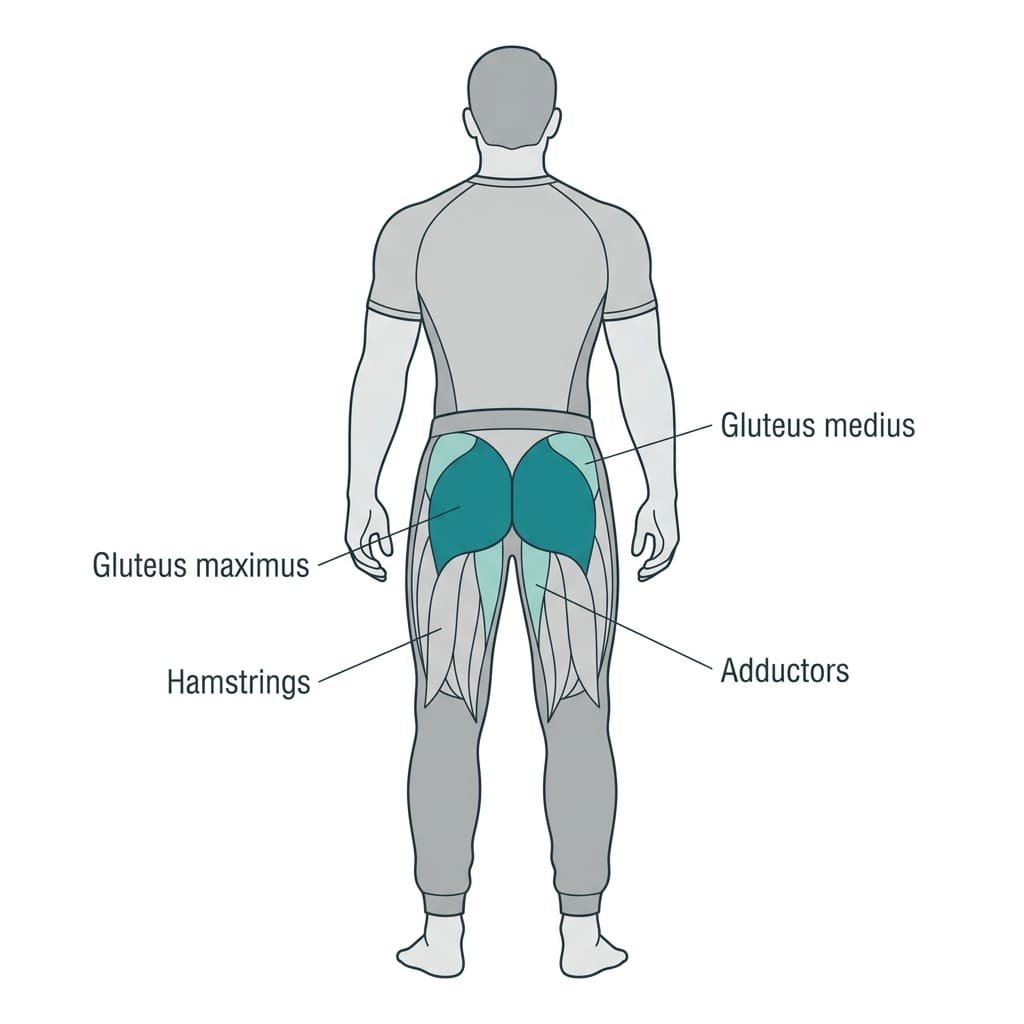
The combination is the point. Any one of those changes helps a little. Together they leave the gluteus maximus as the main muscle producing the lift, with the gluteus medius and minimus assisting.
The trade-off is range of motion. Because the pelvis is tucked and the spine is not allowed to arch, your hips will only rise a few inches. That is correct. If your hips are rising high, your lower back is almost certainly doing some of the work.
Muscles worked
| Muscle | Role in the frog pump | Emphasis |
|---|---|---|
| Gluteus maximus | Extends the hip, producing the lift | Primary |
| Gluteus medius and minimus | Assist with hip extension and rotation | Secondary |
| Adductors | Press the soles together and stabilise the legs | Secondary |
| Hamstrings | Assist slightly, deliberately limited by the knee bend | Minimal |
| Spinal erectors | Deliberately limited by the pelvic tuck | Minimal |
| Abdominals | Hold the pelvis in a tucked position | Stabilising |
Pressing the soles of your feet firmly together throughout gives the inner thighs a light job too, which keeps the knees steady and the movement controlled.
How to do frog pumps
- Lie on your back on a mat with your knees bent
- Bring the soles of your feet together and let your knees fall open to the sides
- Slide your heels toward your hips until they are roughly a foot away. The closer they are, the harder it gets
- Tuck your chin toward your chest and place your arms on the floor at your sides or bend the elbows and press them into the mat
- Tilt your pelvis under so your lower back presses flat into the floor
- Squeeze your glutes and push your hips up by driving the outer edges of your feet into the floor. Keep the soles pressed together
- Pause for one to two seconds at the top with the glutes squeezed hard
- Lower under control until your hips lightly touch the floor, then go again
What it should feel like: a strong squeeze in the middle and lower part of your glutes, possibly a mild stretch in the inner thighs, and very little in the lower back or the back of the thighs. If your hamstrings are cramping or your back is working, your setup needs adjusting.
The short range of motion catches people out. A frog pump done well looks like a small, controlled lift. Chasing height is the most common way to turn it back into a lower back exercise.
Three cues that fix most problems
1. Ribs down, pelvis tucked
Before each set, flatten your lower back into the mat and imagine pulling your pubic bone toward your belly button. Hold that tuck through every rep. If you lose it at the top, you have gone too high.
2. Push through the outside of the feet
Drive the outer edges of your feet into the floor while keeping the soles pressed together. It encourages the hips to stay turned out, which keeps the glutes in their best position.
3. Squeeze, do not bounce
The value of the exercise is in the contraction at the top. Fast, bouncing reps with no pause let momentum do the work. A one-second hold at the top roughly doubles how much you feel each rep.
Sets and reps by goal
Frog pumps are flexible. How you use them depends on what you want from them.
| Goal | Sets and reps | Rest | When to do it |
|---|---|---|---|
| Glute activation warm-up | 2 sets of 15 to 20 | 30 seconds | Before squats, deadlifts, hip thrusts or running |
| Glute finisher | 2 to 3 sets of 25 to 30, or as many as possible | 45 seconds | At the end of a lower body session |
| Main exercise, bodyweight | 3 sets of 20 to 30 with a 2-second hold | 60 seconds | In a home workout |
| Main exercise, loaded | 3 to 4 sets of 12 to 20 | 60 to 90 seconds | After compound lifts |
Frequency: two to three times a week. As a warm-up, they can be done before every lower body session.
A word on high reps. Frog pumps are often prescribed in sets of 50 or 100. That will certainly produce a burn, but for building muscle there is little reason to go far past 30 reps. Once you can do 30 clean reps with a pause, it is time to add load rather than more reps.
How to progress frog pumps
Bodyweight frog pumps become easy fairly quickly. These are the ways to keep them productive, in roughly the order to try them.
| Step | Progression | What it adds |
|---|---|---|
| 1 | Add a 2 to 3 second pause at the top | More time under tension at no cost |
| 2 | Bring the heels closer to the hips | Shortens the hamstrings further, increasing glute demand |
| 3 | Mini band just above the knees, pushing the knees out | Adds resistance to the hip rotation and the gluteus medius |
| 4 | Dumbbell or weight plate resting on the hips | Direct load on hip extension |
| 5 | Upper back on a bench or sofa (frog thrust) | Larger range of motion with the same position |
| 6 | Combine the band and the weight | The hardest version |
The frog thrust is the natural next step. With your shoulders on a bench or the edge of a sofa, the hips can travel further, which loads the glutes through a bigger range. The setup is the same as a hip thrust, but with the soles together and the knees open. Our hip thrusts at home guide covers how to set up safely on household furniture.
Loading tips: place a folded towel over your hip bones before resting a dumbbell or plate on them. Hold the weight with both hands so it cannot roll, and start light, around 5 to 10 kg, because the restricted position makes it harder than it looks.
Frog pump vs glute bridge vs hip thrust
| Feature | Frog pump | Glute bridge | Hip thrust |
|---|---|---|---|
| Foot position | Soles together, knees wide | Feet flat, hip width | Feet flat, hip width |
| Upper back | On the floor | On the floor | On a bench |
| Range of motion | Short | Moderate | Long |
| Hamstring involvement | Low | Moderate | Moderate |
| How heavily it can be loaded | Light to moderate | Moderate | Heavy |
| Best use | Activation, high-rep glute work, home training | All-round glute work, beginners | Heavy glute strength and size |
None of these is strictly better. The frog pump is the most glute-specific of the three at light loads. The hip thrust allows the heaviest loading and the biggest range. The glute bridge sits in the middle and suits almost everyone. Our glute bridge vs hip thrust comparison goes into those two in detail.
A sensible approach for most people is to use frog pumps as the warm-up or finisher and a bridge or hip thrust as the main loaded exercise.
A 15-minute glute routine with frog pumps
All you need is a mat and, if you have one, a mini band.
| Exercise | Sets and reps | Rest |
|---|---|---|
| Frog pump, bodyweight with a 2-second hold | 2 x 20 | 30 sec |
| Glute bridge | 3 x 15 | 45 sec |
| Clamshell | 2 x 15 per side | 30 sec |
| Fire hydrant | 2 x 12 per side | 30 sec |
| Single-leg glute bridge | 3 x 10 per side | 45 sec |
| Frog pump finisher, as many as possible in 45 seconds | 2 rounds | 45 sec |
The clamshell and fire hydrant train the side of the hip that frog pumps only touch lightly. Our clamshell exercise and fire hydrant exercise guides explain the form for each.
Who frog pumps suit, and who should skip them
The frog position asks for a fair amount of hip external rotation and a comfortable inner thigh stretch. Most people have enough. Some do not, and forcing it is not worth it.
| Situation | Recommendation |
|---|---|
| New to glute training | Excellent, one of the easiest ways to feel the glutes working |
| Training at home with no equipment | Excellent |
| Lower back discomfort in regular bridges | Often helpful, because the tuck takes the lower back out |
| Tight hips, knees will not open comfortably | Bring the feet further from the hips, or use a standard bridge |
| Pain at the front of the hip or in the groin | Switch to a standard glute bridge |
| Knee pain in the frog position | Switch to a standard glute bridge |
| Pregnant, especially after the first trimester | Check with your midwife or doctor about lying flat on your back |
If the position is uncomfortable, you are not missing much by skipping it. A standard glute bridge with a deliberate pelvic tuck and a pause at the top trains the same muscles very effectively.
Five variations worth knowing
| Variation | Setup | Why use it |
|---|---|---|
| Frog pump with a hold | Pause 3 to 5 seconds at the top of every rep | Builds the mind-muscle connection, no equipment needed |
| Isometric frog hold | Hold the top position for 20 to 45 seconds | A good finisher, and useful if reps irritate anything |
| Banded frog pump | Mini band just above the knees, push the knees out against it | Adds work for the gluteus medius |
| Weighted frog pump | Dumbbell or plate on the hips over a folded towel | Direct load for growth |
| Frog thrust | Upper back on a bench or sofa edge | Larger range of motion, accepts more load |
Pairing variations works well. A set of weighted frog pumps followed immediately by an isometric hold at the top, with the weight removed, is a short and very effective finisher.
What to expect over 8 weeks
| Weeks | What to do | What you will usually notice |
|---|---|---|
| Weeks 1 to 2 | Bodyweight, 2 to 3 sets of 15 to 20 with a pause | You can feel your glutes working on command |
| Weeks 3 to 4 | Add the band or bring the heels closer | The top squeeze feels stronger, less lower back involvement |
| Weeks 5 to 6 | Add a light dumbbell, 3 x 15 | Clear progress in load and control |
| Weeks 7 to 8 | Move to frog thrusts or heavier weight | Glutes noticeably stronger in bridges and hip thrusts |
Visible changes in glute size take longer than eight weeks and depend on your overall training, protein intake and calories. Frog pumps contribute to that, but they work best alongside heavier lower body exercises rather than on their own.
Seven common mistakes
- Arching the lower back to get higher. The frog pump has a short range on purpose. Stop where the tuck holds
- Letting the soles separate. The pressed-together feet are what keep the hips turned out
- Placing the heels too far from the hips, which lets the hamstrings help more
- Bouncing out of the bottom with no pause at the top
- Lifting the head and arching the neck. Keep the chin tucked
- Doing 100 reps forever instead of adding a band or weight once 30 feels easy
- Forcing the knees open when the hips clearly do not allow it
Using frog pumps as a warm-up
Frog pumps are one of the most popular glute activation exercises, and they work well in that role. Before a lower body session, two sets of 15 to 20 reps with a pause at the top take a couple of minutes and get the glutes contracting before you load them.
Pair them with a few other short drills for a complete warm-up.
- Cat cow: 8 slow reps
- Frog pumps: 2 x 15 with a 1-second pause
- Bodyweight squats: 10 reps
- Walking lunges: 6 per leg
- One light set of your first main exercise
Whether “activation” makes your main lifts stronger is still debated, and the evidence is mixed. What is clear is that a short, specific warm-up helps you feel the right muscles working and prepares the hips to move, which is reason enough to include it.
The bottom line
Frog pumps look odd for a reason. Bending the knees, pressing the soles together and tucking the pelvis together take the hamstrings and lower back out of the lift, so your glutes do most of the work. That makes them one of the easiest ways to train and feel your glutes with no equipment.
Keep the range short and the squeeze long. Use them as a warm-up, a finisher, or a main exercise in a home workout, and stop adding reps at around 30. From there, add a pause, a band, then a weight, and eventually move to the frog thrust with your shoulders on a bench.
And if the frog position does not suit your hips, swap it for a standard glute bridge. The goal is strong glutes, not a particular position.
Frequently asked questions
What muscles do frog pumps work?
Mainly the gluteus maximus, with the gluteus medius, gluteus minimus and inner thigh muscles assisting. The bent knees, turned-out hips and tucked pelvis deliberately reduce the contribution of the hamstrings and lower back, which is why frog pumps are known as a glute-focused exercise.
How many frog pumps should I do?
For a warm-up, 2 sets of 15 to 20. As a finisher, 2 to 3 sets of 25 to 30. As a main exercise, 3 sets of 20 to 30 with a pause at the top. Once you can do 30 clean reps with a pause, add a band or a weight rather than doing more reps.
Are frog pumps better than glute bridges?
They are more glute-specific at light loads because the position limits the hamstrings and lower back. Glute bridges allow a larger range and more load, and hip thrusts allow even more. Most people benefit from using frog pumps for warm-ups or finishers and bridges or hip thrusts as the main loaded exercise.
Why do my hips only go up a little in frog pumps?
That is correct form. With the pelvis tucked and the lower back flat, the range of motion is naturally short. If your hips rise high, your lower back is probably arching to create extra height, which shifts the work away from your glutes.
Can frog pumps grow your glutes?
Yes, as part of a progressive programme. Bodyweight frog pumps are a good starting point, but muscle growth needs progressive overload, so add a pause, then a band above the knees, then a dumbbell on the hips. Combining them with heavier exercises such as hip thrusts or squats gives the best results.
Why do I feel frog pumps in my lower back?
Usually because you are arching your back to lift higher. Flatten your lower back into the floor before each set, tuck your pelvis under, keep your chin tucked and only lift as high as you can while holding that tuck. If it still hurts, switch to a standard glute bridge.
Should frog pumps be done before or after a workout?
Either. Before a lower body session, 2 sets of 15 to 20 serve as a glute warm-up. After a session, 2 to 3 high-rep sets work as a finisher. In a home workout with no equipment, they can also be one of the main exercises.
What if I cannot get my knees to open in the frog position?
Move your feet further away from your hips, which reduces the stretch, or simply use a standard glute bridge. Do not force the knees open. If you feel pain at the front of the hip, in the groin or in the knees, the frog position is not right for you, and a regular bridge works the same muscles.
What’s next?
Reading is the easy part. Pick one of these and do it today.