Plyometric Workout for Beginners: 12 Exercises and a 6-Week Plan
Plyometrics is jump training. It is how athletes build the spring that lets them leap, sprint and change direction, and it is one of the few kinds of exercise that trains your body to produce force quickly instead of just producing a lot of it.
It also has a reputation for being hard on the joints, and that reputation is earned when people do it badly. When I first tried a plyometric routine I found online, it called for a hundred and fifty jumps. I did them all, landed like a sack of potatoes on most, and could barely walk down stairs for three days.
Done properly, plyometrics is the opposite of that. It means a small number of high-quality jumps, soft landings and plenty of rest. This guide explains how it works, how to tell whether you are ready, how to land, twelve exercises from easiest to hardest, and a six-week plan.
At a glance
- Plyometrics are quick, explosive movements such as jumps, hops and bounds
- They train your muscles and tendons to store and release energy, which improves jump height, speed and power
- Learn to land before you learn to jump. Soft, quiet landings protect your joints
- Quality beats quantity. Beginners need only 40 to 80 jumps per session
- Rest fully between sets and train two days a week, never on consecutive days
- Build a base of strength first. You should be able to do 15 controlled bodyweight squats
- Skip high-impact jumps if you have joint pain or are significantly overweight, and use the low-impact versions
What a plyometric workout is
A plyometric exercise is any movement where a muscle is stretched quickly and then immediately shortens with force. A jump is the clearest example. You dip down, and then you spring up.
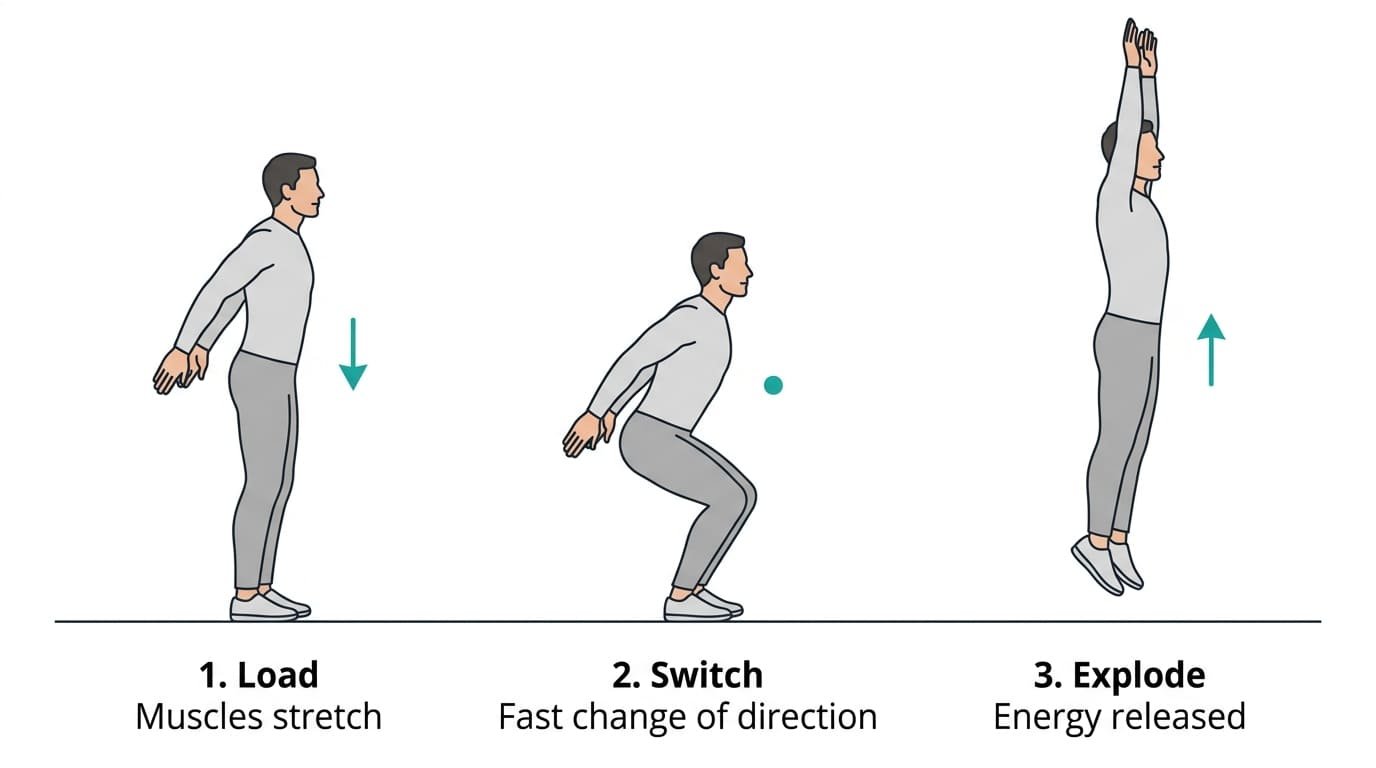
Sports scientists describe this as the stretch-shortening cycle, and it has three phases.
| Phase | What happens | In a jump |
|---|---|---|
| 1. Loading (eccentric) | The muscle lengthens under tension and the tendon stretches, storing elastic energy | The quick dip down |
| 2. Transition (amortisation) | The brief moment between going down and going up | The instant at the bottom |
| 3. Take-off (concentric) | The muscle shortens and the stored energy is released | The explosive push off the ground |
The key is the second phase. The shorter it is, the more of the stored energy you get back. If you pause at the bottom, that energy is lost as heat and the jump is powered by muscle alone. This is why plyometric exercises are done quickly, with a fast change of direction, and why they stop being useful when you are tired and slow.
Plyometrics is not the same as cardio or high-intensity intervals, even though all of them can involve jumping. In a conditioning circuit the aim is to keep moving while tired. In plyometrics the aim is maximum quality on every single rep, with long rests so you stay fresh.
Benefits of plyometric training
- A higher jump. A review that pooled 26 studies found plyometric training improved vertical jump height by roughly 5 to 9 percent, depending on the type of jump tested
- More power. Power is force produced quickly. It is what you use to sprint, climb stairs two at a time or catch yourself when you trip
- Faster running and quicker changes of direction
- Stronger tendons and bones. Both respond to impact by becoming more robust
- Better landing mechanics, which may lower the risk of knee injuries in sport
- It protects a quality that fades with age. Power declines faster than strength as we get older, and it is closely tied to staying independent
- Short sessions. A full workout takes 15 to 25 minutes
Are you ready for plyometrics?
You do not need to be an athlete, but you do need a base.
| Check | Standard | If you cannot yet |
|---|---|---|
| Bodyweight squats | 15 slow, controlled reps with knees tracking over toes | Build up with our beginner leg workout |
| Single-leg balance | 30 seconds on each leg without wobbling | Practise daily |
| Calf raises | 20 reps on two legs | Add them to your routine |
| Step-down from a low step | Controlled, knee not caving in | Practise slow step-downs |
| Pain | No current knee, ankle, hip or back pain | Use the low-impact options below and get advice |
Take extra care or get advice first if you:
- Are significantly overweight. Every landing loads your joints with several times your body weight. Start with the low-impact versions and build strength first
- Have had a recent lower-limb injury or surgery
- Have osteoporosis, arthritis in the knees or hips, or pelvic floor problems
- Are pregnant
- Are over 60 and new to exercise. Plyometrics can be very valuable at this age, but begin with the gentlest drills
Learn to land first
Most plyometric injuries happen on the way down. Spend your first week on landing alone.
A good landing looks and sounds like this:
- It is quiet. If you can hear a thud, you are landing too hard
- You land on the balls of your feet and roll back to flat, not on your heels and not on your toes alone
- Your ankles, knees and hips all bend together to absorb the force
- Your knees stay in line with your toes. They do not collapse inwards
- Your hips move back, as in a squat, and your chest stays lifted
- You finish balanced, able to hold the position for two seconds
The snap-down drill
- Stand tall on your toes with your arms overhead
- Drop quickly into a quarter-squat, swinging your arms down and back
- Land flat-footed, hips back, knees over toes, and freeze for two seconds
- Stand up and reset
Do 3 sets of 5. When every landing is silent and steady, move on.
Where to train: a surface with a little give is ideal, such as a rubber gym floor, a sprung wooden floor, firm grass or a thin mat on a solid floor. Avoid bare concrete and very soft surfaces such as thick foam or sand, which slow the rebound. Wear trainers with reasonable cushioning and good grip.
12 plyometric exercises, from easiest to hardest
Do every rep with full intent, then stop. If your landings get noisy or your jumps get lower, the set is over.
1. Pogo hops
Level: beginner. The foundation for everything else.
- Stand tall with your feet hip-width apart and your hands on your hips
- Keeping your knees almost straight, bounce on the balls of your feet using your ankles
- Stay tall and make each contact with the ground as brief as you can
- Aim for quick, low, springy hops, like skipping without a rope
Sets and reps: 3 sets of 10 to 15.
2. Skipping with a rope
Level: beginner. A simple way to accumulate light, rhythmic contacts. Keep the jumps low, land softly and turn the rope with your wrists.
Sets and reps: 3 sets of 20 to 30 seconds.
3. Squat jump
Level: beginner.
- Stand with your feet shoulder-width apart
- Dip quickly into a quarter- to half-squat, swinging your arms back
- Jump straight up as high as you can, swinging your arms forward and up
- Land softly in the same squat position and hold it for a second
- Stand up, reset, and repeat
Sets and reps: 3 sets of 5.
Our jump squats guide covers this exercise in detail.
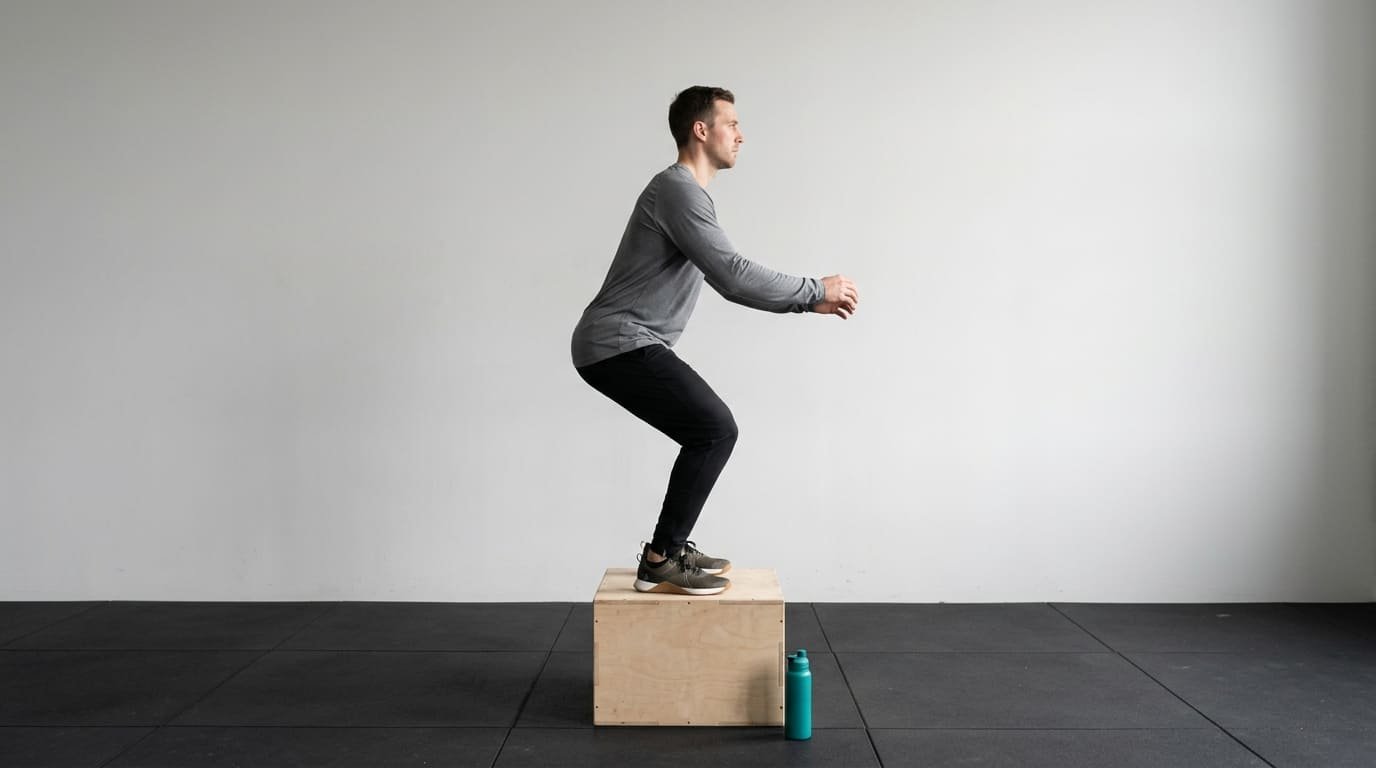
4. Box jump
Level: beginner. Landing on a raised surface reduces the impact, because you do not fall as far.
- Stand about half a step from a sturdy box or step, 20 to 40 cm high
- Dip, swing your arms and jump onto the box
- Land with both feet fully on the top, in a soft quarter-squat
- Stand tall, then step down one foot at a time. Do not jump down
Sets and reps: 3 sets of 5.
Form cue: choose a height you can land on with your hips above your knees. If you have to tuck your knees to your chest to make it, the box is too high. A higher box does not mean a higher jump.
5. Broad jump
Level: beginner to intermediate. This trains horizontal power.
- Stand with your feet hip-width apart
- Swing your arms back as you dip, then jump forward as far as you can
- Land on both feet with your hips back and knees bent
- Hold the landing for two seconds without stepping forward
- Walk back and reset
Sets and reps: 3 sets of 4.
6. Lateral bound
Level: intermediate. Also called a skater jump.
- Stand on your right leg with the knee slightly bent
- Push off sideways and land softly on your left leg
- Hold the landing for two seconds, hips level and knee over toes
- Bound back to the right
Sets and reps: 3 sets of 4 per side.
Side-to-side power is missing from most routines. Our speed and agility exercises guide has more drills of this kind.
7. Split jump
Level: intermediate.
- Start in a lunge position, front knee over the ankle
- Jump straight up and switch your legs in the air
- Land softly in a lunge with the other leg forward
- Pause, then repeat
Sets and reps: 3 sets of 4 per side.
Easier version: jump and land with the same leg forward, then switch after the set.
8. Tuck jump
Level: intermediate.
- Stand with your feet hip-width apart
- Jump as high as you can and pull your knees up toward your chest
- Extend your legs and land softly
- Reset fully before the next rep
Sets and reps: 3 sets of 4.
9. Single-leg hop
Level: intermediate.
- Stand on one leg
- Hop forward a short distance and land on the same leg
- Hold the landing for two seconds, knee in line with toes
- Repeat for the set, then switch legs
Sets and reps: 2 sets of 4 per leg. Keep the hops short. Control matters more than distance.
10. Depth drop
Level: intermediate. This teaches you to absorb force, which prepares you for the depth jump.
- Stand on a low box or step, 20 to 30 cm high
- Step off, do not jump, and drop to the floor
- Land on both feet at once, quietly, in a quarter-squat
- Freeze for two seconds
Sets and reps: 3 sets of 4.
11. Depth jump
Level: advanced. The classic plyometric exercise, and the most demanding. Leave it until you have done at least six weeks of the easier jumps.
- Step off a 20 to 30 cm box
- Land on both feet and immediately jump straight up as high as possible
- Spend as little time on the ground as you can
- Land softly from the second jump and reset
Sets and reps: 3 sets of 3.
12. Plyometric push-up
Level: intermediate. Plyometrics for the upper body.
- Place your hands on a sturdy bench or counter in a push-up position
- Lower your chest toward the surface
- Push up hard enough that your hands leave the surface briefly
- Land with soft elbows and go straight into the next rep
Sets and reps: 3 sets of 5.
Progress to the floor, from your knees and then your toes, when the incline version feels easy. Throwing a medicine ball against a wall or slamming it to the floor is another good upper-body option. See our medicine ball workouts.
Low-impact options
If jumping is not right for you at the moment, these train the same quick, powerful movement with little or no landing.
| Instead of | Do this |
|---|---|
| Squat jump | Fast squat to tiptoes: squat down, drive up quickly onto your toes without leaving the floor |
| Box jump | Fast step-up: drive up onto a step as quickly as you can, step down slowly |
| Lateral bound | Quick side step with a pause on one leg |
| Tuck jump | Fast high-knee march |
| Broad jump | Kettlebell or dumbbell swing |
| Plyometric push-up | Medicine ball chest pass against a wall |
Our low-impact workout for beginners has a full routine.
How many jumps? Sets, reps and rest
Plyometric volume is counted in ground contacts, meaning the number of times your feet land. A two-footed jump counts as one. A hop on one leg also counts as one, but is more demanding.
| Level | Contacts per session | Sessions per week |
|---|---|---|
| Beginner | 40 to 80 | 2 |
| Intermediate | 80 to 120 | 2 to 3 |
| Advanced | 120 to 140 | 2 to 3 |
| Variable | Guideline |
|---|---|
| Reps per set | 3 to 6 for jumps, 10 to 15 for pogo hops |
| Rest between sets | 60 to 120 seconds, until you feel fully fresh |
| Rest between sessions | At least 48 hours |
| Effort | Maximum intent on every rep |
| When in the session | First, after the warm-up, before strength work or cardio |
| When to stop | When jump height drops or landings get loud |
The rest periods will feel too long. They are correct. You are training speed and quality, and neither survives fatigue.
Warm-up
- Three minutes of brisk walking, easy jogging or skipping
- 10 bodyweight squats
- 10 walking lunges
- 10 leg swings each leg, forward and sideways
- 15 calf raises
- 2 sets of 10 pogo hops
- 5 snap-downs
Our workout warm-up guide has more.
The 6-week beginner plyometric plan
Train two days a week with at least two days between sessions, for example Monday and Thursday. Rest 60 to 90 seconds between sets.
Weeks 1 and 2: landing and rhythm (about 45 contacts)
| Exercise | Sets | Reps |
|---|---|---|
| Snap-down | 3 | 5 |
| Pogo hops | 3 | 10 |
| Squat jump, hold each landing for 2 seconds | 3 | 4 |
| Box jump onto a low step, step down | 2 | 4 |
Weeks 3 and 4: add distance and direction (about 60 contacts)
| Exercise | Sets | Reps |
|---|---|---|
| Pogo hops | 3 | 12 |
| Squat jump | 3 | 5 |
| Box jump | 3 | 5 |
| Broad jump, hold the landing | 3 | 3 |
| Lateral bound, hold the landing | 2 | 3 per side |
Weeks 5 and 6: more power (about 75 contacts)
| Exercise | Sets | Reps |
|---|---|---|
| Pogo hops | 3 | 15 |
| Box jump, slightly higher | 3 | 5 |
| Broad jump | 3 | 4 |
| Lateral bound | 3 | 4 per side |
| Split jump, or tuck jump | 2 | 4 per side, or 4 |
| Depth drop from a low step | 2 | 4 |
After six weeks, test your jump again, take an easier week, and then repeat weeks five and six with one extra set on two of the exercises, or introduce depth jumps.
Plyometrics for your vertical jump
If jumping higher is your main goal, three things matter.
- Get stronger. Jump height depends on how much force you can put into the ground. Squats, split squats, deadlifts and calf raises build that. Combining strength training with plyometrics works better than either alone
- Practise jumping at full effort. Squat jumps, box jumps and, later, depth jumps, with complete rest between sets
- Learn the arm swing. Swinging your arms back as you dip and driving them up as you take off adds noticeably to your height
How to test your vertical jump at home:
- Stand side-on to a wall and reach up as high as you can with one hand, feet flat. Mark the spot with chalk or a piece of tape
- Step slightly away, then jump and touch the wall at the highest point you can
- Mark that spot
- Measure the distance between the two marks
Take the best of three attempts and retest every six weeks, at the same time of day and after the same warm-up.
Fitting plyometrics into your week
| Your routine | Where plyometrics go |
|---|---|
| Full body, three days | At the start of two sessions, 10 to 15 minutes each |
| Upper lower, four days | At the start of both lower-body days |
| Running or team sport | On non-consecutive days, not the day before a hard run or match |
| Home workouts | As a separate 20-minute session twice a week |
Always do them fresh, at the beginning of a session. Our 3-day workout split and sprint workouts for beginners guides pair well with this plan.
Common mistakes
- Doing too many reps. A hundred tired jumps train endurance and bad habits, not power
- Resting too little between sets
- Landing loudly with stiff legs
- Letting the knees cave inwards on take-off or landing
- Using a box that is too high and jumping back down from it
- Doing plyometrics at the end of a workout when you are already tired
- Training on consecutive days
- Skipping the strength base and going straight to advanced jumps
- Jumping on concrete in thin shoes
The bottom line
Plyometrics trains the spring in your legs. It makes you jump higher, move faster and absorb impact better, and it takes very little time.
The rules are simple. Learn to land quietly before anything else. Keep the numbers low, rest until you are fresh, and give every jump full effort. Train twice a week at the start of a session, and build strength alongside it.
Start with snap-downs, pogo hops, squat jumps and low box jumps. Six weeks of that, done well, is enough to see and feel a difference.
For a lighter way to build bounce and calf strength, try my jump rope workout for beginners. It makes a great warm-up before plyometrics.
For a single-leg plyometric move, see my guide to jump lunges, including how to land softly and how many to do.
Frequently asked questions
What is a plyometric workout?
It is a session of quick, explosive movements such as jumps, hops and bounds. These use a fast stretch of the muscle followed immediately by a powerful contraction, which trains your body to produce force quickly. A session is short, with few reps and long rests.
Are plyometrics good for beginners?
Yes, if you start with low-intensity drills. Beginners should learn to land softly first, then use pogo hops, squat jumps and low box jumps. You should be able to do 15 controlled bodyweight squats and have no current joint pain before starting.
How often should I do plyometric workouts?
Two days a week is right for beginners, with at least 48 hours between sessions. Intermediate trainees can do three. The muscles, tendons and joints need time to recover from impact, so never do plyometrics on consecutive days.
Do plyometrics increase vertical jump?
Yes. A review of 26 studies found plyometric training increased vertical jump height by roughly 5 to 9 percent. Results are best when plyometrics are combined with strength training for the legs and practised at full effort with complete rest.
How many jumps should a beginner do in a plyometric workout?
About 40 to 80 ground contacts per session, split into sets of 3 to 6 jumps. That might be four exercises of three sets each. Stop a set when your jumps get lower or your landings get louder.
Are plyometrics bad for your knees?
Not when they are done properly on healthy knees. Soft landings, low volumes, suitable surfaces and gradual progression keep the stress manageable, and tendons and bones adapt by getting stronger. If you have knee pain or arthritis, use low-impact versions and get advice.
Can I do plyometrics at home without equipment?
Yes. Pogo hops, squat jumps, broad jumps, lateral bounds, split jumps and tuck jumps need no equipment. A sturdy low step is useful for box jumps and depth drops. Train on a floor with a little give and wear cushioned trainers.
Should I do plyometrics before or after weights?
Before. Plyometrics depend on speed and quality, and both drop when you are tired. Do them straight after your warm-up, then move on to strength training. Doing them at the end of a session increases injury risk and reduces the benefit.
What’s next?
Reading is the easy part. Pick one of these and do it today.