Crows Nest Exercise: How to Do Crow Pose Step by Step for Beginners
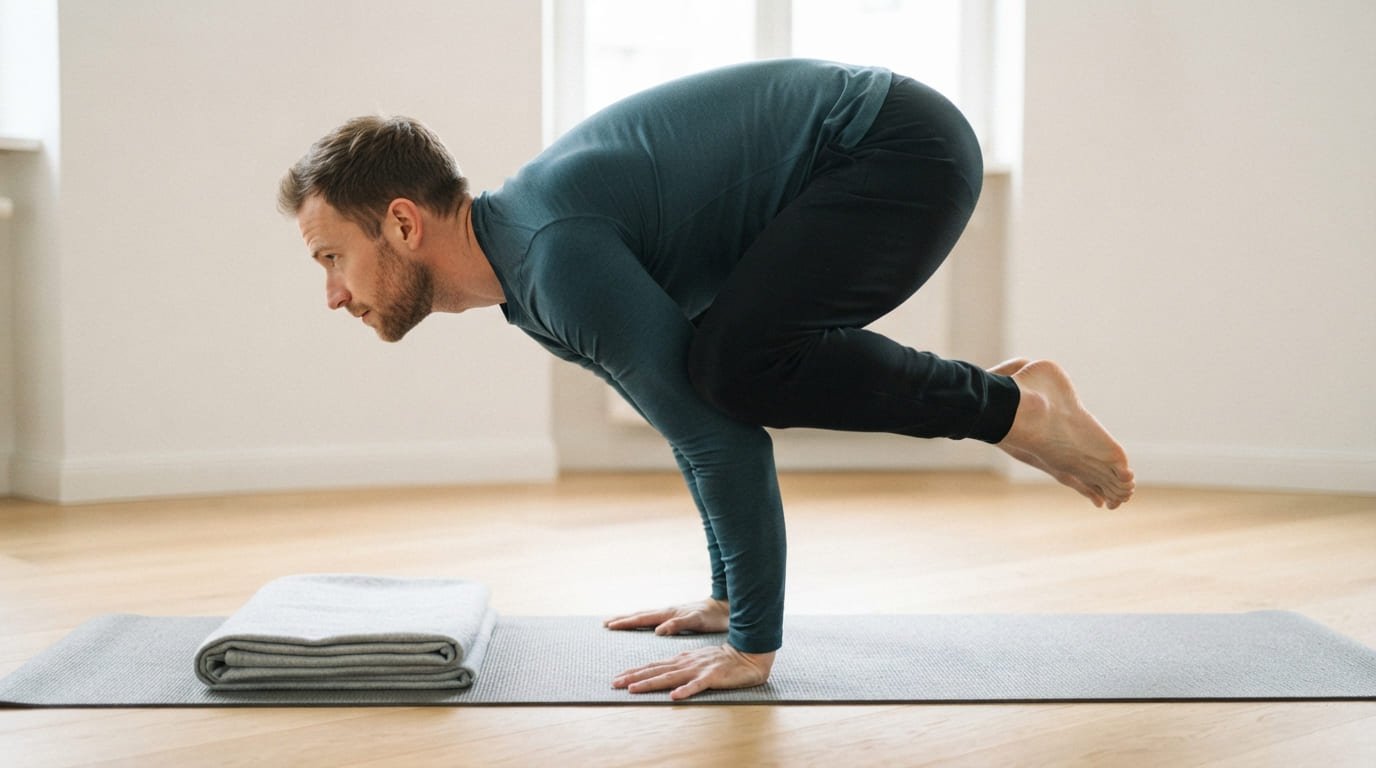
If you searched for the crows nest exercise, you are not alone. It is a popular search, but “crow’s nest” is not the standard name of any one exercise in yoga, calisthenics or physiotherapy. When people look it up, the move they almost always end up learning is crow pose: the arm balance where you squat down, rest your knees on the backs of your arms and tip forward until your feet lift off the floor.
I want to be upfront about that, because I would rather tell you what I found than pretend there is an official crows nest exercise with its own rulebook. Crow pose, also called the crow stand, Bakasana in yoga and the frog stand in calisthenics, is a fantastic skill for beginners. It builds wrist, shoulder and core strength, teaches balance, and gives you a real sense of achievement the first time your feet leave the floor.
This guide shows you how to do crow pose step by step, 6 drills that prepare your body, easier versions for complete beginners, a 4-week plan and the safety points that protect your wrists and face.
At a glance
- “Crows nest exercise” usually refers to crow pose, an arm balance also called the crow stand or frog stand
- You balance on your hands with your knees resting on the backs of your upper arms
- It builds wrist, shoulder, arm and core strength, plus balance and body control
- The two keys are leaning forward far enough and pulling your knees in tight
- Warm up your wrists first and place a cushion in front of your face
- Most beginners can hold it for a few seconds within 2 to 6 weeks of regular practice
- A large review found yoga to be about as safe as other exercise, but arm balances still need care
What is crow pose?
Crow pose is an arm balance. You start in a deep squat, place your hands flat on the floor, bend your elbows slightly, rest your knees high on the backs of your upper arms and then shift your weight forward until your feet float. Your body looks a little like a bird perched on a branch, which is where the name comes from.
| Name | Where you will hear it | Arm position |
|---|---|---|
| Crow pose | Yoga classes | Elbows slightly bent, knees on the backs of the upper arms |
| Crane pose | Yoga, as a harder version | Arms straighter, knees higher toward the armpits |
| Crow stand | General fitness | Same as crow pose |
| Frog stand | Calisthenics and gymnastics | Knees often resting on the outsides of the elbows, elbows bent more |
| Crows nest exercise | Search engines | Usually refers to crow pose |
Whichever name you use, the technique and the benefits are very similar. In this guide I will call it crow pose, the most common name.
Benefits of crow pose
- Stronger wrists, forearms and shoulders. You hold your bodyweight on your hands
- Core strength. Your abs work hard to keep your knees pulled in and your hips lifted
- Balance and body awareness. You learn to control tiny shifts in weight
- Confidence. Arm balances look impressive and feel great to achieve
- A gateway skill. Crow pose is the foundation for many harder calisthenics and yoga balances
Is crow pose safe?
For most healthy adults, yes, with sensible preparation. A large review of 94 randomised trials of yoga, with over 8,000 participants, found yoga was about as safe as usual care and other exercise in terms of serious side effects.
That said, crow pose puts real load on the wrists and has a small risk of tipping forward onto your face. Skip it, or get advice first, if you have:
- Wrist pain, carpal tunnel syndrome or a recent wrist, elbow or shoulder injury
- High blood pressure that is not well controlled, glaucoma or other eye pressure problems, since your head is lowered
- Pregnancy, because of the pressure on the abdomen and the risk of falling
- Dizziness or balance problems
6 prep drills before your first crow pose
1. Wrist warm-up
On all fours, circle your wrists 10 times each way. Then gently rock forward and back over your hands with palms flat. Finally, turn your hands so your fingers point toward your knees and gently lean back. About 60 seconds in total. Never skip this. Our guide to the forearm workout at home has more wrist exercises.
2. Deep squat hold (garland pose)
Squat down with feet a little wider than hip-width and heels on the floor if you can. Press your elbows against the insides of your knees and hold for 30 to 60 seconds. This is the starting shape for crow pose. If your heels lift, place a folded towel under them.
3. Plank hold
Hold a high plank with straight arms for 20 to 40 seconds. It builds the shoulder and core strength you need to support your bodyweight. Our beginner core workout covers planks in more detail.
4. Knee-to-elbow plank
From a high plank, bring one knee toward the same-side elbow, squeezing your abs. Return and switch. Do 8 per side. This trains the exact core action of pulling your knees high and tight in crow pose.
5. Crow lean with toes down
Set up in the crow pose shape with your knees on your arms, but keep both toes on the floor. Simply lean forward, shifting weight into your hands, and hold for 5 to 10 seconds. Learning how far forward you need to lean is the biggest breakthrough for most beginners.
6. Feet on a block
Place your feet on a yoga block, a low step or a thick book. Starting higher makes it much easier to get your knees high on your arms and lift your feet.
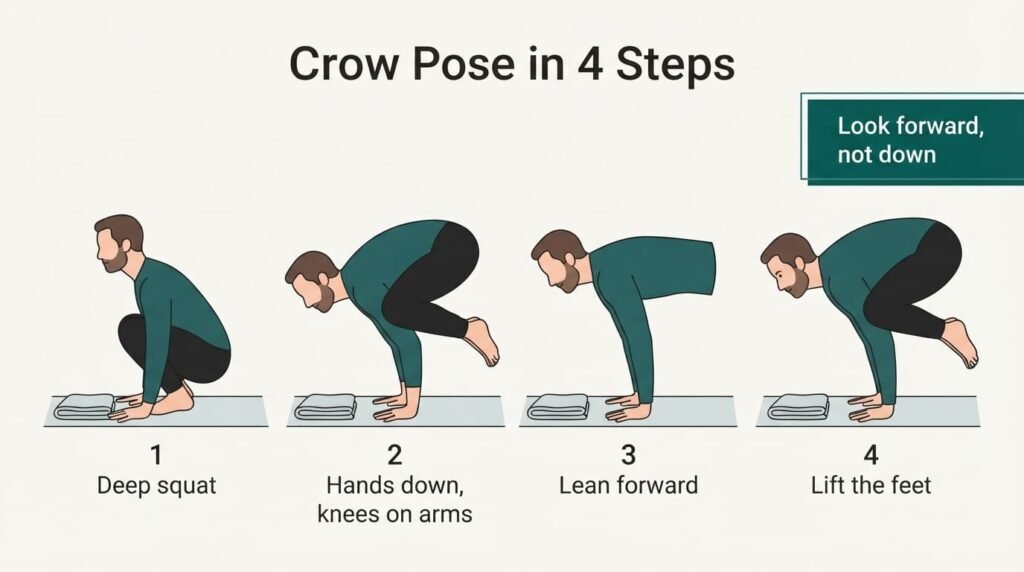
How to do crow pose step by step
- Place a cushion or folded blanket on the floor in front of where your face will be
- Squat down with feet together or slightly apart, up on the balls of your feet
- Place your hands flat on the floor, shoulder-width apart, fingers spread wide, about a foot in front of your feet
- Bend your elbows slightly backward, like the start of a push-up
- Lift your hips and place your knees as high as you can on the backs of your upper arms, near the armpits
- Look forward at the floor a little in front of your hands, not at your feet
- Lean your weight forward into your hands until your toes feel light
- Lift one foot, then the other, drawing your heels toward your buttocks
- Squeeze your knees into your arms and pull your belly in. Breathe
- Hold for a few seconds, then lower your feet slowly back down
When you start, a crows nest exercise attempt might last only one second. That is a win. The time will grow quickly with practice.
The cues that make it work
- Lean further than feels natural. Most people do not lean far enough. The cushion is there so you can trust it
- Look forward, not down. Looking at your feet pulls your weight backward
- Spread your fingers and grip the floor. Your fingertips make tiny balance corrections
- Knees high, heels to bottom. The tighter and higher you tuck, the lighter you feel
- Round your upper back slightly. Pushing the floor away helps keep you lifted
Easier versions for complete beginners
| Version | How it helps |
|---|---|
| Toes-down crow lean | Teaches the lean without lifting |
| Feet on a block | Higher start makes the knee position easier |
| One foot at a time | Builds confidence before both feet lift |
| Supported crow | Rest your forehead lightly on a block or cushion, creating a tripod |
| Frog stand with elbows more bent | Knees rest on the outsides of the elbows, a more stable shelf for some people |
Pick the version that lets you hold the shape for 5 seconds with good form, and move on when that feels easy. There is no shame in staying on an easier version for a few weeks. Every lean and every short hold is building the wrist, shoulder and core strength that makes the full pose possible, and rushing ahead usually just means more wobbling and sore wrists.
A 4-week plan for crow pose for beginners
Practise 3 or 4 times a week. Each session takes about 10 minutes.
| Week | Practice | Goal |
|---|---|---|
| 1 | Wrist warm-up, deep squat hold 2 x 30 seconds, plank 3 x 20 seconds, crow lean 5 x 5 seconds | Get comfortable with the lean |
| 2 | Add knee-to-elbow plank 2 x 8 per side, crow lean with feet on a block 5 x 10 seconds | Lift one foot at a time |
| 3 | Crow attempts with feet on a block, 5 to 8 tries | Lift both feet for 2 to 3 seconds |
| 4 | Crow attempts from the floor, 5 to 8 tries, plus prep drills | Hold for 5 seconds or more |
Some people get their first lift in a week. Others take a couple of months. Both are completely normal. Strength, wrist mobility and body weight distribution all play a part.
Crow pose in yoga vs calisthenics
The crows nest exercise people search for shows up in two worlds: yoga studios and calisthenics parks. The basic shape is the same, but the style and goals differ a little.
| Point | Yoga crow pose | Calisthenics frog stand |
|---|---|---|
| Main goal | Balance, focus and breath | Strength and progression to harder skills |
| Arm position | Elbows slightly bent, knees high on the upper arms | Elbows more bent, knees often on the outsides of the elbows |
| Typical hold | Several slow breaths | Timed holds, often building to 30 to 60 seconds |
| Next steps | Crane pose, side crow, headstand variations | Tuck planche, handstand work |
Either approach works for beginners. Choose the one that matches how you like to train.
Strength exercises that help you balance longer
If you can lift your feet but cannot hold the pose, more strength usually helps. Add these to your workouts two or three times a week:
| Exercise | Why it helps | Sets and reps |
|---|---|---|
| Push-ups or incline push-ups | Builds chest, shoulders and triceps | 3 x 6 to 12 |
| Plank shoulder taps | Trains shoulder stability on one arm at a time | 3 x 10 per side |
| Hollow body hold | Strengthens the abs that keep your knees tucked | 3 x 15 to 30 seconds |
| Wrist push-ups or palm lifts | Builds wrist and forearm strength | 2 x 10 |
| Deep squat hold | Improves hip mobility for the starting shape | 2 x 60 seconds |
Our guides to incline and decline push-ups and plank shoulder taps explain these moves in detail.
Crow pose for beginners of different ages and sizes
Crow pose for beginners is not only for young, light people. Body weight, limb length and age all change how the pose feels, but most people can work toward it with patience.
- Heavier beginners: start with the toes-down crow lean and the feet-on-a-block version, and build wrist and core strength first
- Older adults: warm up the wrists thoroughly, keep the cushion in front and focus on short leans rather than full lifts at first
- People with tight hips: spend more time in the deep squat hold and use a block under the feet
- People with long legs: you may find the frog stand position more stable than the high-knee crow
Progress, not perfection, is the goal. Even the toes-down lean builds useful strength and balance.
Common mistakes
| Mistake | What happens | Fix |
|---|---|---|
| Not leaning forward enough | Feet will not leave the floor | Lean until your toes feel light, with a cushion in front |
| Looking down at your feet | Weight shifts back | Look a little ahead of your hands |
| Knees too low on the arms | Feels heavy and unstable | Lift your hips and place knees near the armpits |
| Elbows flaring out | Arms collapse | Keep elbows pointing back, hugging in slightly |
| Skipping the wrist warm-up | Sore or strained wrists | Always warm up the wrists first |
| Holding your breath | Body tenses and wobbles | Keep breathing slowly |
| Jumping into the pose | Risk of tipping forward | Shift weight slowly and lift one foot at a time |
What to do after you master crow pose
Once you can hold crow pose for 10 to 20 seconds, you can try:
- Crane pose: straighter arms and knees higher toward the armpits
- One-legged crow: extend one leg back while balancing
- Side crow: both knees on one arm, twisting the body
- Tuck planche lean: a calisthenics progression toward more advanced holds
Our calisthenics workout plan for beginners and calisthenics core workout build the strength you need for these.
Adding the crows nest exercise to your workouts
Crow pose works well as a skill practice at the start of a workout, after your warm-up, when you are fresh. Spend 5 minutes on attempts, then move on to your main workout. You can also add it to a stretching or yoga session. Our stretching routine for beginners and guide to improving flexibility pair well with it.
This article is general information, not medical advice. Stop if you feel wrist, elbow or shoulder pain, and check with a doctor or physiotherapist if you have a health condition. See our medical disclaimer.
The bottom line
The crows nest exercise people search for is, in almost every case, crow pose: an arm balance where you rest your knees on the backs of your arms and tip forward until your feet lift. It builds strength in your wrists, shoulders and core, and it is a brilliant first balancing skill.
Warm up your wrists, place a cushion in front of you, lean further than feels natural and keep your knees high and tight. Use the prep drills and easier versions, practise 3 or 4 times a week, and celebrate every extra second you hold it.
Track your crow pose progress
Arm balances improve in small steps, so tracking helps you stay motivated. After each practice, note three things: the version you practised, your best hold in seconds and how your wrists felt. Over four weeks you will usually see the version get harder and the holds get longer.
| Week | Version | Best hold | Wrists |
|---|---|---|---|
| Example week 1 | Toes-down lean | 8 seconds of leaning | Fine after warm-up |
| Example week 3 | Feet on block, both feet lifted | 3 seconds | Slightly tired |
If your wrists feel sore for more than a day after practice, reduce how many attempts you do and spend more time on the warm-up and strength drills. Progress with the crows nest exercise is not a race. Steady, pain-free practice will get you there.
Frequently asked questions
What is the crows nest exercise?
There is no single standard exercise called the crows nest exercise. When people search for it, they almost always mean crow pose, an arm balance where you rest your knees on the backs of your upper arms and lift your feet off the floor.
Is crow pose good for beginners?
Yes, as long as you prepare well. Start with wrist warm-ups, deep squats, planks and crow leans with your toes on the floor, and place a cushion in front of you. Most beginners can learn it within a few weeks.
What is the difference between crow pose and frog stand?
They are very similar. In crow pose the knees rest on the backs of the upper arms with slightly bent elbows. In the calisthenics frog stand, the knees often rest on the outsides of more bent elbows. Both build the same strength and balance.
Why can I not lift my feet in crow pose?
Usually because you are not leaning forward enough or your knees are too low on your arms. Lean until your toes feel light, look slightly ahead and lift one foot at a time. Putting your feet on a block can help.
Does crow pose hurt your wrists?
It can if you skip the warm-up or have existing wrist problems. Always warm up your wrists, spread your fingers wide to share the load, and stop if you feel pain.
How long should I hold crow pose?
Start with 2 to 5 seconds and build gradually to 20 to 30 seconds. Several short, good-quality holds are better than one long, wobbly one.
What muscles does crow pose work?
It works the wrists, forearms, shoulders, chest, triceps and core, especially the abdominals that keep the knees pulled in. It also improves balance and body control.
How long does it take to learn crow pose?
It varies. Some people manage a short hold within a week, while others take one to two months. Practising 3 or 4 times a week with the prep drills speeds things up.
Can I do the crows nest exercise without yoga experience?
Yes. You do not need any yoga background. Start with the wrist warm-up, deep squat, plank and toes-down crow lean in this guide, and practise a few times a week. Strength and confidence build quickly.
Should I do crow pose before or after my workout?
Before your main workout, after a warm-up, is best, because balance skills are hardest when you are tired. Spend 5 to 10 minutes on attempts and prep drills, then move on to the rest of your session.
What if I fall forward in crow pose?
That is why the cushion is there. If you feel yourself tipping, tuck your chin and let your head land softly on the cushion, or step your feet back down. Falling forward a little is a sign you are finally leaning far enough.
Is the crows nest exercise good for weight loss?
Crow pose builds strength and balance, but it burns few calories on its own. For weight loss, combine it with regular walking or cardio, strength training and sensible eating.
How do I make crow pose harder once I can hold it?
Straighten your arms slowly toward crane pose, extend one leg back, or try side crow with both knees on one arm. In calisthenics, the next step is often a tuck planche lean.
What’s next?
Reading is the easy part. Pick one of these and do it today.