Stability Ball Exercises: 15 Best Moves and 3 Workouts for Beginners
The stability ball is the piece of equipment most people already own and never use. It sits in a corner, slowly losing air, because nobody is quite sure what to do with it beyond sitting on it and trying a few crunches.
That is a waste, because it is one of the most useful things you can have at home. I bought mine for about the price of a pizza, mostly out of curiosity. The first time I tried a hamstring curl on it, my legs shook so much that I had to stop after five reps. An exercise that looked gentle turned out to be one of the hardest things I had done that month.
You may know it as an exercise ball, a Swiss ball, a yoga ball, a Pilates ball or a gym ball. They are all the same thing. This guide covers how to choose the right size, how to use it safely, fifteen exercises with clear steps, and three workouts.
At a glance
- A stability ball is a large inflatable ball used for core, strength and balance exercises
- Choose the size by your height. When you sit on it, your hips and knees should be at about 90 degrees
- The unstable surface makes your core muscles work harder to keep you steady
- It is best for core training, hamstrings, glutes and balance. It is not the tool for lifting heavy weights
- Start with exercises where your feet stay on the floor
- Do 2 to 3 sets of 8 to 15 slow reps, two or three times a week
- Buy an anti-burst ball and check it for damage before each session
Why train with a stability ball
A ball rolls. That simple fact is the whole point. Whenever part of your body rests on it, the muscles of your trunk and hips have to make constant small corrections to keep you from tipping.
- Your core works harder. In one classic study, doing curl-ups on a ball produced substantially higher abdominal muscle activity than doing them on a stable bench
- A bigger range of motion. The curve of the ball lets your spine extend backward over it, so a crunch starts from a stretched position that the floor does not allow
- Hard hamstring and glute work with no weights. Curls and bridges on the ball are demanding for most beginners
- Better balance and body awareness
- Gentle on joints. Most exercises are low impact
- Cheap, light and versatile. One ball replaces a bench for several exercises
It also has limits, and it is worth being honest about them. A review of training on unstable surfaces concluded that it is useful for core training and general fitness, but that instability reduces the force your muscles can produce. In plain terms, you cannot lift as much on a ball as on the floor or a bench. For building maximum strength or size in your chest, shoulders or legs, stable exercises with heavier loads work better.
So use the ball for what it does best: your core, the back of your legs, and balance.

What size stability ball do you need?
Size is the diameter of the ball when inflated. The usual guide goes by height.
| Your height | Ball size |
|---|---|
| Under 152 cm (under 5 ft) | 45 cm |
| 152 to 170 cm (5 ft to 5 ft 7 in) | 55 cm |
| 171 to 185 cm (5 ft 8 in to 6 ft 1 in) | 65 cm |
| Over 185 cm (6 ft 2 in and over) | 75 cm |
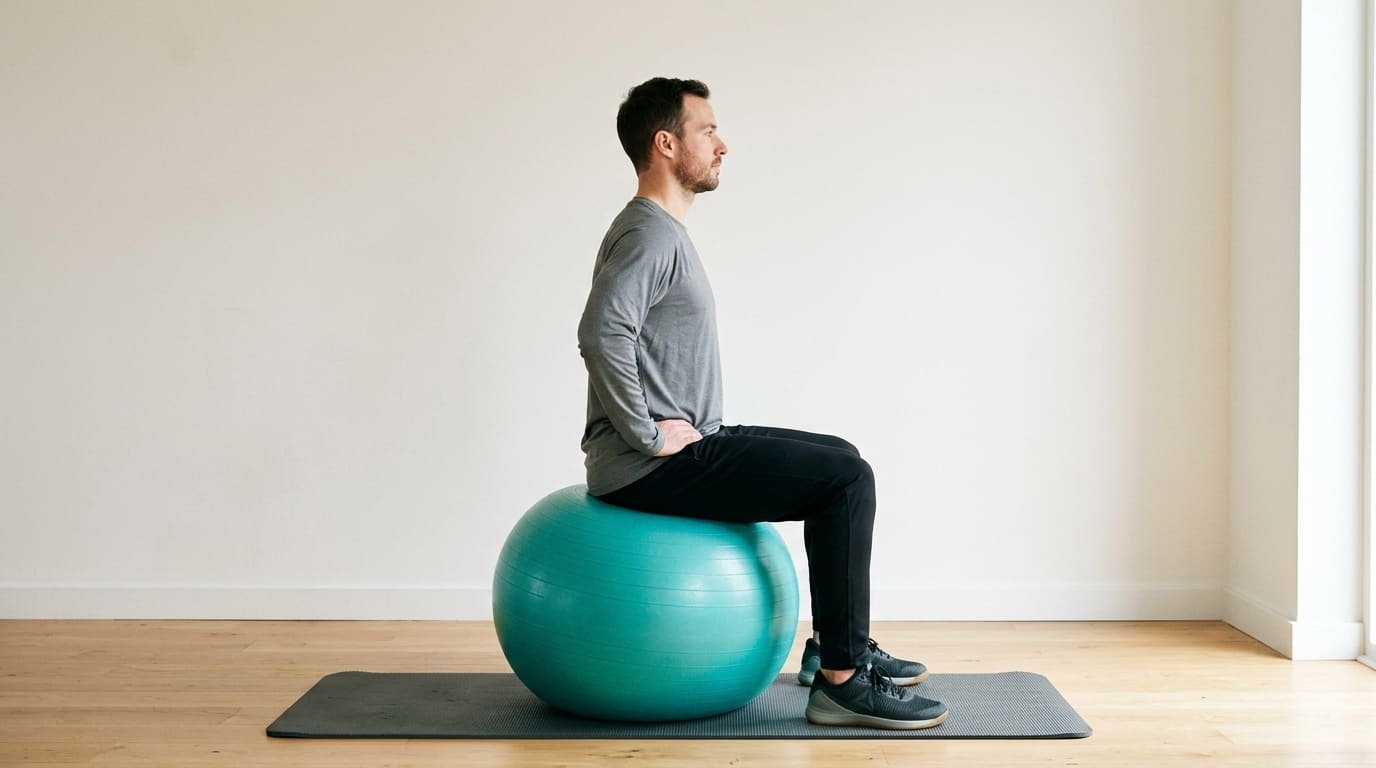
The sitting test is more reliable than the chart. Sit on the inflated ball with your feet flat on the floor. Your thighs should be level with the floor or sloping very slightly downward, with your hips and knees bent to about 90 degrees.
- If your knees are higher than your hips, the ball is too small or too soft
- If your feet barely reach the floor, it is too big
If you are between sizes, choose the larger ball if you have long legs and the smaller one if you mainly want it for floor exercises such as hamstring curls and pikes.
What to look for when buying
| Feature | What to look for | Why it matters |
|---|---|---|
| Anti-burst rating | Labelled anti-burst or burst-resistant | If punctured, it deflates slowly instead of popping |
| Weight rating | Well above your body weight, plus any weights you might hold | Safety margin |
| Surface | Slightly textured or matte | Stops you sliding off |
| Thickness | Thicker walls, often around 2 mm | Lasts longer and feels firmer |
| Pump included | Hand or foot pump | You will need to top it up |
| Material | Latex-free if you have an allergy | Most are PVC |
Inflation: pump the ball to about 80 percent, leave it for a day so the material stretches, then inflate it to full size. It should feel firm and give only a few centimetres when you sit on it. A softer ball is more stable and easier. A firmer ball rolls more readily and is harder.
Safety before you start
- Check the ball for cuts, scuffs and soft spots before each session
- Clear the floor around you of furniture, sharp objects and anything you could fall onto
- Use a non-slip surface. A mat or carpet is better than polished wood or tiles
- Train near a wall or sturdy chair at first so you have something to hold
- Go barefoot or wear grippy shoes, not socks
- Learn each exercise slowly before adding reps or weights
- Keep heavy weights off the ball. Light dumbbells are fine for experienced users. Barbells and heavy loads are not
If you have a balance disorder, osteoporosis, a recent injury or surgery, or you are pregnant, speak to your doctor or physiotherapist before using a stability ball for exercise.
The 15 best stability ball exercises
They are ordered roughly from easiest to hardest. Move slowly, and breathe out during the effort.
1. Seated balance and march
The place to start. It teaches you how the ball moves.
- Sit tall on the centre of the ball with your feet flat and hip-width apart
- Place your hands on your hips and gently tighten your stomach
- Lift one foot a few centimetres off the floor and hold for two seconds
- Lower it and lift the other
Sets and reps: 2 sets of 10 lifts per leg.
2. Seated pelvic tilts and circles
- Sit tall on the ball with your hands on your hips
- Tuck your tailbone under so the ball rolls slightly forward, then tip your pelvis the other way so it rolls back
- Repeat side to side, then draw slow circles with your hips in each direction
Sets and reps: 10 tilts each way and 5 circles each direction. This is a good warm-up and a gentle mobility drill for a stiff lower back.
3. Wall squat
- Place the ball between your lower back and a wall
- Walk your feet about half a metre forward, hip-width apart
- Bend your knees and lower until your thighs are parallel to the floor, letting the ball roll up your back
- Push through your heels to stand
Sets and reps: 3 sets of 10 to 15.
The ball guides your back in a straight line, which makes this a comfortable way to learn squat depth. Hold dumbbells by your sides to make it harder.
4. Stability ball crunch
- Sit on the ball and walk your feet forward until your lower back rests on the top of it
- Place your feet flat and wide for balance, hands lightly behind your head or crossed on your chest
- Let your upper back curve gently over the ball
- Curl your ribs toward your pelvis until your shoulder blades lift
- Pause, then lower slowly back over the curve
Sets and reps: 2 to 3 sets of 10 to 15.
Form cue: the ball should not roll. If it does, widen your feet.
5. Glute bridge with feet on the ball
- Lie on your back with your heels and calves resting on the ball, arms on the floor by your sides
- Press your heels into the ball and lift your hips until your body forms a straight line from shoulders to heels
- Hold for two seconds without letting the ball wobble
- Lower under control
Sets and reps: 3 sets of 10 to 12.
6. Hamstring curl
One of the best bodyweight hamstring exercises there is.
- Start at the top of the glute bridge above, hips lifted, legs straight
- Keeping your hips high, bend your knees and roll the ball toward you with your heels
- Pause when your feet are flat on the ball
- Slowly straighten your legs again without dropping your hips
Sets and reps: 2 to 3 sets of 6 to 10.
Make it easier: lower your hips to the floor between reps. Make it harder: use one leg. Our hamstring exercises at home guide has more options for this muscle.
7. Back extension
- Kneel behind the ball and lie over it so your stomach and hips rest on top
- Straighten your legs and brace your toes against the floor, or against a wall for more stability
- Place your hands behind your head or across your chest
- Lift your chest until your body forms a straight line. Do not arch beyond that
- Lower slowly over the ball
Sets and reps: 2 to 3 sets of 10 to 12. Our erector spinae exercises guide explains the muscles this trains.
8. Dead bug with the ball
- Lie on your back with your knees over your hips and your arms straight up
- Hold the ball between your hands and your knees, pressing lightly into it from both sides
- Keeping your lower back on the floor, extend your right arm overhead and your left leg forward, holding the ball in place with the other hand and knee
- Return and switch sides
Sets and reps: 2 to 3 sets of 6 to 8 per side.
9. Ball pass
- Lie on your back with your arms overhead, holding the ball, and your legs straight
- Lift your arms and legs at the same time and pass the ball from your hands to between your ankles
- Lower your arms and legs toward the floor without touching down
- Lift again and pass the ball back to your hands
Sets and reps: 2 sets of 8 to 10 passes.
Form cue: keep your lower back pressed down. If it arches, do not lower your legs as far.
10. Plank on the ball
- Kneel in front of the ball and place your forearms on top of it, hands clasped
- Step your feet back until your body forms a straight line from head to heels
- Squeeze your glutes and brace your stomach
- Hold without letting your hips sag or the ball drift
Sets and reps: 3 holds of 20 to 40 seconds.
Make it easier: keep your knees on the floor. Make it harder: move your forearms in small circles, a variation often called stir the pot.
11. Incline push-up with hands on the ball
- Place your hands on the ball, slightly wider than your shoulders, fingers pointing down the sides
- Step your feet back into a straight line
- Lower your chest to the ball with your elbows at about 45 degrees
- Press back up
Sets and reps: 2 to 3 sets of 6 to 10.
Brace the ball against a wall at first. For a harder version, place your shins on the ball and your hands on the floor.
12. Knee tuck
- Start in a push-up position with your shins on the ball and your hands on the floor under your shoulders
- Keep your arms straight and your back flat
- Pull your knees toward your chest, rolling the ball forward
- Extend your legs back to the start
Sets and reps: 2 to 3 sets of 8 to 12.
13. Rollout
A demanding core exercise. Research measuring muscle activity during ball exercises found that the rollout and the pike were the most effective for the abdominal muscles, while keeping lower back and hip flexor activity relatively low.
- Kneel on a mat with the ball in front of you and your forearms resting on it
- Brace your stomach and squeeze your glutes
- Roll the ball forward by extending your arms, letting your hips move forward with you
- Go only as far as you can without your lower back sagging
- Pull the ball back with your arms and abs
Sets and reps: 2 to 3 sets of 6 to 10.
14. Pike
- Start in a push-up position with your shins on the ball
- Keeping your legs straight, lift your hips toward the ceiling and roll the ball toward your hands
- Stop when your toes are on the ball and your body forms an upside-down V
- Lower slowly back to the start
Sets and reps: 2 sets of 5 to 8. Master the knee tuck first.
15. Side crunch
- Kneel beside the ball and lean your hip and side over it
- Straighten your top leg and brace your feet against the bottom of a wall
- Place your hands behind your head
- Lift your trunk sideways toward the ceiling, then lower slowly over the ball
Sets and reps: 2 sets of 10 to 12 per side. Our oblique exercises guide has more work for the sides of the waist.
Which exercise trains what
| Exercise | Main muscles | Level |
|---|---|---|
| Seated balance and march | Deep core, hip flexors | Beginner |
| Pelvic tilts and circles | Lower back mobility, deep core | Beginner |
| Wall squat | Quadriceps, glutes | Beginner |
| Crunch | Abdominals | Beginner |
| Glute bridge, feet on ball | Glutes, hamstrings | Beginner |
| Dead bug with ball | Abdominals, deep core | Beginner |
| Back extension | Lower back, glutes | Beginner |
| Hamstring curl | Hamstrings, glutes | Intermediate |
| Ball pass | Abdominals, hip flexors | Intermediate |
| Plank on ball | Whole core, shoulders | Intermediate |
| Incline push-up on ball | Chest, shoulders, triceps, core | Intermediate |
| Side crunch | Obliques | Intermediate |
| Knee tuck | Abdominals, hip flexors, shoulders | Intermediate |
| Rollout | Abdominals, lats | Advanced |
| Pike | Abdominals, shoulders | Advanced |
Three stability ball workouts
Rest 45 to 60 seconds between sets.
Workout 1: beginner full body (15 minutes)
| Exercise | Sets | Reps |
|---|---|---|
| Seated balance and march | 2 | 10 per leg |
| Wall squat | 3 | 12 |
| Glute bridge, feet on ball | 3 | 10 |
| Stability ball crunch | 2 | 12 |
| Back extension | 2 | 10 |
| Dead bug with ball | 2 | 6 per side |
Workout 2: core (15 minutes)
| Exercise | Sets | Reps |
|---|---|---|
| Plank on ball | 3 | 20 to 40 seconds |
| Stability ball crunch | 3 | 12 to 15 |
| Knee tuck | 3 | 8 to 10 |
| Side crunch | 2 | 10 per side |
| Rollout | 2 | 6 to 8 |
Workout 3: legs and glutes (20 minutes)
| Exercise | Sets | Reps |
|---|---|---|
| Wall squat, holding dumbbells if available | 3 | 12 to 15 |
| Hamstring curl | 3 | 8 to 10 |
| Glute bridge, feet on ball, 2-second hold | 3 | 12 |
| Back extension | 3 | 12 |
| Ball pass | 2 | 8 |
Pair these with an upper-body routine such as our beginner upper body workout, or alternate them with the beginner core workout.
How often and how to progress
| Question | Answer |
|---|---|
| How often? | 2 to 3 times a week, with a day between sessions |
| How many exercises? | 4 to 6 per session |
| How many sets and reps? | 2 to 3 sets of 8 to 15, or holds of 20 to 40 seconds |
| How fast? | Slow and controlled, about two seconds each way |
| When to progress? | When you can complete every set without the ball wobbling |
Progress in this order:
- Add reps, or hold for longer
- Slow the lowering phase to three seconds
- Bring your feet closer together to narrow your base
- Inflate the ball a little more so it rolls more easily
- Move to a harder exercise, such as from the glute bridge to the hamstring curl, or from the knee tuck to the pike
- Use one leg or one arm
Stability ball exercises during pregnancy
Many women use a ball in pregnancy, where it is often called a birthing ball. Sitting on it can feel more comfortable than a chair, and gentle movements may ease a stiff lower back.
Exercises that are commonly suggested, with your midwife’s or doctor’s approval:
- Sitting tall on the ball with feet wide and flat
- Pelvic tilts forward and back
- Hip circles in each direction
- Gentle side-to-side rocking
- Wall squats with the ball behind your back, if you were squatting comfortably before pregnancy
Things to avoid: lying on your back on the floor for long periods after the first trimester, exercises where you could fall such as planks and pikes on the ball, and anything that causes pain, dizziness or pressure. Keep the ball near a wall or have someone with you, and choose a size that keeps your hips slightly higher than your knees.
Always check with your midwife or doctor before exercising during pregnancy. Every pregnancy is different, and this section is general information only.
Should you use a ball as an office chair?
It is a popular idea, and the evidence for it is weak. Sitting on a ball does make your trunk muscles work slightly more, but the difference is small, and studies of ball chairs have generally found no meaningful improvement in posture or back pain. Some people report more discomfort after long periods.
A sensible approach is to sit on the ball for 10 to 20 minutes at a time as a change of position, not all day. Getting up and moving regularly does far more for your back than what you sit on. Our posture exercises guide covers what helps.
Common mistakes
- Using the wrong size. Do the sitting test
- An under-inflated ball. It makes sitting exercises easy and rolling exercises sloppy
- Rushing. Speed lets momentum do the work and makes the ball unpredictable
- Letting the lower back sag in planks, rollouts and knee tucks
- Pulling on the neck in crunches
- Jumping to advanced exercises. Pikes and rollouts need a base of plank strength first
- Holding your breath
- Training on a slippery floor or in socks
Stability ball, medicine ball or balance board?
These are often confused.
| Equipment | What it is | Best for |
|---|---|---|
| Stability ball | Large, light, inflatable, 45 to 75 cm | Core, hamstrings, balance, low-impact strength |
| Medicine ball | Small, heavy, 1 to 10 kg | Throws, slams, weighted core work |
| Small Pilates ball | Soft, inflatable, about 20 to 25 cm | Squeezing between the knees, supporting the lower back |
| Balance board | A rigid board on a pivot | Ankle stability and standing balance |
Our medicine ball workouts and balance board exercises guides cover the other two.
Looking after your ball
- Keep it away from radiators, direct sunlight and sharp edges
- Wipe it with a damp cloth and mild soap. Avoid harsh cleaners
- Top up the air every few weeks. All balls lose pressure slowly
- Replace it if you see cracks, deep scuffs or bulges
The bottom line
A stability ball is cheap, takes up little room, and makes ordinary core and leg exercises harder in a way that is easy on your joints. It will not replace weights for building strength, but for your abdominals, your hamstrings and your balance, it is hard to beat for the price.
Get the right size by sitting on it and checking that your hips and knees are at 90 degrees. Start with the seated drills, wall squats, bridges and crunches. When those feel steady, add hamstring curls, planks and knee tucks, and work toward rollouts and pikes.
Fifteen minutes, two or three times a week, is enough to feel the difference.
Once the ball rollout feels controlled, our guide to ab wheel exercises covers the next step.
Frequently asked questions
What size stability ball do I need?
Choose by height: 45 cm if you are under 152 cm, 55 cm for 152 to 170 cm, 65 cm for 171 to 185 cm, and 75 cm if you are taller. When you sit on it with feet flat, your hips and knees should be bent to about 90 degrees.
Are stability ball exercises effective?
Yes, especially for the core. Research shows that exercises on a ball produce higher abdominal muscle activity than the same exercises on a stable surface. They are also good for hamstrings, glutes and balance. They are less suited to building maximum strength with heavy weights.
What are the best stability ball exercises for beginners?
Start with seated balance drills, wall squats, glute bridges with your feet on the ball, crunches, back extensions and the dead bug holding the ball. These keep you stable while you learn how the ball moves. Add hamstring curls and planks next.
Is a stability ball good for abs?
Yes. Crunches on a ball work the abdominals through a longer range than floor crunches, and rollouts and pikes have been shown to be among the most effective core exercises. Visible abs still depend on body fat, which exercise alone does not change much.
How often should I do stability ball workouts?
Two or three times a week, with a day of rest between sessions. Each session needs four to six exercises and takes 15 to 20 minutes. You can also add one or two ball exercises to the end of another workout.
Can I use a stability ball while pregnant?
Many women do, mainly for sitting, pelvic tilts and gentle hip circles, and it can ease lower back stiffness. Always check with your midwife or doctor first, keep the ball near a wall for support, and avoid exercises where you could fall.
Is sitting on a stability ball instead of a chair good for you?
The benefit is small. Studies have not shown meaningful improvements in posture or back pain from ball chairs, and long periods can be uncomfortable. Use it for short spells as a change of position, and stand up and move regularly.
How much air should a stability ball have?
It should be firm, giving only a few centimetres when you sit on it, and it should reach the diameter printed on it. Inflate to about 80 percent, wait a day, then fill it fully. Softer is more stable and firmer is more challenging.
What’s next?
Reading is the easy part. Pick one of these and do it today.