Boxing Bag Workout for Beginners: Punches, Combos and 5 Routines
Hitting a heavy bag is one of the few workouts that people actually look forward to. It is absorbing in a way that a treadmill is not. You have to think about your feet, your hands and your breathing all at once, and three minutes disappears.
It also humbles you quickly. The first time I worked a bag, I threw everything as hard as I could for about forty seconds and then stood there with my arms hanging, unable to lift my gloves. Nobody had told me that boxing fitness is about rhythm and breathing, not about smashing the bag.
This guide is for people who want to use a punching bag for fitness, not for fighting. It covers the gear, how to stand, the six basic punches, how to protect your hands and wrists, and five routines that start at ten minutes.
At a glance
- A boxing bag workout is done in rounds, usually 2 to 3 minutes of work with 1 minute of rest
- You need a bag, boxing gloves and hand wraps. The wraps are not optional
- Learn the stance and the jab and cross before anything else
- Power comes from your legs and hips, not your arms
- Start at about half power and build technique first
- Breathe out sharply with every punch
- Two or three sessions a week of 15 to 30 minutes is plenty for a beginner
Why train on a boxing bag
- Cardio that does not feel like cardio. Your heart rate climbs while your attention is on the combination
- It works the whole body. Legs and hips generate the force, the core transfers it, and the shoulders and arms deliver it
- Coordination and balance. Footwork, timing and rotation all improve
- Shoulder and upper-back endurance. Holding your hands up for three minutes is harder than it sounds
- Stress relief. There is something straightforwardly satisfying about hitting a bag
- Built-in intervals. Rounds with rest are a natural form of interval training
The research on boxing for fitness is still small, but it is encouraging. In one pilot study, adults with abdominal obesity did either boxing-based interval training or brisk walking four times a week for twelve weeks. The boxing group reduced their body fat and improved their aerobic fitness and blood pressure. It was a small study, so treat it as a promising sign, not as proof.
The gear you need
| Item | What to look for | Essential? |
|---|---|---|
| Heavy bag | Hanging or free-standing. For adults, roughly half your body weight is a common guide, often 30 to 45 kg | Yes |
| Boxing gloves | Bag gloves or training gloves of 12 to 16 oz. Heavier gloves have more padding | Yes |
| Hand wraps | Cotton or semi-elastic wraps, about 4.5 metres long, or padded quick wraps | Yes |
| Flat, grippy shoes | Trainers with a flat sole, or boxing shoes | Yes |
| Timer | A phone app with round and rest bells | Very useful |
| Skipping rope | For warm-ups | Optional |
Which type of bag?
| Type | Pros | Cons | Best for |
|---|---|---|---|
| Hanging heavy bag | Realistic swing, takes hard punches, lasts for years | Needs a strong beam, a wall bracket or a stand | A garage or a gym |
| Free-standing bag | No drilling, can be moved and stored | Can slide or tip with hard hits, feels different | Flats and rented homes |
| Wall-mounted pad | Takes almost no space | Does not move, limited to straight punches and hooks | Very small spaces |
A hanging bag must be fixed to something that can take a moving load several times the bag’s weight. If you are not sure about a ceiling joist or a bracket, ask someone qualified. A free-standing bag filled with water or sand avoids the question.
Why hand wraps matter
Your hand contains 27 small bones, and your wrist is not built to take repeated impact in a bent position. Wraps hold the bones of the hand together and support the wrist so it stays straight on contact. Gloves pad the knuckles. Wraps protect the structure. You need both, every session.
How to wrap, in brief: loop over the thumb, wrap the wrist three times, wrap across the knuckles three times, pass between each pair of fingers and back to the wrist, lock the thumb, then finish with any remaining length around the knuckles and wrist. It should feel snug with your fist closed and comfortable with your hand open. It is easiest to learn from a video the first time.
The boxing stance
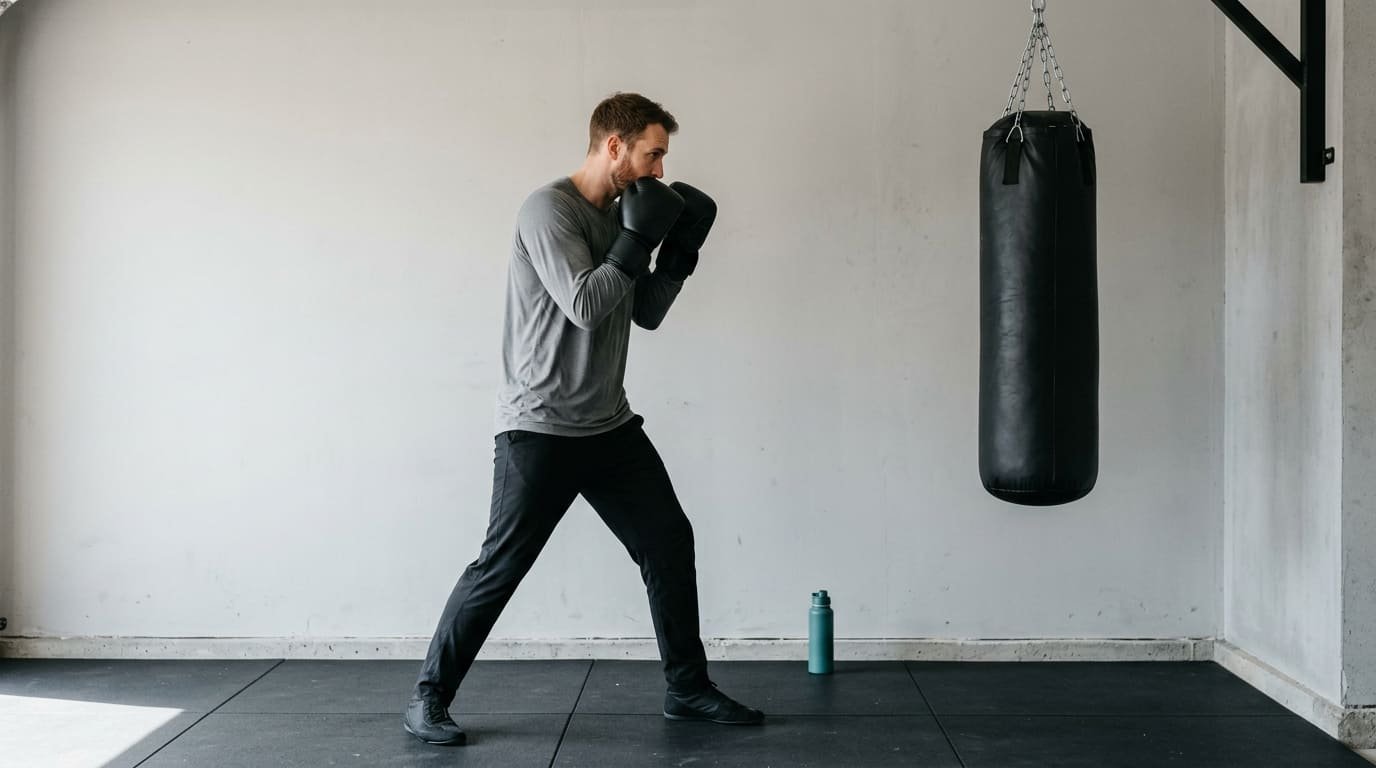
Everything starts here. A good stance keeps you balanced and lets you punch with your whole body.
- Stand with your feet shoulder-width apart
- If you are right-handed, step your left foot forward about one natural stride. Left-handers do the opposite. Your front foot is your lead foot
- Turn both feet about 45 degrees toward your rear side. Your front toe and your back heel should sit on either side of an imaginary line, never directly on it
- Bend your knees slightly and keep your weight spread evenly, on the balls of your feet. Your back heel is lifted a little
- Bring both fists up to cheek height, elbows tucked in over your ribs
- Tuck your chin slightly and look at the bag over your gloves
| Term | Meaning for a right-hander |
|---|---|
| Orthodox | Left foot and left hand forward. The standard stance for right-handers |
| Southpaw | Right foot and right hand forward. The standard stance for left-handers |
| Lead hand | The front hand: left for orthodox |
| Rear hand | The back hand, the stronger one: right for orthodox |
| Guard | Hands up by the cheeks, elbows in |
Distance: stand so that your jab lands with your arm almost fully straight. Beginners nearly always stand too close.
The six basic punches
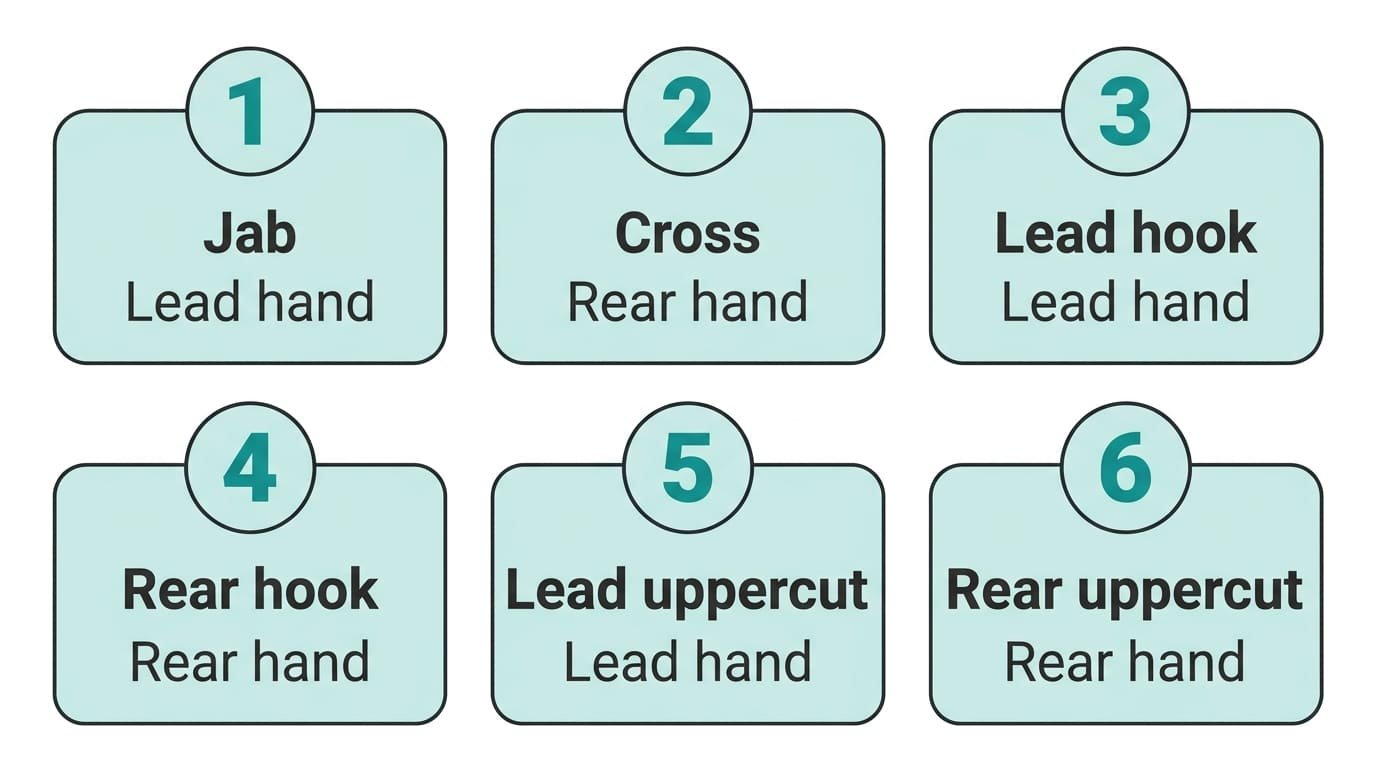
Boxing numbers its punches, which makes combinations easy to write down. Odd numbers are the lead hand and even numbers are the rear hand.
| Number | Punch | Hand | Target on the bag |
|---|---|---|---|
| 1 | Jab | Lead | Head height, straight |
| 2 | Cross | Rear | Head height, straight |
| 3 | Lead hook | Lead | Side of the bag at head height |
| 4 | Rear hook | Rear | Side of the bag at head height |
| 5 | Lead uppercut | Lead | Upward, at chin height |
| 6 | Rear uppercut | Rear | Upward, at chin height |
For a complete beginner, the first three are enough for several weeks.
1. Jab
The most important punch. It is quick, straight and light.
- From your guard, extend your lead hand straight out from your cheek
- Rotate your fist as it travels, so your palm faces the floor at contact
- Take a tiny step forward with your lead foot as you throw
- Snap the hand straight back to your cheek along the same line
Your rear hand stays glued to your face throughout.
2. Cross
Your power punch. It travels straight from the rear hand.
- Push off the ball of your back foot and pivot it, as if putting out a cigarette
- Turn your rear hip and shoulder forward
- Extend your rear hand straight to the target, palm down at contact
- Bring it straight back to your cheek as your hips return
The power comes from the pivot and the hip turn. Your arm is only the last link.
3. Lead hook
- Bend your lead arm to about 90 degrees with the elbow lifted to shoulder height
- Pivot on the ball of your lead foot and turn your lead hip and shoulder inward together
- Swing the fist around in a short, tight arc to hit the side of the bag
- Your arm keeps its shape. The turn of your body moves it
- Return to guard
Fist position: palm facing you or palm facing down are both used. Choose whichever keeps your wrist straight.
4, 5 and 6: rear hook and uppercuts
- Rear hook: the same shape as the lead hook, thrown with the rear hand and a pivot of the back foot. It travels a long way, so use it after another punch
- Uppercuts: dip slightly by bending your knees, then drive up through your legs and hips, with your arm bent to 90 degrees and your palm facing you. On a straight heavy bag, uppercuts land awkwardly. Aim them at the bag at a slight angle and keep them light, or leave them out until you have a suitable bag
How to punch without hurting your hands
- Make a proper fist. Curl your fingers into your palm and fold your thumb across the outside of your index and middle fingers. Never tuck the thumb inside
- Land with the first two knuckles, the index and middle finger
- Keep your wrist straight. The back of your hand and your forearm should form one flat line at contact. A bent wrist is how most bag injuries happen
- Stay loose until impact. Keep your hand relaxed as it travels, and tighten your fist only at the moment of contact
- Start at half power. Skin, tendons and small joints need weeks to adapt
- Do not push the bag. Snap the punch and bring your hand back. A pushed punch loads the wrist and shoulder for longer
- Do not lock your elbow. Stop just short of fully straight
- Stop if your wrist, knuckles or shoulder hurt. Soreness in the muscles is fine. Sharp joint pain is not
Breathing and pacing
Breathe out through your mouth with a short, sharp exhale on every punch. Many boxers make a quiet hiss. This stops you holding your breath, keeps your trunk tight at impact and sets your rhythm.
Between combinations, breathe in through your nose and keep moving your feet.
Think of effort on a scale of one to ten. Most of a round should sit at about five or six, with short bursts at eight or nine. If you are gasping after thirty seconds, slow down. A good round is steady, with punches thrown in clusters and movement in between.
Beginner combinations
Learn them slowly, in the air, before trying them on the bag.
| Combination | In words | What it teaches |
|---|---|---|
| 1 | Jab | Distance and rhythm |
| 1-1 | Double jab | Staying busy with the lead hand |
| 1-2 | Jab, cross | The foundation of boxing |
| 1-1-2 | Jab, jab, cross | Setting up the power hand |
| 1-2-3 | Jab, cross, lead hook | Weight transfer in both directions |
| 1-2-3-2 | Jab, cross, hook, cross | Flow and hip rotation |
| 2-3-2 | Cross, hook, cross | Power punching |
| 1-2, move, 1-2 | Jab, cross, step to the side, jab, cross | Punching and footwork together |
After every combination, bring both hands back to your face and take a step. Standing still in front of the bag is the habit to avoid.
Warm-up
- Three minutes of skipping, or jogging on the spot with high knees
- 10 arm circles in each direction
- 10 trunk rotations each way
- 10 bodyweight squats
- 10 push-ups, or incline push-ups
- One round of shadow boxing: two minutes of throwing light punches in the air while moving around
Shadow boxing matters. It rehearses the movements at no impact and warms up exactly the joints you are about to use. Our workout warm-up guide has more.
Five boxing bag workouts
Wrap your hands and warm up first. Rest one minute between rounds unless stated.
Workout 1: first session (10 minutes)
Two-minute rounds, at half power.
| Round | Focus |
|---|---|
| 1 | Jab only. Move around the bag and find your distance |
| 2 | Jab and cross. Throw 1-2, step, reset your guard |
| 3 | Jab, jab, cross. Breathe out on every punch |
| 4 | Free round. Any of the above, with more movement than punching |
Workout 2: adding the hook (15 minutes)
Two-minute rounds.
| Round | Focus |
|---|---|
| 1 | Jabs and double jabs |
| 2 | 1-2 with a step after each combination |
| 3 | Lead hook only, slowly, checking your wrist stays straight |
| 4 | 1-2-3 |
| 5 | Free round at a steady pace |
Workout 3: classic rounds (20 minutes)
Five three-minute rounds. This is the traditional boxing format.
| Round | Focus | Effort out of 10 |
|---|---|---|
| 1 | Jab and movement | 5 |
| 2 | 1-2 and 1-1-2 | 6 |
| 3 | 1-2-3 and 1-2-3-2 | 6 |
| 4 | Body shots: bend your knees and throw the same punches at the middle of the bag | 7 |
| 5 | Free round. In the last 30 seconds, throw fast, light straight punches without stopping | 8 |
Workout 4: intervals (12 minutes)
Work for 30 seconds, rest for 30 seconds, for twelve rounds. Alternate the two types of round.
| Round type | What to do |
|---|---|
| Power | Single, hard 1-2 combinations with a full reset between each |
| Speed | Light, fast, continuous straight punches at about 60 percent power |
Workout 5: bag and bodyweight circuit (20 minutes)
Four rounds. Rest one minute after each.
| Station | Time or reps |
|---|---|
| Bag work, any combinations | 2 minutes |
| Bodyweight squats | 15 |
| Push-ups, or incline push-ups | 10 |
| Plank | 30 seconds |
For more circuits of this style, see our conditioning workouts for beginners and HIIT workout for beginners at home.
A 6-week beginner plan
| Week | Sessions | Workout | Notes |
|---|---|---|---|
| 1 | 2 | Workout 1 | Half power. Technique only |
| 2 | 2 to 3 | Workout 1, then Workout 2 | Add the hook slowly |
| 3 | 3 | Workout 2 | Start moving around the bag more |
| 4 | 3 | Workout 2 and Workout 3 | First three-minute rounds |
| 5 | 3 | Workout 3 and Workout 4 | Raise power to about 70 percent |
| 6 | 3 | Workout 3, 4 and 5 | Mix as you like |
Leave at least a day between sessions for the first month. Your hands, wrists and shoulders need the recovery more than your lungs do.
How many calories does a boxing bag workout burn?
Exercise scientists rate punching a bag at about 5.5 METs, which is a moderate to vigorous effort.
| Body weight | Per minute of bag work | 15 minutes of bag work | 30 minutes of bag work |
|---|---|---|---|
| 60 kg | About 6 calories | About 87 | About 173 |
| 70 kg | About 7 calories | About 101 | About 202 |
| 85 kg | About 8 calories | About 123 | About 245 |
| 100 kg | About 10 calories | About 144 | About 289 |
Harder rounds and added bodyweight exercises will raise those figures. Much higher numbers are often quoted online, and they usually assume continuous, near-maximal work that beginners cannot sustain. Our calories burned calculator gives a personal estimate, and does cardio help you lose weight explains where exercise fits in fat loss.
Muscles worked
| Muscle group | What it does in a punch |
|---|---|
| Calves, quadriceps and glutes | Push off the floor and start the rotation |
| Hips and obliques | Rotate the trunk and transfer force from the legs |
| Abdominals | Brace the trunk at impact |
| Shoulders | Lift and extend the arm, and hold the guard up |
| Chest and triceps | Extend the arm in straight punches |
| Lats and upper back | Pull the hand back and stabilise the shoulder |
| Forearms | Hold the fist and wrist firm |
Bag work is mainly conditioning. It builds endurance in these muscles more than size or maximum strength. Pair it with two strength sessions a week, such as our full-body workout for beginners, and include pulling exercises to balance all the punching.
Common mistakes
- Punching as hard as possible from the first second
- Skipping hand wraps
- Bending the wrist on contact
- Dropping the other hand while one punches
- Standing square and flat-footed
- Standing too close, so every punch is cramped
- Pushing the bag instead of snapping the punch
- Punching with the arms only, with no pivot or hip turn
- Holding your breath
- Chasing a swinging bag. Step to the side and let it come back to you
- Flaring the elbow out before a straight punch, which signals it and strains the shoulder
Safety
- Check the bag fixing, chain and stand before each session
- Keep the area around the bag clear, with room to step in every direction
- Trim your fingernails and remove rings and watches
- Build up gradually. Sore knuckles and wrists are a sign to reduce power, not to push through
- Speak to your doctor first if you have a heart condition, high blood pressure, or a wrist, elbow, shoulder or neck problem
- Fitness bag work is not self-defence training or sparring. If you want to box with a partner, join a club with qualified coaches
The bottom line
A boxing bag workout is interval training that happens to be enjoyable. It raises your heart rate, works your whole body and demands enough attention that the time goes quickly.
Wrap your hands every time. Learn the stance, then the jab and the cross, and stay at half power while your technique and your wrists catch up. Breathe out with every punch, move your feet between combinations, and keep most of each round at a steady effort.
Start with four two-minute rounds. In six weeks, five three-minute rounds will feel within reach.
Not sure which gloves to buy? Our guide to boxing gloves for beginners explains the weights, types and fit.
Skipping is the classic boxer warm-up. If you are new to it, my jump rope workout guide shows how to stop tripping and gives a 6-week plan.
Frequently asked questions
Is a boxing bag workout good for beginners?
Yes. You can control the intensity completely, and the basic punches are simple to learn. Start with two-minute rounds at half power, focus on the jab and cross, and always wear hand wraps and gloves to protect your hands and wrists.
How long should a beginner hit the heavy bag?
Start with about 10 minutes: four rounds of two minutes with a minute of rest between. Build up over six weeks to 20 minutes, or five rounds of three minutes. Two or three sessions a week is enough at first.
Do I need hand wraps for a punching bag?
Yes. Wraps hold the small bones of the hand together and support the wrist so it stays straight on impact. Gloves only pad the knuckles. Hitting a bag without wraps is a common cause of wrist and hand injuries.
What size boxing gloves should I use on a bag?
Most adults do well with 12 to 16 oz training or bag gloves. Heavier gloves have more padding and are kinder to your hands, which suits beginners. Lighter people often choose 12 oz and heavier people 14 or 16 oz.
Is hitting a punching bag good for losing weight?
It helps. Bag work burns roughly 6 to 10 calories a minute depending on your weight and effort, and it is easier to stick with than many forms of cardio. Fat loss still depends mainly on eating slightly less than you burn.
Does a boxing bag workout build muscle?
It builds muscular endurance in the shoulders, arms, core and legs, and can add a little muscle for beginners. It is mainly a conditioning workout. For noticeable muscle growth, combine it with strength training two or three times a week.
Can I do a boxing bag workout every day?
It is better not to as a beginner. Your hands, wrists and shoulders need time to adapt to the impact. Two or three sessions a week with a rest day between is ideal. More experienced people can train more often at varied intensity.
What is the best punching bag for home use?
A hanging heavy bag of about half your body weight gives the best feel if you have a strong beam or a stand. A free-standing bag is the practical choice for flats and rented homes, because it needs no drilling and can be moved.
What’s next?
Reading is the easy part. Pick one of these and do it today.