Bear Crawl Exercise: How to Do It, Muscles Worked and 8 Variations
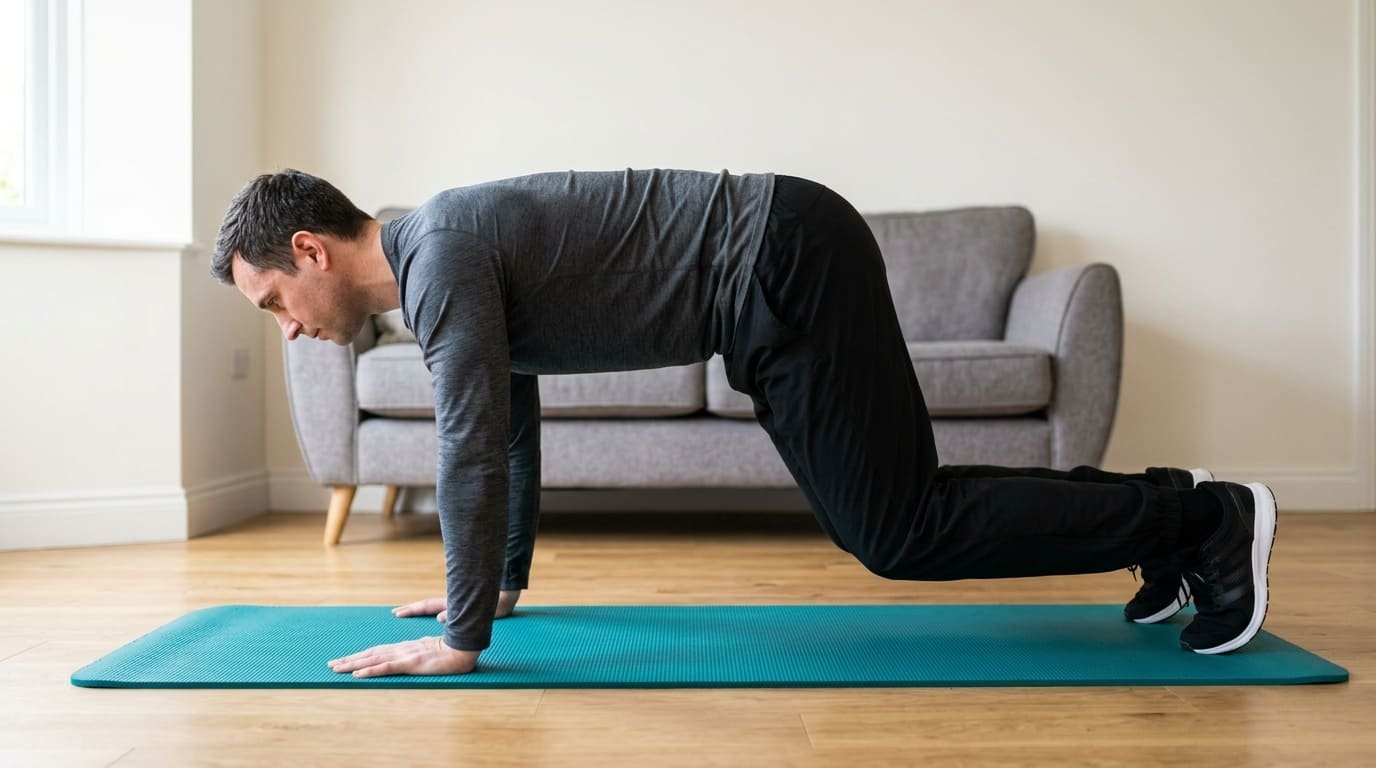
The bear crawl exercise is exactly what it sounds like: you move across the floor on your hands and feet, knees hovering just above the ground, like a bear on all fours. It looks playful, and it is, but it is also one of the most demanding bodyweight exercises you can do in a small space. Thirty seconds of slow, controlled crawling will have your shoulders, core and thighs burning.
I first tried it in a park bootcamp, where the instructor asked us to bear crawl ten metres and back. I assumed it would be easy because the children nearby were doing something similar for fun. Halfway back, my shoulders were shaking and my hips had shot up into the air. The instructor’s only advice was “lower and slower”, and she was right: the slower and lower I went, the harder and better it became.
This guide explains how to do the bear crawl exercise properly, the bear crawl muscles worked, its benefits, eight bear crawl variations from the gentlest hold to advanced moves, and three workouts you can do at home.
At a glance
- A bear crawl is moving forward on hands and feet with your knees hovering a few centimetres off the floor
- It works the shoulders, core, quadriceps and hip muscles all at once
- Keep your back flat, your hips low and move opposite hand and foot together
- Beginners should start with the static bear hold before crawling
- Slow crawling is harder and more useful than fast crawling
- Do it as a warm-up, a finisher or part of a circuit, two or three times a week
- It needs no equipment and only a few metres of floor, or none at all if you crawl on the spot
How to do the bear crawl exercise
Get into position
- Start on all fours, hands directly under your shoulders and knees directly under your hips
- Spread your fingers and press the floor away, so your upper back is not sagging between the shoulder blades
- Tuck your toes under
- Brace your core, then lift your knees two to five centimetres off the floor
- Keep your back flat, as if a glass of water were balanced on it
Crawl forward
- Move your right hand and left foot forward a short distance at the same time
- Then move your left hand and right foot forward together
- Keep the steps small, about the length of your hand
- Keep your knees low, your hips level and your head in line with your spine
- Breathe steadily throughout
Start with: 3 rounds of 10 to 20 seconds, or 5 metres forward and 5 metres back.
Form cues
| Do | Do not |
|---|---|
| Keep the knees hovering just above the floor | Let the hips shoot up into a downward dog shape |
| Move opposite hand and foot together | Move the hand and foot on the same side together |
| Take small steps | Take long, lunging steps |
| Keep the back flat and the hips level | Let the hips sway side to side |
| Push the floor away with your hands | Let the chest sag between the shoulders |
| Look at the floor slightly ahead | Lift your head to look forward |
Bear crawl muscles worked
The bear crawl is a full-body exercise. Holding the position and moving through it brings in muscles from your fingers to your toes.
| Muscle group | What it does in the bear crawl |
|---|---|
| Shoulders (deltoids) and serratus anterior | Hold your upper body up and push the floor away |
| Triceps and chest | Support your weight through straight arms |
| Core (abdominals, obliques, transverse abdominis) | Stop the trunk twisting and the hips sagging or lifting |
| Quadriceps | Hold the bent-knee position and drive you forward |
| Hip flexors and glutes | Move the legs and keep the hips stable |
| Calves | Support you on your toes |
| Wrists and forearms | Carry weight through the hands |
The bear crawl muscles worked most obviously are the shoulders and quadriceps, which is where most people feel the burn first. But the core is working the whole time, especially to stop your hips rocking from side to side as each hand and foot lifts.
Bear crawl benefits
- Total-body strength. Shoulders, core and legs all work together
- Core stability. Every step challenges your trunk to stay still while the limbs move
- Coordination. Moving opposite hand and foot together trains the cross-body pattern used in walking, running and throwing
- Shoulder stability. Bearing weight through straight arms strengthens the muscles that keep the shoulder blades steady
- Conditioning. Longer sets raise the heart rate quickly
- No equipment, little space. A hallway is enough, and you can crawl on the spot
- Easy to scale. From a still hold to fast, multi-directional crawls
Research on crawling exercises is still small, but one trial found that a programme of quadrupedal movement training, which includes bear crawls and similar moves, improved movement quality scores, joint range of motion and stability compared with a control group. It is a reasonable alternative or addition to traditional training for whole-body stability.
The bear crawl also counts as muscle-strengthening activity, which the World Health Organization recommends adults do on at least two days a week, alongside regular aerobic activity.
8 bear crawl variations
They run from easiest to hardest. Move on when you can do the current one for 30 seconds with good form.
1. Bear hold
Set up as above and simply hold the position with your knees hovering. No movement.
Dose: 3 holds of 15 to 30 seconds. The best starting point, and a great core exercise in its own right.
2. Bear hold with shoulder taps
From the bear hold, lift one hand and tap the opposite shoulder, then switch. Keep the hips completely still.
Dose: 3 sets of 10 taps. See our plank shoulder taps guide for the plank version.
3. Bear crawl on the spot
Step one hand and the opposite foot forward a few centimetres, then back, then switch sides. You stay in the same place, which is ideal for small rooms.
Dose: 3 sets of 20 to 30 seconds.
4. Forward bear crawl
The standard version: crawl forward over a few metres.
Dose: 3 to 4 sets of 5 to 10 metres, or 20 to 30 seconds.
5. Backward bear crawl
Crawl backward with the same pattern. It works the quadriceps and shoulders in a different way and demands more coordination.
Dose: 3 sets of 5 metres or 20 seconds.
6. Lateral bear crawl
Crawl sideways: move your right hand and right foot out to the right, then follow with the left hand and left foot. Keep the hips low and level.
Dose: 3 sets of 5 metres each way.
7. Banded or weighted bear crawl
Loop a light resistance band around your wrists or above your ankles, or wear a weighted vest. Crawl as normal.
Dose: 3 sets of 15 to 20 seconds. Our weighted vest training guide explains how to choose a vest.
8. Bear crawl with a sled or plate drag
Hold a towel tied to a light weight plate, or push a plate on a towel across a smooth floor, as you crawl. Advanced, and very demanding for the shoulders.
Dose: 3 sets of 5 to 10 metres.
| Variation | Level | Space needed | Main focus |
|---|---|---|---|
| Bear hold | Beginner | None | Core and shoulders |
| Bear hold with shoulder taps | Beginner | None | Anti-rotation core |
| Bear crawl on the spot | Beginner | None | Coordination |
| Forward bear crawl | Intermediate | A few metres | Full body |
| Backward bear crawl | Intermediate | A few metres | Quadriceps, coordination |
| Lateral bear crawl | Intermediate | A few metres | Hips, shoulders |
| Banded or weighted crawl | Advanced | A few metres | Strength |
| Sled or plate drag | Advanced | A few metres | Strength and conditioning |
Making it easier
If the bear crawl exercise feels too hard:
- Start with the bear hold for short holds
- Keep the knees on the floor and crawl on hands and knees first
- Raise the hands onto a low step or the bottom stair for the hold
- Shorten the time: 10 seconds of good crawling beats 30 seconds of sagging
- Use fists or push-up handles if your wrists are uncomfortable
Three bear crawl workouts
Workout 1: 5-minute warm-up
| Exercise | Time |
|---|---|
| Marching on the spot | 60 seconds |
| Cat-cow | 10 slow reps |
| Bear hold | 20 seconds |
| Bear crawl on the spot | 30 seconds |
| Inchworm | 5 reps |
| Bear crawl forward and back | 30 seconds |
Workout 2: core and shoulders, about 12 minutes
| Exercise | Sets | Reps or time |
|---|---|---|
| Bear hold | 3 | 20 to 30 seconds |
| Bear hold with shoulder taps | 3 | 10 taps |
| Dead bug | 3 | 6 per side |
| Forward and backward bear crawl | 3 | 20 seconds each way |
| Side plank from the knees | 2 | 20 seconds per side |
Rest 30 to 45 seconds between sets. Our beginner core workout has more ideas.
Workout 3: full-body finisher, about 10 minutes
Do 40 seconds of work and 20 seconds of rest for each exercise. Repeat the circuit twice.
| Exercise | Time |
|---|---|
| Bear crawl forward and back | 40 seconds |
| Bodyweight squats | 40 seconds |
| Push-ups or incline push-ups | 40 seconds |
| Lateral bear crawl | 40 seconds |
| Glute bridges | 40 seconds |
Our HIIT workout for beginners at home uses the same timing.
Bear crawl vs plank vs mountain climber
| Exercise | Movement | Main focus | Best for |
|---|---|---|---|
| Bear crawl exercise | Moving on hands and feet, knees hovering | Shoulders, core, legs and coordination | Full-body strength and control |
| Plank | Holding a straight line on forearms or hands | Core endurance | Learning to brace |
| Mountain climber | Driving the knees in fast from a plank | Conditioning and core | Raising the heart rate |
All three are useful. The bear crawl exercise sits in the middle: harder for the legs and coordination than a plank, more controlled than a mountain climber. Many beginners find the bear hold easier on the lower back than a long plank, because the bent knees take some of the load.
Prepare your wrists
Bearing weight through the hands is new for many adults, and the wrists can complain. Spend a minute warming them up first:
- Circle the wrists 10 times each way
- Kneel and place your palms on the floor, fingers forward, then rock gently forward and back 10 times
- Turn the hands so the fingers point toward your knees and rock gently again
- Make fists and open them wide 10 times
If your wrists still hurt, use fists, push-up handles or a pair of dumbbells to keep them straight.
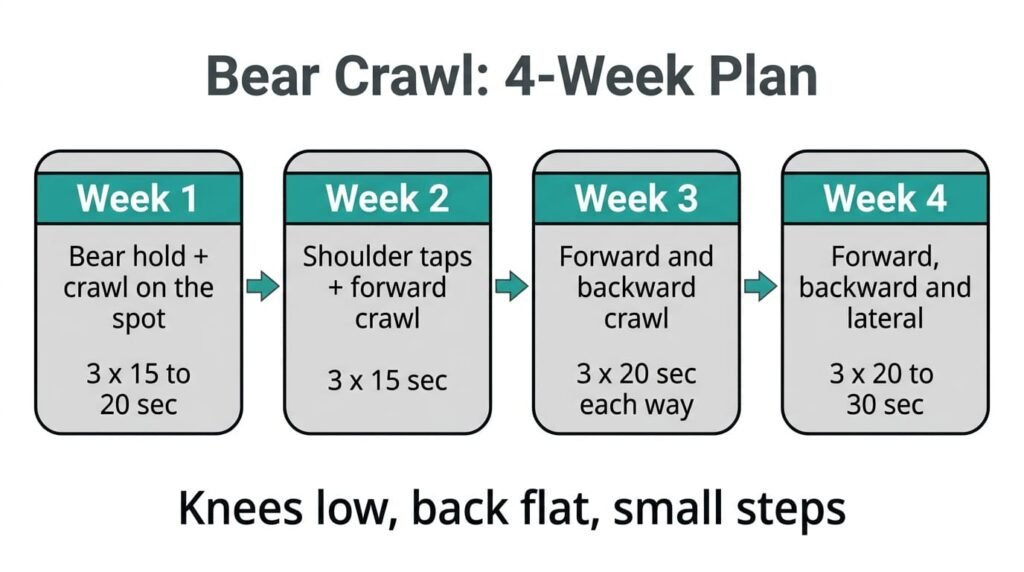
A 4-week bear crawl plan
| Week | Sessions | What to do |
|---|---|---|
| 1 | 3 a week | Bear hold 3 x 15 to 20 seconds, bear crawl on the spot 3 x 15 seconds |
| 2 | 3 a week | Bear hold with shoulder taps 3 x 8 taps, forward bear crawl 3 x 15 seconds |
| 3 | 3 a week | Forward and backward bear crawl 3 x 20 seconds each way |
| 4 | 3 a week | Forward, backward and lateral bear crawl 3 x 20 to 30 seconds |
Keep every set slow and controlled. If your hips start to rise or sway, the set is over.
Track two simple numbers each week: how many seconds you can hold the bear position with good form, and how many metres you can crawl forward and back before your hips start to lift. Both should creep up week by week. If they stall for two weeks, add a rest day rather than more sets. Shoulders and wrists adapt more slowly than legs, and a little patience in the first month prevents the aches that make people give up on this exercise. When the 4-week plan feels easy, move on to the harder progressions below, or use the bear crawl as a five-minute finisher at the end of your usual workouts.
Bear crawls for families
The bear crawl exercise is one of the few strength moves children find genuinely fun. Turn it into a game: a bear crawl race across the living room, a relay with an animal walk on the way back, or a follow-the-leader where everyone copies the bear. Our group exercises at home guide has more ideas for training together.
Bear crawls for runners and athletes
Runners often lack upper body and trunk strength, and the bear crawl exercise trains both without equipment. Team sport players use it to build shoulder stability for falls and contact. Martial artists and climbers like it for the cross-body coordination. For all of them, two or three sets in a warm-up, two or three times a week, is plenty. Treat it as a skill as much as a strength exercise: smooth, quiet, controlled steps are the goal, and the strength follows. Lateral and backward crawls are especially useful for sports that involve changing direction, because they train the hips and shoulders to stay stable while you move in less familiar ways.
Bear crawls for older or heavier beginners
The full crawl is demanding, but the pattern is valuable at any age because it trains getting down to and up from the floor. Start with the version that suits you:
- Hands on a bench or the bottom stair, knees on a cushion, then lift the knees briefly
- Hands and knees crawling across a mat, which builds the same coordination with less load
- Short bear holds of 5 to 10 seconds, rested on the knees in between
Progress slowly, keep breathing, and stop if the wrists, shoulders or knees complain.
Progressing past bodyweight
Once 45 seconds of slow forward, backward and lateral crawling feels comfortable, make it harder without making it faster:
- Slow it down further, taking two or three seconds per step
- Lift the knees only one centimetre from the floor
- Add a pause on each step, holding three limbs on the floor
- Add load with a weighted vest or a light band around the wrists
- Change direction every few steps without stopping
Quick bear crawl challenges
| Challenge | How it works |
|---|---|
| Water bottle balance | Place a plastic bottle on your lower back and crawl without it falling |
| Square crawl | Crawl forward, sideways, backward and sideways to finish a square |
| Crawl and tap | Crawl three steps, pause and tap one shoulder, repeat |
| Minute ladder | Crawl 10 seconds, rest 10 seconds, adding 5 seconds of crawling each round up to 30 |
How often and how much
| Goal | How to use the bear crawl | How often |
|---|---|---|
| Warm-up | 20 to 30 seconds after a short walk or march | Every workout |
| Core strength | 3 to 4 sets of 20 to 40 seconds | 2 to 3 times a week |
| Conditioning | In a circuit with 30 to 45 seconds of work | 2 to 3 times a week |
| Skill and coordination | Forward, backward and lateral crawls, slowly | 2 to 3 times a week |
The bear crawl exercise pairs well with other floor-based moves. Our calisthenics workout plan for beginners and no equipment home workout show where to fit it.
Common mistakes
- Hips too high, turning the crawl into a walking downward dog
- Knees too low, dragging on the floor
- Same-side hand and foot moving together
- Big steps, which make the hips sway
- Sagging between the shoulder blades
- Holding the breath
- Rushing. Speed hides poor form. Slow crawling is harder and better
- Looking up, which strains the neck
Who should be careful
- Wrist pain: use fists, push-up handles or dumbbells to keep the wrists straight, or stick to holds
- Shoulder injury: start with short bear holds and get advice if weight-bearing hurts
- Knee pain: the knees are bent but not loaded much, so most people tolerate it, but stop if it hurts
- High blood pressure: avoid long holds where you strain and hold your breath. Keep breathing
- Pregnancy: ask your midwife or doctor, especially later in pregnancy
This article is general information, not medical advice. Stop if you feel sharp pain, dizziness or chest discomfort. See our medical disclaimer.
The bottom line
The bear crawl exercise is a simple, equipment-free move that trains your shoulders, core and legs together while building coordination. Keep your knees hovering just above the floor, your back flat and your steps small, and move opposite hand and foot together.
Start with the bear hold, then progress through on-the-spot, forward, backward and lateral crawls. Use the bear crawl variations as a warm-up, a core session or a tough finisher, two or three times a week. Lower and slower is always the right answer.
Frequently asked questions
What muscles does the bear crawl exercise work?
It works the shoulders, triceps and chest, the whole core including the obliques and deep abdominals, and the quadriceps, hip flexors and glutes. The shoulders and quadriceps usually tire first, while the core works throughout.
Is the bear crawl good for beginners?
Yes, if you start with the bear hold and short crawls. Hold the position for 15 to 30 seconds first, then try crawling on the spot before crawling across the room.
What are the benefits of bear crawls?
Bear crawl benefits include full-body strength, core stability, shoulder stability, coordination and conditioning. It needs no equipment and very little space.
How long should I do bear crawls for?
Beginners can start with 3 rounds of 10 to 20 seconds. Build up to 30 to 45 seconds per round, or 10 metres forward and back, as your strength improves.
Should my knees touch the ground in a bear crawl?
No. Keep them hovering a few centimetres off the floor. If that is too hard, crawl on your hands and knees first, then progress to the hover.
Are bear crawls cardio or strength?
Both. Short, slow crawls build strength and stability, while longer or faster crawls in a circuit raise your heart rate and act as conditioning.
What are good bear crawl variations?
The bear hold, bear hold with shoulder taps, bear crawl on the spot, forward, backward and lateral crawls, and banded or weighted crawls for advanced lifters.
Can I do bear crawls in a small room?
Yes. The bear hold, shoulder taps and bear crawl on the spot need almost no space, and a hallway is enough for forward and backward crawls.
What’s next?
Reading is the easy part. Pick one of these and do it today.


